# Wexflow - Full Documentation Context
> Auto-generated full documentation context compiled from the Wexflow Wiki.
> Generated on: 2026-10-11T08:58:39Z
---
# Document: Android App
> Source: https://github.com/aelassas/wexflow/wiki/Android-App

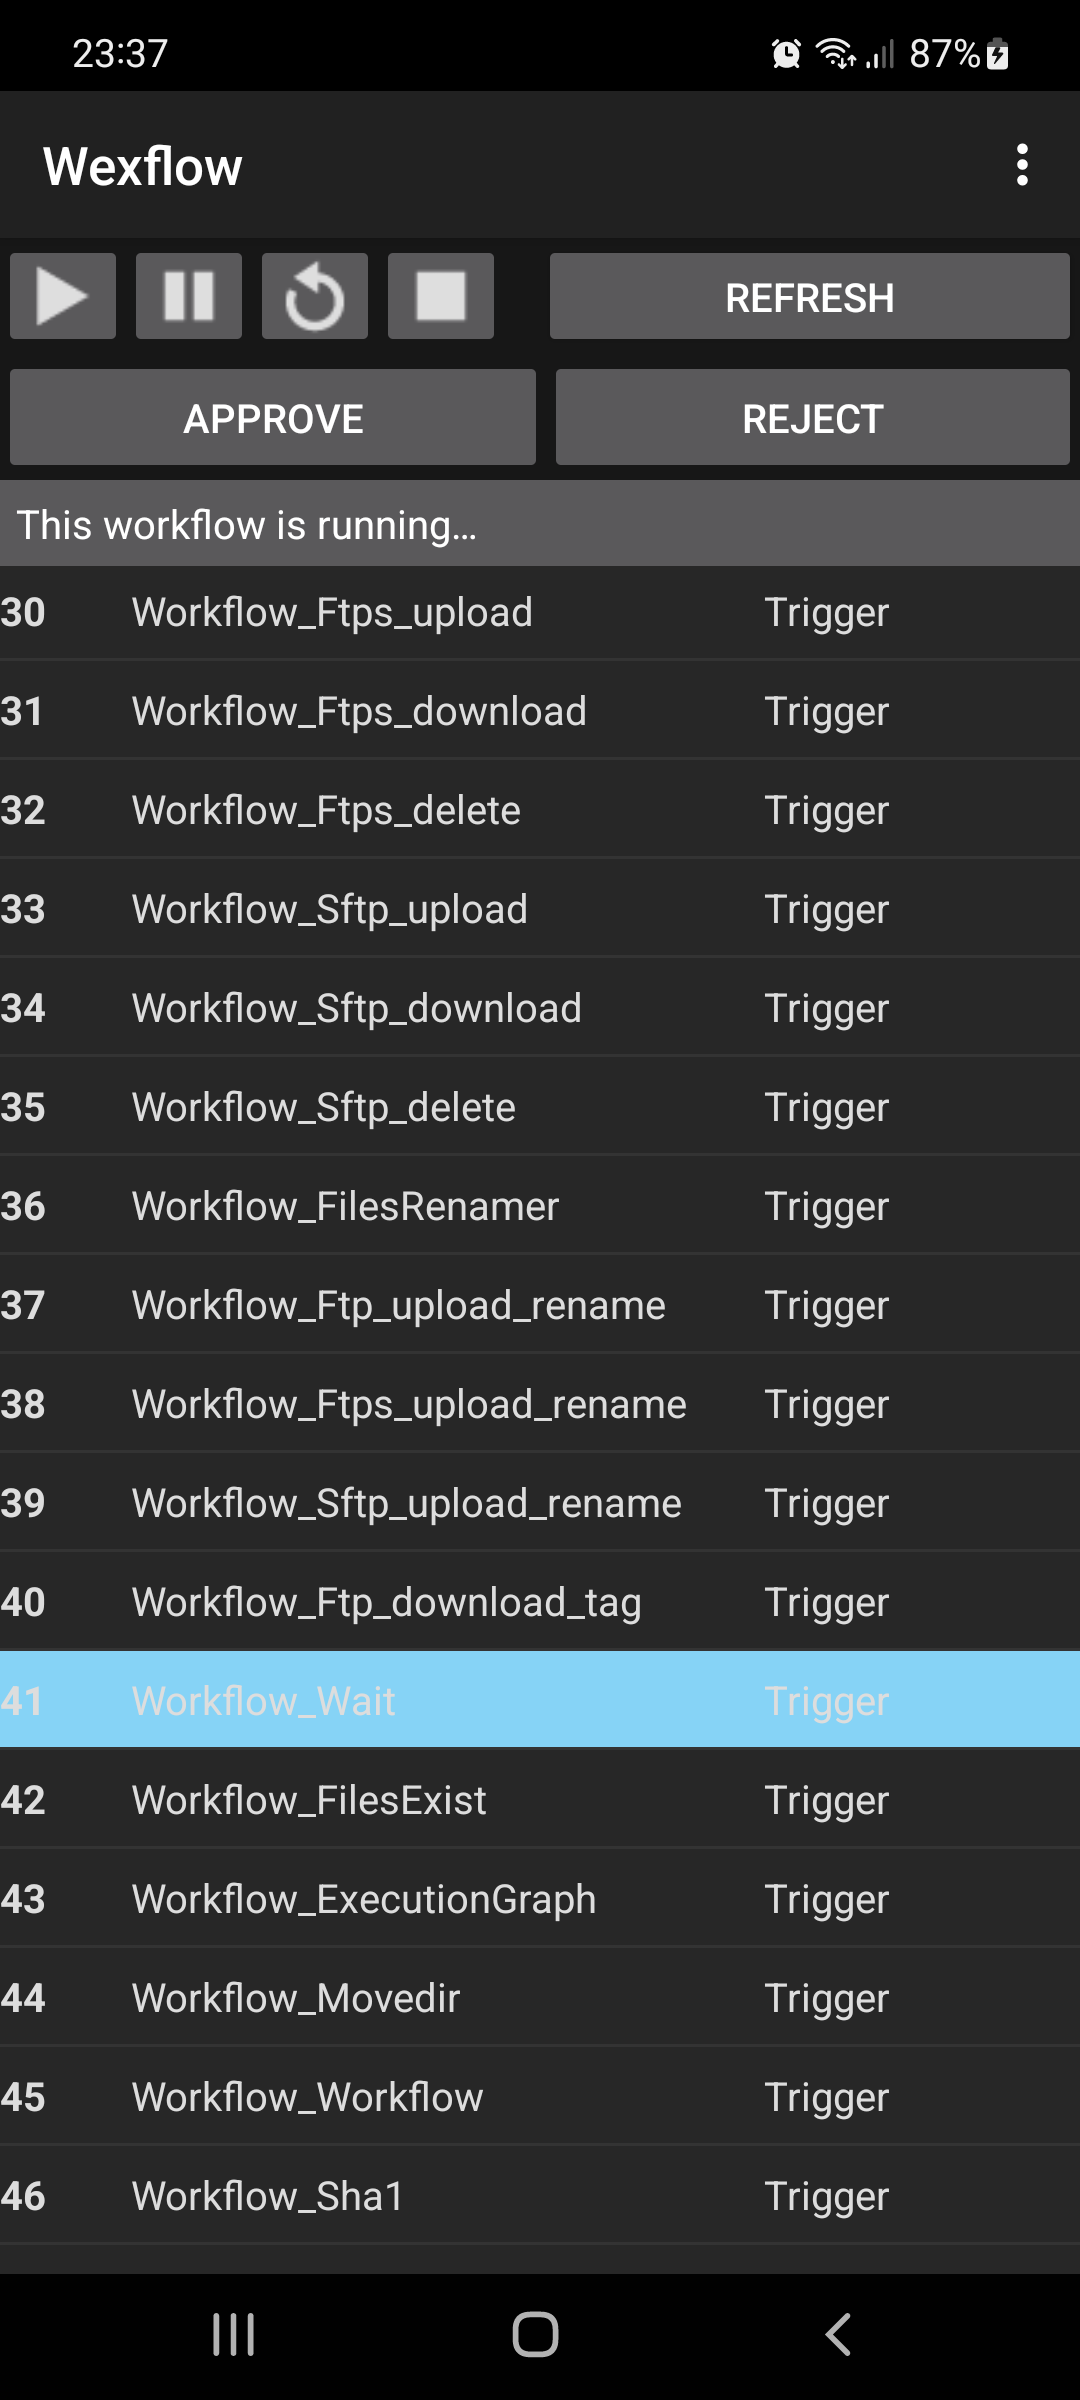
 The Android app allows you to do the following things:
- See all the workflows loaded by Wexflow Engine
- See the status of the selected workflow (running, suspended, waiting for approval or disabled)
- Start a workflow
- Stop a workflow
- Suspend a workflow
- Resume a workflow
- Approve a workflow
- Reject a workflow
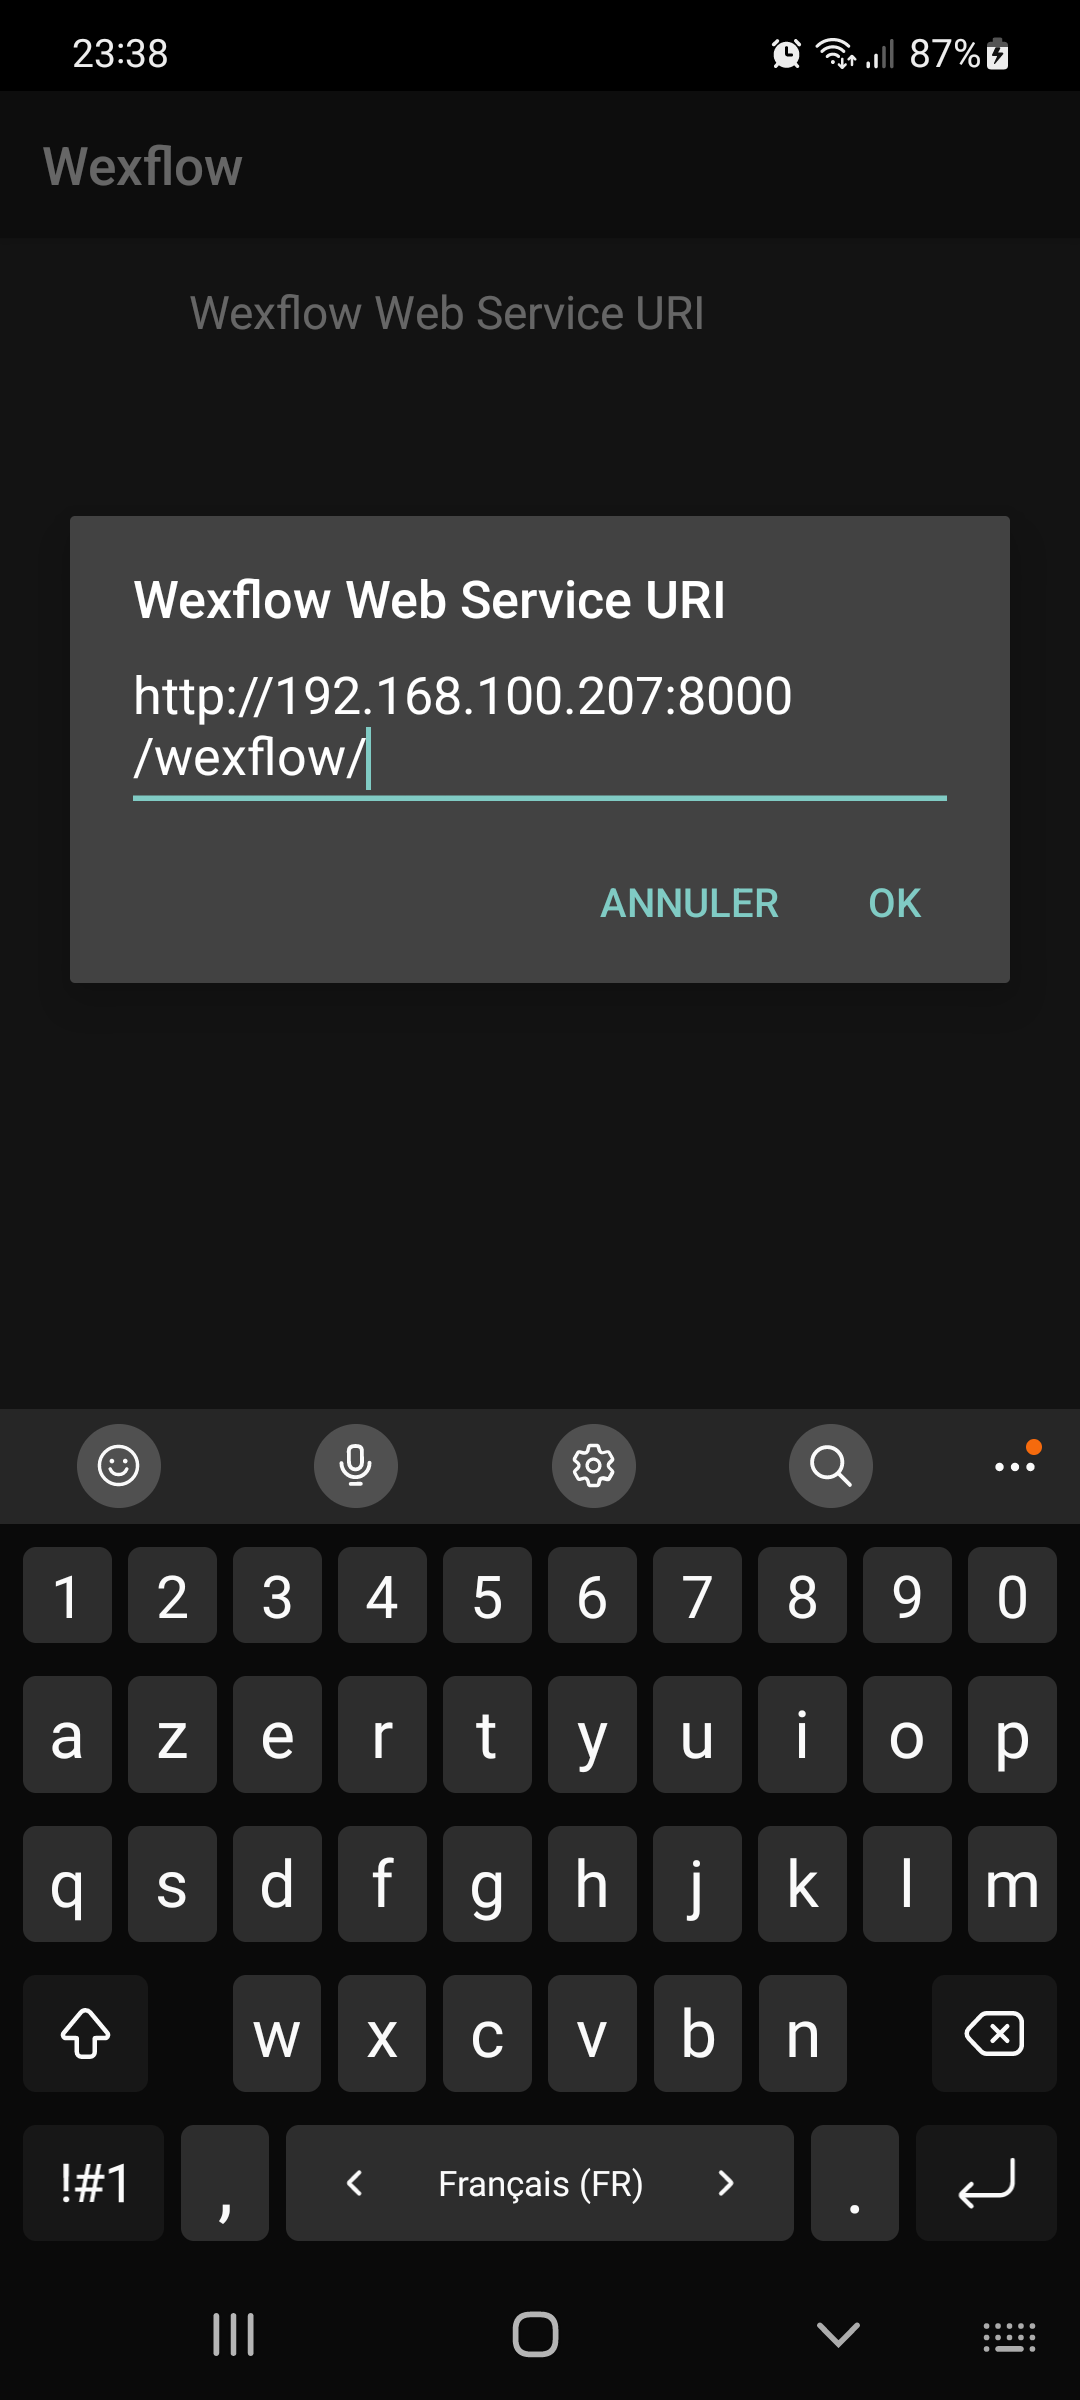
When you open the Android App, the first thing you'll need to do is to set up Wexflow API URL in the settings.
Then, you will get a login screen.
Here are the credentials to sign in:
- **Username**: admin
- **Password**: wexflow2018
You can change the password from the backend.
---
# Document: Approval
> Source: https://github.com/aelassas/wexflow/wiki/Approval
```xml
```
---
# Document: ApprovalRecordsCreator
> Source: https://github.com/aelassas/wexflow/wiki/ApprovalRecordsCreator
```xml
```
---
# Document: ApprovalWorkflowsCreator
> Source: https://github.com/aelassas/wexflow/wiki/ApprovalWorkflowsCreator
```xml
```
---
# Document: ApproveRecord
> Source: https://github.com/aelassas/wexflow/wiki/ApproveRecord
```xml
```
---
# Document: C# Client
> Source: https://github.com/aelassas/wexflow/wiki/C#-Client
Here is a sample C# client:
```csharp
using Newtonsoft.Json;
using System;
using System.Net.Http;
using System.Text;
using System.Threading.Tasks;
using Wexflow.Core.Service.Contracts;
namespace Wexflow.Core.Service.Client
{
public class WexflowServiceClient(string uri)
{
public string Uri { get; } = uri.TrimEnd('/');
private static async Task DownloadStringAsync(HttpClient client, string url, string token)
{
HttpRequestMessage request = new(HttpMethod.Get, url);
if (!string.IsNullOrEmpty(token))
{
request.Headers.Add("Authorization", $"Bearer {token}");
}
var response = await client.SendAsync(request);
var byteArray = await response.Content.ReadAsByteArrayAsync();
var responseString = Encoding.UTF8.GetString(byteArray, 0, byteArray.Length);
return responseString;
}
private static async Task UploadStringAsync(HttpClient client, string url, string token, string body = "")
{
HttpRequestMessage request = new(HttpMethod.Post, url);
if (!string.IsNullOrEmpty(token))
{
request.Headers.Add("Authorization", $"Bearer {token}");
}
if (!string.IsNullOrEmpty(body))
{
request.Content = new StringContent(body, Encoding.UTF8, "application/json");
}
var response = await client.SendAsync(request);
var byteArray = await response.Content.ReadAsByteArrayAsync();
var responseString = Encoding.UTF8.GetString(byteArray, 0, byteArray.Length);
return responseString;
}
public async Task Login(string username, string password)
{
var uri = $"{Uri}/login";
using HttpClient webClient = new();
var requestBody = JsonConvert.SerializeObject(new { username, password });
var response = await UploadStringAsync(webClient, uri, null, requestBody);
// Deserialize response JSON into a dynamic object
dynamic res = JsonConvert.DeserializeObject(response);
// Return the access_token property
return res?.access_token;
}
public async Task Search(string keyword, string token)
{
var uri = $"{Uri}/search?s={keyword}";
using HttpClient webClient = new();
var response = await DownloadStringAsync(webClient, uri, token);
var workflows = JsonConvert.DeserializeObject(response);
return workflows;
}
public async Task StartWorkflow(int id, string token)
{
var uri = $"{Uri}/start?w={id}";
using HttpClient webClient = new();
var instanceId = await UploadStringAsync(webClient, uri, token);
return Guid.Parse(instanceId.Replace("\"", string.Empty));
}
public async Task StartWorkflowWithVariables(string payload, string token)
{
var uri = $"{Uri}/start-with-variables";
using HttpClient webClient = new();
var instanceId = await UploadStringAsync(webClient, uri, token, payload);
return Guid.Parse(instanceId.Replace("\"", string.Empty));
}
public async Task StopWorkflow(int id, Guid instanceId, string token)
{
var uri = $"{Uri}/stop?w={id}&i={instanceId}";
using HttpClient webClient = new();
_ = await UploadStringAsync(webClient, uri, token);
}
public async Task SuspendWorkflow(int id, Guid instanceId, string token)
{
var uri = $"{Uri}/suspend?w={id}&i={instanceId}";
using HttpClient webClient = new();
_ = await UploadStringAsync(webClient, uri, token);
}
public async Task ResumeWorkflow(int id, Guid instanceId, string token)
{
var uri = $"{Uri}/resume?w={id}&i={instanceId}";
using HttpClient webClient = new();
_ = await UploadStringAsync(webClient, uri, token);
}
public async Task ApproveWorkflow(int id, Guid instanceId, string token)
{
var uri = $"{Uri}/approve?w={id}&i={instanceId}";
using HttpClient webClient = new();
_ = await UploadStringAsync(webClient, uri, token);
}
public async Task RejectWorkflow(int id, Guid instanceId, string token)
{
var uri = $"{Uri}/reject?w={id}&i={instanceId}";
using HttpClient webClient = new();
_ = await UploadStringAsync(webClient, uri, token);
}
public async Task GetWorkflow(string token, int id)
{
var uri = $"{Uri}/workflow?w={id}";
using HttpClient webClient = new();
var response = await DownloadStringAsync(webClient, uri, token);
var workflow = JsonConvert.DeserializeObject(response);
return workflow;
}
public async Task GetUser(string username, string token)
{
var uri = $"{Uri}/user?username={System.Uri.EscapeDataString(username)}";
using HttpClient webClient = new();
var response = await DownloadStringAsync(webClient, uri, token);
var user = JsonConvert.DeserializeObject(response);
return user;
}
}
}
```
---
# Document: C# SSE Client
> Source: https://github.com/aelassas/wexflow/wiki/C#-SSE-Client
## Prerequisites
* Install [.NET](https://dotnet.microsoft.com/)
* Create a new console app:
```
dotnet new console -n dotnet
```
# SSE Client Sample
Here is a sample C# SSE client `Program.cs`:
```cs
using System;
using System.Net.Http;
using System.Net.Http.Headers;
using System.Text.Json;
using System.Text;
using System.IO;
var baseUrl = "http://localhost:8000/api/v1";
var username = "admin";
var password = "wexflow2018";
var workflowId = 41;
using var httpClient = new HttpClient();
async Task LoginAsync(string user, string pass, bool stayConnected = false)
{
var payload = new
{
username = user,
password = pass,
stayConnected = stayConnected
};
var content = new StringContent(JsonSerializer.Serialize(payload), Encoding.UTF8, "application/json");
var response = await httpClient.PostAsync($"{baseUrl}/login", content);
if (!response.IsSuccessStatusCode)
throw new Exception($"Login failed: HTTP {response.StatusCode} - {response.ReasonPhrase}");
var json = await response.Content.ReadAsStringAsync();
var doc = JsonDocument.Parse(json);
return doc.RootElement.GetProperty("access_token").GetString();
}
async Task StartWorkflowAsync(string token, int workflowId)
{
var request = new HttpRequestMessage(HttpMethod.Post, $"{baseUrl}/start?w={workflowId}");
request.Headers.Authorization = new AuthenticationHeaderValue("Bearer", token);
var response = await httpClient.SendAsync(request);
if (!response.IsSuccessStatusCode)
throw new Exception($"Start failed: HTTP {response.StatusCode} - {response.ReasonPhrase}");
var json = await response.Content.ReadAsStringAsync();
return JsonSerializer.Deserialize(json);
}
async Task ListenToSseAsync(string url, string token)
{
var request = new HttpRequestMessage(HttpMethod.Get, url);
request.Headers.Accept.Add(new MediaTypeWithQualityHeaderValue("text/event-stream"));
request.Headers.Authorization = new AuthenticationHeaderValue("Bearer", token);
var response = await httpClient.SendAsync(request, HttpCompletionOption.ResponseHeadersRead);
using var stream = await response.Content.ReadAsStreamAsync();
using var reader = new StreamReader(stream);
Console.WriteLine("SSE connection opened");
while (!reader.EndOfStream)
{
var line = await reader.ReadLineAsync();
if (!string.IsNullOrWhiteSpace(line) && line.StartsWith("data: "))
{
var json = line.Substring("data: ".Length);
try
{
var doc = JsonDocument.Parse(json);
Console.WriteLine("Received SSE JSON:");
Console.WriteLine(doc.RootElement.ToString());
break; // Close after first message
}
catch (Exception ex)
{
Console.WriteLine("Failed to parse SSE JSON: " + ex.Message);
}
}
}
Console.WriteLine("SSE connection closed");
}
try
{
var token = await LoginAsync(username, password);
var jobId = await StartWorkflowAsync(token, workflowId);
Console.WriteLine($"Workflow {workflowId} started. Job ID: {jobId}");
var sseUrl = $"{baseUrl}/sse/{workflowId}/{jobId}";
await ListenToSseAsync(sseUrl, token);
}
catch (Exception ex)
{
Console.WriteLine("Error: " + ex.Message);
}
```
To run the client, use the following command:
```bash
cd dotnet
dotnet run
```
---
# Document: CPP Client
> Source: https://github.com/aelassas/wexflow/wiki/CPP-Client
## Prerequisites
### Windows
* Install [MSYS2](https://www.msys2.org/)
* Open the MSYS2 MinGW 64-bit shell and run:
```
pacman -Syu # Update package database and core system
pacman -Su # Finish update (may require closing/reopening terminal)
pacman -S mingw-w64-x86_64-gcc mingw-w64-x86_64-curl
```
### Linux
On Debian/Ubuntu:
```bash
sudo apt update
sudo apt install libcurl4-openssl-dev build-essential
```
On Fedora:
```bash
sudo dnf install libcurl-devel gcc-c++
```
On Arch Linux:
```bash
sudo pacman -S curl
```
## Client Sample
Here is a sample C++ client `client.cpp`:
```cpp
#include
#include
#include
static size_t WriteCallback(void *contents, size_t size, size_t nmemb, std::string *s)
{
size_t totalSize = size * nmemb;
s->append((char *)contents, totalSize);
return totalSize;
}
std::string login(const std::string &baseUrl, const std::string &username, const std::string &password)
{
CURL *curl = curl_easy_init();
if (!curl)
throw std::runtime_error("Failed to init curl");
std::string url = baseUrl + "/login";
std::string readBuffer;
std::string jsonData = "{\"username\":\"" + username + "\",\"password\":\"" + password + "\",\"stayConnected\":false}";
struct curl_slist *headers = nullptr;
headers = curl_slist_append(headers, "Content-Type: application/json");
curl_easy_setopt(curl, CURLOPT_URL, url.c_str());
curl_easy_setopt(curl, CURLOPT_HTTPHEADER, headers);
curl_easy_setopt(curl, CURLOPT_POSTFIELDS, jsonData.c_str());
curl_easy_setopt(curl, CURLOPT_WRITEFUNCTION, WriteCallback);
curl_easy_setopt(curl, CURLOPT_WRITEDATA, &readBuffer);
CURLcode res = curl_easy_perform(curl);
if (res != CURLE_OK)
{
curl_slist_free_all(headers);
curl_easy_cleanup(curl);
throw std::runtime_error(std::string("curl_easy_perform() failed: ") + curl_easy_strerror(res));
}
long http_code = 0;
curl_easy_getinfo(curl, CURLINFO_RESPONSE_CODE, &http_code);
curl_slist_free_all(headers);
curl_easy_cleanup(curl);
if (http_code != 200)
throw std::runtime_error("Login failed with HTTP code " + std::to_string(http_code));
// Simple parsing to extract access_token value from JSON response
// For production, use a JSON parser like nlohmann/json
auto startPos = readBuffer.find("\"access_token\":\"");
if (startPos == std::string::npos)
throw std::runtime_error("access_token not found in response");
startPos += strlen("\"access_token\":\"");
auto endPos = readBuffer.find("\"", startPos);
if (endPos == std::string::npos)
throw std::runtime_error("Malformed access_token in response");
return readBuffer.substr(startPos, endPos - startPos);
}
std::string startWorkflow(const std::string &baseUrl, const std::string &token, int workflowId)
{
CURL *curl = curl_easy_init();
if (!curl)
throw std::runtime_error("Failed to init curl");
std::string url = baseUrl + "/start?w=" + std::to_string(workflowId);
std::string readBuffer;
struct curl_slist *headers = nullptr;
std::string authHeader = "Authorization: Bearer " + token;
headers = curl_slist_append(headers, authHeader.c_str());
headers = curl_slist_append(headers, "Content-Type: application/json");
headers = curl_slist_append(headers, "Content-Length: 0");
curl_easy_setopt(curl, CURLOPT_URL, url.c_str());
curl_easy_setopt(curl, CURLOPT_HTTPHEADER, headers);
curl_easy_setopt(curl, CURLOPT_POST, 1L);
curl_easy_setopt(curl, CURLOPT_WRITEFUNCTION, WriteCallback);
curl_easy_setopt(curl, CURLOPT_WRITEDATA, &readBuffer);
CURLcode res = curl_easy_perform(curl);
if (res != CURLE_OK)
{
curl_slist_free_all(headers);
curl_easy_cleanup(curl);
throw std::runtime_error(std::string("curl_easy_perform() failed: ") + curl_easy_strerror(res));
}
long http_code = 0;
curl_easy_getinfo(curl, CURLINFO_RESPONSE_CODE, &http_code);
curl_slist_free_all(headers);
curl_easy_cleanup(curl);
if (http_code != 200)
throw std::runtime_error("Start workflow failed with HTTP code " + std::to_string(http_code));
return readBuffer;
}
int main()
{
const std::string baseUrl = "http://localhost:8000/api/v1";
const std::string username = "admin";
const std::string password = "wexflow2018";
const int workflowId = 41;
try
{
std::string token = login(baseUrl, username, password);
std::string jobId = startWorkflow(baseUrl, token, workflowId);
std::cout << "Workflow " << workflowId << " started successfully. Job ID: " << jobId << std::endl;
}
catch (const std::exception &e)
{
std::cerr << "Error: " << e.what() << std::endl;
return 1;
}
return 0;
}
```
## Run the Client
### Windows
Open the MSYS2 MinGW 64-bit shell (not the default MSYS shell) and run:
```bash
g++ client.cpp -o wexflow_client.exe -lcurl -lws2_32 -lcrypt32
./wexflow_client.exe
```
### Linux
```bash
g++ client.cpp -o wexflow_client -lcurl
./wexflow_client
```
---
# Document: CPP SSE Client
> Source: https://github.com/aelassas/wexflow/wiki/CPP-SSE-Client
## Prerequisites
### Windows
* Install [MSYS2](https://www.msys2.org/)
* Open the MSYS2 MinGW 64-bit shell and run:
```
pacman -Syu # Update package database and core system
pacman -Su # Finish update (may require closing/reopening terminal)
pacman -S mingw-w64-x86_64-gcc mingw-w64-x86_64-curl
```
### Linux
On Debian/Ubuntu:
```bash
sudo apt update
sudo apt install libcurl4-openssl-dev build-essential
```
On Fedora:
```bash
sudo dnf install libcurl-devel gcc-c++
```
On Arch Linux:
```bash
sudo pacman -S curl
```
## SSE Client Sample
Here is a sample C++ SSE client `sse.cpp`:
```cpp
#include
#include
#include
#include
#include
#include
using json = nlohmann::json;
static std::string baseUrl = "http://localhost:8000/api/v1";
static std::string username = "admin";
static std::string password = "wexflow2018";
static int workflowId = 41;
// Helper for libcurl response data
static size_t WriteCallback(void *contents, size_t size, size_t nmemb, void *userp)
{
((std::string *)userp)->append((char *)contents, size * nmemb);
return size * nmemb;
}
// Perform HTTP POST with JSON payload, return response body as string
std::string httpPost(const std::string &url, const std::string &jsonPayload, const std::string &bearerToken = "")
{
CURL *curl = curl_easy_init();
if (!curl)
throw std::runtime_error("Failed to init curl");
std::string readBuffer;
struct curl_slist *headers = nullptr;
headers = curl_slist_append(headers, "Content-Type: application/json");
if (!bearerToken.empty())
{
std::string authHeader = "Authorization: Bearer " + bearerToken;
headers = curl_slist_append(headers, authHeader.c_str());
}
curl_easy_setopt(curl, CURLOPT_URL, url.c_str());
curl_easy_setopt(curl, CURLOPT_HTTPHEADER, headers);
curl_easy_setopt(curl, CURLOPT_POSTFIELDS, jsonPayload.c_str());
curl_easy_setopt(curl, CURLOPT_WRITEFUNCTION, WriteCallback);
curl_easy_setopt(curl, CURLOPT_WRITEDATA, &readBuffer);
CURLcode res = curl_easy_perform(curl);
long httpCode = 0;
curl_easy_getinfo(curl, CURLINFO_RESPONSE_CODE, &httpCode);
curl_slist_free_all(headers);
curl_easy_cleanup(curl);
if (res != CURLE_OK)
{
throw std::runtime_error(std::string("curl_easy_perform() failed: ") + curl_easy_strerror(res));
}
if (httpCode < 200 || httpCode >= 300)
{
throw std::runtime_error("HTTP error code: " + std::to_string(httpCode));
}
return readBuffer;
}
// Login to get token
std::string login(const std::string &user, const std::string &pass)
{
json j;
j["username"] = user;
j["password"] = pass;
j["stayConnected"] = false;
std::string url = baseUrl + "/login";
return json::parse(httpPost(url, j.dump()))["access_token"];
}
// Start workflow, returns jobId string
std::string startWorkflow(const std::string &token, int workflowId)
{
std::string url = baseUrl + "/start?w=" + std::to_string(workflowId);
// POST empty body for start
std::string raw = httpPost(url, "", token);
json j = json::parse(raw);
return j.get();
}
// SSE event handler
size_t sseWriteCallback(char *ptr, size_t size, size_t nmemb, void *userdata)
{
size_t totalSize = size * nmemb;
std::string chunk(ptr, totalSize);
std::cout << ">>> SSE Chunk received:\n"
<< chunk << std::endl;
static std::string buffer;
buffer += chunk;
size_t pos;
while ((pos = buffer.find("\n\n")) != std::string::npos)
{
std::string eventBlock = buffer.substr(0, pos);
buffer.erase(0, pos + 2);
size_t dataPos = eventBlock.find("data: ");
if (dataPos != std::string::npos)
{
std::string jsonData = eventBlock.substr(dataPos + 6);
std::cout << "Received SSE data: " << jsonData << std::endl;
try
{
auto j = json::parse(jsonData);
if (j.contains("status") && j["status"] == "Done")
{
std::cout << "Workflow status Done received, exiting SSE loop." << std::endl;
std::atomic *doneFlag = static_cast *>(userdata);
doneFlag->store(true);
}
}
catch (const std::exception &e)
{
std::cerr << "JSON parse error: " << e.what() << std::endl;
}
}
}
return totalSize;
}
// Listen to SSE stream until "Done" status
void listenToSse(const std::string &sseUrl, const std::string &token)
{
CURL *curl = curl_easy_init();
if (!curl)
{
throw std::runtime_error("Failed to init curl");
}
std::atomic done(false);
struct curl_slist *headers = nullptr;
headers = curl_slist_append(headers, "Accept: text/event-stream");
headers = curl_slist_append(headers, ("Authorization: Bearer " + token).c_str());
headers = curl_slist_append(headers, "Expect:"); // Disable 'Expect: 100-continue'
curl_easy_setopt(curl, CURLOPT_URL, sseUrl.c_str());
curl_easy_setopt(curl, CURLOPT_HTTPHEADER, headers);
curl_easy_setopt(curl, CURLOPT_WRITEFUNCTION, sseWriteCallback);
curl_easy_setopt(curl, CURLOPT_WRITEDATA, &done);
curl_easy_setopt(curl, CURLOPT_TIMEOUT, 0L); // Keep connection open indefinitely
curl_easy_setopt(curl, CURLOPT_TCP_KEEPALIVE, 1L); // Keep connection alive
curl_easy_setopt(curl, CURLOPT_NOSIGNAL, 1L); // Required for multithreaded / Windows apps
curl_easy_setopt(curl, CURLOPT_VERBOSE, 1L); // Optional: enable debug output
CURLcode res = curl_easy_perform(curl);
if (res != CURLE_OK)
{
std::cerr << "SSE connection error: " << curl_easy_strerror(res) << std::endl;
}
curl_slist_free_all(headers);
curl_easy_cleanup(curl);
}
int main()
{
try
{
std::string token = login(username, password);
std::string jobId = startWorkflow(token, workflowId);
std::cout << "Workflow " << workflowId << " started. Job ID: " << jobId << std::endl;
std::string sseUrl = baseUrl + "/sse/" + std::to_string(workflowId) + "/" + jobId;
listenToSse(sseUrl, token);
std::cout << "SSE listening finished. Exiting." << std::endl;
}
catch (const std::exception &e)
{
std::cerr << "Error: " << e.what() << std::endl;
}
return 0;
}
```
## Run the Client
Download [samples/clients/sse/cpp](https://github.com/aelassas/wexflow/tree/main/samples/clients/sse/cpp) example from GitHub repo.
### Windows
Open the MSYS2 MinGW 64-bit shell (not the default MSYS shell), and run:
```bash
cd cpp
g++ sse.cpp -o wexflow_sse.exe -Iinclude -lcurl -lws2_32 -lcrypt32
./wexflow_sse.exe
```
### Linux
```bash
cd cpp
g++ sse.cpp -o wexflow_sse -Iinclude -lcurl -pthread
./wexflow_sse
```
---
# Document: Command Line Client
> Source: https://github.com/aelassas/wexflow/wiki/Command-Line-Client
Wexflow provides a command line client for querying Wexflow server. The command line tool is available for both .NET and .NET Core and works on Windows, Linux and macOS.
# Windows (.NET)
The command line tool is located in C:\Program Files\Wexflow\Wexflow.Clients.CommandLine. To run the command line tool, just run the executable C:\Program Files\Wexflow\Wexflow.Clients.CommandLine\Wexflow.Clients.CommandLine.exe
The configuration file C:\Program Files\Wexflow\Wexflow.Clients.CommandLine\Wexflow.Clients.CommandLine.exe.config contains WexflowWebServiceUri, Username and Password settings.
# Windows (.NET Core)
The command line tool is located in .\Wexflow.Clients.CommandLine. To run the command line tool, just run the following command
```bash
cd .\Wexflow.Clients.CommandLine
dotnet Wexflow.Clients.CommandLine.dll
```
The configuration file .\Wexflow.Clients.CommandLine\appsettings.json contains WexflowWebServiceUri, Username and Password settings.
# Linux
After installing Wexflow on Linux, the command line tool is located in /opt/wexflow/Wexflow.Clients.CommandLine. To run the command line tool, just run the following command
```bash
cd /opt/wexflow/Wexflow.Clients.CommandLine
dotnet Wexflow.Clients.CommandLine.dll
```
The configuration file /opt/wexflow/Wexflow.Clients.CommandLine/appsettings.json contains WexflowWebServiceUri, Username and Password settings.
# macOS
After installing Wexflow on macOS, the command line tool is located in /Applications/wexflow/Wexflow.Clients.CommandLine. To run the command line tool, just run the following command
```bash
cd /Applications/wexflow/Wexflow.Clients.CommandLine
dotnet Wexflow.Clients.CommandLine.dll
```
The configuration file /Applications/wexflow/Wexflow.Clients.CommandLine/appsettings.json contains WexflowWebServiceUri, Username and Password settings.
# Options
```
-o, --operation Required. start|suspend|resume|stop|approve|reject
-i, --workflowId Required. Workflow Id
-j, --jobId Job instance id (Guid)
-w, --wait (Default: false) Wait until workflow finishes
--help Display this help screen.
--version Display version information.
```
# Examples
## Fire and wait
The following command starts the workflow 41 and waits until it finishes its jobs:
```bash
Wexflow.Clients.CommandLine.exe -o start -i 41 -w
```
## Fire and forget
The following command starts the workflow 41:
```bash
Wexflow.Clients.CommandLine.exe -o start -i 41
```
## Stop
The following command stops the workflow 41:
```bash
Wexflow.Clients.CommandLine.exe -o stop -i 41 -j 9144e328-dde3-468e-a8ba-913e3d5b7b92
```
## Suspend
The following command suspends the workflow 41:
```bash
Wexflow.Clients.CommandLine.exe -o suspend -i 41 -j 9144e328-dde3-468e-a8ba-913e3d5b7b92
```
## Resume
The following command resumes the workflow 41:
```bash
Wexflow.Clients.CommandLine.exe -o resume -i 41 -j 9144e328-dde3-468e-a8ba-913e3d5b7b92
```
## Approve
The following command approves the workflow 126:
```bash
Wexflow.Clients.CommandLine.exe -o approve -i 126 -j 9144e328-dde3-468e-a8ba-913e3d5b7b92
```
## Reject
The following command rejects the workflow 126:
```bash
Wexflow.Clients.CommandLine.exe -o reject -i 126 -j 9144e328-dde3-468e-a8ba-913e3d5b7b92
```
---
# Document: Configuration
> Source: https://github.com/aelassas/wexflow/wiki/Configuration
# Wexflow Configuration Guide
Wexflow works out of the box with zero configuration. However, if you want to customize settings, this page explains how to configure Wexflow server and its main configuration files.
## Table of Contents
1. [Wexflow Server Configuration](https://github.com/aelassas/wexflow/wiki/Configuration#wexflow-server-configuration)
1. [.NET 4.8](https://github.com/aelassas/wexflow/wiki/Configuration#net-48)
1. [.NET 9.0+](https://github.com/aelassas/wexflow/wiki/Configuration#net-90)
1. [Wexflow.xml Configuration File](https://github.com/aelassas/wexflow/wiki/Configuration#wexflowxml-configuration-file)
1. [.NET 4.8](https://github.com/aelassas/wexflow/wiki/Configuration#net-48-1)
1. [.NET 9.0+](https://github.com/aelassas/wexflow/wiki/Configuration#net-90-1)
1. [Windows](https://github.com/aelassas/wexflow/wiki/Configuration#windows)
1. [Linux](https://github.com/aelassas/wexflow/wiki/Configuration#linux)
1. [macOS](https://github.com/aelassas/wexflow/wiki/Configuration#macos)
1. [Admin Panel Configuration](https://github.com/aelassas/wexflow/wiki/Configuration#admin-panel-configuration)
1. [.NET 4.8](https://github.com/aelassas/wexflow/wiki/Configuration#net-48-2)
1. [.NET 9.0+](https://github.com/aelassas/wexflow/wiki/Configuration#net-90-2)
## Wexflow Server Configuration
### .NET 4.8
You can configure Wexflow Server from C:\Program Files\Wexflow\Wexflow.Server.exe.config:
```xml
...
```
LogLevel options:
* Debug: All logs and debug logs.
* All: All logs without debug logs (Default).
* Severely: Only last workflow log and error logs.
* Minimum: Only last workflow log.
* None: No logs.
### .NET 9.0+
You can configure Wexflow Server from Wexflow.Server/appsettings.json:
```js
{
"WexflowSettingsFile": "C:\\Wexflow-netcore\\Wexflow.xml",
"LogLevel": "All",
"WexflowServicePort": 8000,
"SuperAdminUsername": "admin",
"EnableWorkflowsHotFolder": false,
"EnableRecordsHotFolder": true,
"EnableEmailNotifications": false,
"DateTimeFormat": "dd-MM-yyyy HH:mm:ss", /* Date and time format in the backend. */
"Smtp.Host": "smtp.gmail.com",
"Smtp.Port": 587,
"Smtp.EnableSsl": true,
"Smtp.User": "user",
"Smtp.Password": "password",
"Smtp.From": "user",
"AdminFolder": "..\\Admin",
"HTTPS": false,
"PfxFile": "C:\\Wexflow-netcore\\wexflow.pfx",
"PfxPassword": "wexflow2018"
}
```
> [!NOTE]
> To change Wexflow's server and API port, change `WexflowServicePort` and `port` in `Admin\js\settings.js`. Then restart Wexflow server to apply changes.
## Wexflow.xml Configuration File
Wexflow.xml is the main configuration file of Wexflow server. Its path is configured from:
* .NET 4.8 — in `C:\Program Files\Wexflow\Wexflow.Server.exe.config`
* .NET 9.0+ — in `Wexflow.Server/appsettings.json`
### .NET 4.8
Wexflow.xml is located in: C:\Wexflow\Wexflow.xml
Below is the configuration file Wexflow.xml for the .NET version:
```xml
```
Wexflow ships with 6 persistence providers. You can choose from the following `dbType` options:
* SQLite (Default)
* MongoDB
* SQLServer
* PostgreSQL
* MySQL
* LiteDB
If you change the persistence provider, don't forget to update `connectionString` setting.
### .NET 9.0+
#### Windows
For the .NET 9.0+ version on Windows, Wexflow.xml is located in: C:\Wexflow-netcore\Wexflow.xml
Below is the configuration file Wexflow.xml for the .NET 9.0+ version:
```xml
```
#### Linux
For the .NET 9.0+ version on Linux, Wexflow.xml is located in: /opt/wexflow/Wexflow/Wexflow.xml
Below is the configuration file Wexflow.xml for the .NET 9.0+ version:
```xml
```
#### macOS
For the .NET 9.0+ version on Linux, Wexflow.xml is located in: /Applications/wexflow/Wexflow/Wexflow.xml
Below is the configuration file Wexflow.xml for the .NET 9.0+ version:
```xml
```
## Admin Panel Configuration
It is possible to format date and time in the backend through **DateTimeFormat** setting option. The date is local and can be formatted however you want. The default format is **dd-MM-yyyy HH:mm:ss**.
If you modify this setting, you must restart the Wexflow server to apply changes.
### .NET 4.8
To change the setting option **DateTimeFormat** simply open the settings file C:\Program Files\Wexflow\Wexflow.Server.exe.config and edit the setting option.
### .NET 9.0+
To change the setting option **DateTimeFormat** simply open the settings file Wexflow.Server/appsettings.json and edit the setting option.
---
# Document: Cron Scheduling
> Source: https://github.com/aelassas/wexflow/wiki/Cron-Scheduling
# Introduction
cron is a UNIX tool that has been around for a long time, so its scheduling capabilities are powerful and proven. Wexflow provides the ability to create workflows that start depending on a cron expression.
Cron workflows are often more useful than trigger or periodic workflows, if you need a job-firing schedule that recurs based on calendar-like notions, rather than on the exactly specified intervals.
With cron workflows, you can specify firing-schedules such as "every Friday at noon", or "every weekday and 9:30 am", or even "every 5 minutes between 9:00 am and 10:00 am on every Monday, Wednesday and Friday".
A cron expression is a string comprised of 6 or 7 fields separated by white space. Fields can contain any of the allowed values, along with various combinations of the allowed special characters for that field. The fields are as follows:
```
* * * * * * *
┬ ┬ ┬ ┬ ┬ ┬ ┬
│ │ │ │ │ │ └ Year (1970 - 2099) (Optional) (Allowed Special Characters: , - * /)
│ │ │ │ │ └────── Day of week (1 - 7) (Sunday=1) (Allowed Special Characters: , - * ? / L #)
│ │ │ │ └─────────── Month (1 - 12) (Jan=1) (Allowed Special Characters: , - * /)
│ │ │ └──────────────── Day of month (1 - 31) (Allowed Special Characters: , - * ? / L W)
│ │ └───────────────────── Hours (0 - 23) (Allowed Special Characters: , - * /)
│ └────────────────────────── Minutes (0 - 59) (Allowed Special Characters: , - * /)
└─────────────────────────────── Seconds (0 - 59) (Allowed Special Characters: , - * /)
```
So cron expressions can be as simple as this: * * * * ? *
or more complex, like this: 0/5 14,18,3-39,52 * ? JAN,MAR,SEP MON-FRI 2002-2010
# Pay attention
Wexflow is using [Quartz.NET](https://www.quartz-scheduler.net/) cron expressions. UNIX Cron expressions and Quartz ones are different. Simply:
- In Unix:
```
(minute, hour, day, month, day_of_week, year)
```
- In Quartz:
```
(second, minute, hour, day, month, day_of_week, year)
```
# Special characters
- **""** (“all values”) - used to select all values within a field. For example, "" in the minute field means * “every minute”.
- **?** (“no specific value”) - useful when you need to specify something in one of the two fields in which the character is allowed, but not the other. For example, if I want my workflow to fire on a particular day of the month (say, the 10th), but don’t care what day of the week that happens to be, I would put “10” in the day-of-month field, and “?” in the day-of-week field. See the examples below for clarification.
- **-** used to specify ranges. For example, “10-12” in the hour field means “the hours 10, 11 and 12”.
- **,** used to specify additional values. For example, “MON,WED,FRI” in the day-of-week field means “the days Monday, Wednesday, and Friday”.
- **/** - used to specify increments. For example, “0/15” in the seconds field means “the seconds 0, 15, 30, and 45”. And “5/15” in the seconds field means “the seconds 5, 20, 35, and 50”. You can also specify ‘/’ after the ‘’ character - in this case ‘’ is equivalent to having ‘0’ before the ‘/’. ‘1/3’ in the day-of-month field means “fire every 3 days starting on the first day of the month”.
- **L** (“last”) - has different meaning in each of the two fields in which it is allowed. For example, the value “L” in the day-of-month field means “the last day of the month” - day 31 for January, day 28 for February on non-leap years. If used in the day-of-week field by itself, it simply means “7” or “SAT”. But if used in the day-of-week field after another value, it means “the last xxx day of the month” - for example “6L” means “the last friday of the month”. You can also specify an offset from the last day of the month, such as “L-3” which would mean the third-to-last day of the calendar month. When using the ‘L’ option, it is important not to specify lists, or ranges of values, as you’ll get confusing/unexpected results.
- **W** (“weekday”) - used to specify the weekday (Monday-Friday) nearest the given day. As an example, if you were to specify “15W” as the value for the day-of-month field, the meaning is: “the nearest weekday to the 15th of the month”. So if the 15th is a Saturday, the workflow will fire on Friday the 14th. If the 15th is a Sunday, the workflow will fire on Monday the 16th. If the 15th is a Tuesday, then it will fire on Tuesday the 15th. However if you specify “1W” as the value for day-of-month, and the 1st is a Saturday, the workflow will fire on Monday the 3rd, as it will not ‘jump’ over the boundary of a month’s days. The ‘W’ character can only be specified when the day-of-month is a single day, not a range or list of days. ** The ‘L’ and ‘W’ characters can also be combined in the day-of-month field to yield ‘LW’, which translates to “last weekday of the month”.
- **#** used to specify “the nth” XXX day of the month. For example, the value of “6#3” in the day-of-week field means “the third Friday of the month” (day 6 = Friday and “#3” = the 3rd one in the month). Other examples: “2#1” = the first Monday of the month and “4#5” = the fifth Wednesday of the month. Note that if you specify “#5” and there is not 5 of the given day-of-week in the month, then no firing will occur that month. ** The legal characters and the names of months and days of the week are not case sensitive. MON is the same as mon.
# Examples
Here are some examples:
```
0 0 12 * * ? Fire at 12pm (noon) every day.
0 15 10 ? * * Fire at 10:15am every day.
0 15 10 * * ? Fire at 10:15am every day.
0 15 10 * * ? * Fire at 10:15am every day.
0 15 10 * * ? 2019 Fire at 10:15am every day during the year 2019.
0 * 14 * * ? Fire every minute starting at 2pm and ending at 2:59pm, every day.
0 0/5 14 * * ? Fire every 5 minutes starting at 2pm and ending at 2:55pm, every day.
0 0/5 14,18 * * ? Fire every 5 minutes starting at 2pm and ending at 2:55pm, AND fire every 5 minutes starting at 6pm and ending at 6:55pm, every day.
0 0-5 14 * * ? Fire every minute starting at 2pm and ending at 2:05pm, every day.
0 10,44 14 ? 3 WED Fire at 2:10pm and at 2:44pm every Wednesday in the month of March.
0 15 10 ? * MON-FRI Fire at 10:15am every Monday, Tuesday, Wednesday, Thursday and Friday.
0 15 10 15 * ? Fire at 10:15am on the 15th day of every month.
0 15 10 L * ? Fire at 10:15am on the last day of every month.
0 15 10 L-2 * ? Fire at 10:15am on the 2nd-to-last last day of every month.
0 15 10 ? * 6L Fire at 10:15am on the last Friday of every month.
0 15 10 ? * 6L Fire at 10:15am on the last Friday of every month.
0 15 10 ? * 6L 2019-2020 Fire at 10:15am on every last friday of every month during the years 2019 and 2020.
0 15 10 ? * 6#3 Fire at 10:15am on the third Friday of every month.
0 0 12 1/5 * ? Fire at 12pm (noon) every 5 days every month, starting on the first day of the month.
0 11 11 11 11 ? Fire every November 11th at 11:11am.
0 0 * ? * * * Fire the top of every hour of every day.
*/10 * * * * ? Fire every ten seconds.
0 0 8-10 * * ? 2020 Fire at 8, 9 and 10 o'clock of every day during the year 2020.
0 0 6,19 ? * * Fire at 6:00 AM and 7:00 PM every day.
0 0/30 8-10 ? * * Fire at 8:00, 8:30, 9:00, 9:30, 10:00 and 10:30 every day.
0 0 9-17 * * MON-FRI Fire on the hour nine-to-five weekdays.
0 0 0 25 12 ? Fire at every Christmas Day at midnight, no matter what day of the week it is.
0 15 10 ? * 6L 2022-2025 Fire at 10:15 AM on every Friday of every month during the years 2022, 2023, 2024 and 2025.
0 30 11 ? * 6#2 Fire at 11:30 AM on the second Friday of every month.
```
Pay attention to the effects of ‘?’ and ‘*’ in the day-of-week and day-of-month fields!
# Cron launch type
It is possible to create this type of workflows from Wexflow Designer or through XML editing. However, here is a sample workflow that starts every two minutes:
```xml
```
---
# Document: CsvToJson
> Source: https://github.com/aelassas/wexflow/wiki/CsvToJson
```xml
```
---
# Document: CsvToSql
> Source: https://github.com/aelassas/wexflow/wiki/CsvToSql
```xml
```
---
# Document: CsvToXml
> Source: https://github.com/aelassas/wexflow/wiki/CsvToXml
```xml
```
---
# Document: CsvToYaml
> Source: https://github.com/aelassas/wexflow/wiki/CsvToYaml
```xml
```
---
# Document: Custom Tasks
> Source: https://github.com/aelassas/wexflow/wiki/Custom-Tasks
## Table of Contents
1. [Introduction](https://github.com/aelassas/wexflow/wiki/Custom-Tasks#introduction)
1. [General](https://github.com/aelassas/wexflow/wiki/Custom-Tasks#general)
1. [Creating a Custom Task](https://github.com/aelassas/wexflow/wiki/Custom-Tasks#creating-a-custom-task)
1. [Wexflow Task Class Example](https://github.com/aelassas/wexflow/wiki/Custom-Tasks#wexflow-task-class-example)
1. [Task Status](https://github.com/aelassas/wexflow/wiki/Custom-Tasks#task-status)
1. [Settings](https://github.com/aelassas/wexflow/wiki/Custom-Tasks#settings)
1. [Loading Files](https://github.com/aelassas/wexflow/wiki/Custom-Tasks#loading-files)
1. [Loading Entities](https://github.com/aelassas/wexflow/wiki/Custom-Tasks#loading-entities)
1. [Need A Starting Point?](https://github.com/aelassas/wexflow/wiki/Custom-Tasks#need-a-starting-point)
1. [Installing Your Custom Task in Wexflow](https://github.com/aelassas/wexflow/wiki/Custom-Tasks#installing-your-custom-task-in-wexflow)
1. [.NET Framework 4.8 (Legacy Version)](https://github.com/aelassas/wexflow/wiki/Custom-Tasks#net-framework-48-legacy-version)
1. [.NET 8.0+ (Stable Version)](https://github.com/aelassas/wexflow/wiki/Custom-Tasks#net-80-stable-version)
1. [Referenced Assemblies](https://github.com/aelassas/wexflow/wiki/Custom-Tasks#referenced-assemblies)
1. [Updating a Custom Task](https://github.com/aelassas/wexflow/wiki/Custom-Tasks#updating-a-custom-task)
1. [Using Your Custom Task](https://github.com/aelassas/wexflow/wiki/Custom-Tasks#using-your-custom-task)
1. [Suspend/Resume](https://github.com/aelassas/wexflow/wiki/Custom-Tasks#suspendresume)
1. [Logging](https://github.com/aelassas/wexflow/wiki/Custom-Tasks#logging)
1. [Files](https://github.com/aelassas/wexflow/wiki/Custom-Tasks#files)
1. [Entities](https://github.com/aelassas/wexflow/wiki/Custom-Tasks#entities)
1. [Shared Memory](https://github.com/aelassas/wexflow/wiki/Custom-Tasks#shared-memory)
1. [Designer Integration](https://github.com/aelassas/wexflow/wiki/Custom-Tasks#designer-integration)
1. [Registering the Task](https://github.com/aelassas/wexflow/wiki/Custom-Tasks#registering-the-task)
1. [Adding Settings](https://github.com/aelassas/wexflow/wiki/Custom-Tasks#adding-settings)
1. [How to Debug a Custom Task?](https://github.com/aelassas/wexflow/wiki/Custom-Tasks#how-to-debug-a-custom-task)
## Introduction
Custom tasks are essential in any workflow engine, and Wexflow is no exception.
They allow you to extend the capabilities of Wexflow by integrating your own logic, operations, or external system interactions directly into workflows. Whether you're calling an API, processing files, querying a database, sending notifications, or triggering other services, custom tasks give you the flexibility to automate and orchestrate exactly what your application needs.
In Wexflow, tasks are modular building blocks. While Wexflow includes many built-in tasks, custom tasks empower you to build domain-specific solutions tailored to your environment or business logic.
By creating your own task class that inherits from `Wexflow.Core.Task`, you can plug into Wexflow's engine and leverage features such as:
- Configuration through XML settings
- File and entity sharing across tasks
- Cross-task communication via shared memory
- Logging and debugging integration
- Suspend/resume/stop support
- Flow control using conditions and switch values
This guide walks you through everything you need to know to build, register, and run your own custom tasks in Wexflow.
## General
### Creating a Custom Task
To create a custom task—for example, `MyTask`—follow these steps:
1. **Create a Class Library Project**
- For the **legacy version** (Wexflow on .NET Framework 4.8):
Create a new **Class Library (.NET Framework)** project in **Visual Studio** and name it `Wexflow.Tasks.MyTask`.
Make sure the target framework is set to **.NET Framework 4.8**.
- For the **stable version** (Wexflow on .NET 8.0+):
Use the .NET CLI to create the project:
```bash
dotnet new classlib -n Wexflow.Tasks.MyTask
```
Then edit the `.csproj` file to target .NET 8.0 or later:
```xml
net8.0
```
2. **Add the Wexflow NuGet Package**
You can add the Wexflow package using the NuGet Package Manager in Visual Studio:
```ps1
Install-Package Wexflow
```
Or via the CLI:
```bash
dotnet add package Wexflow
```
**Important:** The project name must start with `Wexflow.Tasks.` and the output DLL file **must also** begin with `Wexflow.Tasks.` for Wexflow to recognize and load it.
### Wexflow Task Class Example
To define your own task, inherit from the `Task` class and override either `RunAsync` (asynchronous) or`Run` (synchronous).
#### Example using `RunAsync`
If you want to use `async/await` functionality, override `RunAsync` instead of `Run`. Here's a simple example of a custom task:
```cs
using System;
using System.Xml.Linq;
using Wexflow.Core;
using Task = Wexflow.Core.Task;
using TaskStatus = Wexflow.Core.TaskStatus;
namespace Wexflow.Tasks.MyTask
{
public class MyTask : Task
{
public MyTask(XElement xe, Workflow wf) : base(xe, wf)
{
// Initialize task settings from the XML element if needed.
// Example: string settingValue = GetSetting("mySetting");
}
public async override System.Threading.Tasks.Task RunAsync()
{
try
{
// Check for workflow cancellation at the start of execution.
// Always include this check in any long-running or looped logic.
Workflow.CancellationTokenSource.Token.ThrowIfCancellationRequested();
// Main task logic goes here.
Info("Running my custom task...");
// Simulate work using asynchronous delay.
await System.Threading.Tasks.Task.Delay(2000);
// Support workflow suspension. This call will block if the workflow is paused.
// Only call WaitOne if cancellation hasn't already been requested.
if (!Workflow.CancellationTokenSource.Token.IsCancellationRequested)
{
WaitOne();
}
// Return success when the task completes successfully
return new TaskStatus(Status.Success);
}
catch (OperationCanceledException)
{
// Don't suppress this exception; it allows proper workflow stop handling.
throw;
}
catch (Exception ex)
{
// Log unexpected errors and return error status.
ErrorFormat("An error occurred while executing the task.", ex);
return new TaskStatus(Status.Error);
}
}
}
}
```
#### Example using `Run`
If you don't need `async/await` functionality, you can use the synchronous `Run` method instead. Here's how the same task would look using `Run`:
```cs
using System;
using System.Threading;
using System.Xml.Linq;
using Wexflow.Core;
using Task = Wexflow.Core.Task;
using TaskStatus = Wexflow.Core.TaskStatus;
namespace Wexflow.Tasks.MyTask
{
public class MyTask : Task
{
public MyTask(XElement xe, Workflow wf) : base(xe, wf)
{
// Initialize task settings from the XML element if needed
// Example: string settingValue = GetSetting("mySetting");
}
public override TaskStatus Run()
{
try
{
// Check for workflow cancellation at the start of execution.
// Always include this check in any long-running or looped logic.
// Required for .NET 8.0+ stable version.
Workflow.CancellationTokenSource.Token.ThrowIfCancellationRequested();
// Main task logic goes here.
Info("Running my custom task...");
// WaitOne() enables suspend/resume support in .NET 8.0+.
// Call this to pause the task when the workflow is suspended.
// Only call WaitOne if cancellation hasn't already been requested.
if (!Workflow.CancellationTokenSource.Token.IsCancellationRequested)
{
WaitOne();
}
// Return success when the task completes successfully
return new TaskStatus(Status.Success);
}
catch (ThreadInterruptedException)
{
// Required for .NET 4.8 legacy version.
// Don't suppress this exception; it allows proper workflow stop handling.
throw;
}
catch (OperationCanceledException)
{
// Required for .NET 8.0+ stable version.
// Don't suppress this exception; it allows proper workflow stop handling.
throw;
}
catch (Exception ex)
{
// Log unexpected errors and return error status.
ErrorFormat("An error occurred while executing the task.", ex);
return new TaskStatus(Status.Error);
}
}
}
}
```
### Task Status
Each task returns a `TaskStatus` object when it finishes performing its job. `TaskStatus` is composed of the following elements:
```csharp
public Status Status { get; set; }
public bool Condition { get; set; }
public string SwitchValue { get; set; }
```
The `Status` can be one of the followings:
```csharp
public enum Status
{
Success,
Warning,
Error
}
```
For example, if a task performs an opetation on a collection of files and if this operation succeeds for all the files then its `Status` should be `Success`. Otherwise, if this operation succeeds for some files and fails for others then its `Status` should be `Warning`. Otherwise, if this operation fails for all the files then its `Status` should be `Error`.
The `Condition` property is designed for flowchart tasks (`If` and `While`). In addition to the `Status` of the task, a flowchart task returns either `true` or `false` after performing its operation.
The `Condition` property should always be set to `false` for sequential tasks.
The `SwitchValue` is designed to be used by `Switch` flowchart nodes. If you set a value in the `SwitchValue` property and use this task in a `Switch` flowchart node, the case corresponding to the value will be executed. Otherwise, if the `Default` case is set, it will be executed.
You can use the `TaskStatus` constructor that suits your needs.
### Settings
To retrieve settings, you can use the following methods:
```csharp
string settingValue = this.GetSetting("settingName");
string settingValue = this.GetSetting("settingName", defaultValue);
string[] settingValues = this.GetSettings("settingName");
bool settingValue = this.GetSettingBool("settingName", defaultValue);
int settingValue = this.GetSettingInt("settingName", defaultValue);
int[] settingValues = this.GetSettingsInt("settingName", defaultValue);
```
### Loading Files
To load a file within a task, you can do it as follows:
```csharp
this.Files.Add(new FileInf(path, this.Id));
```
### Loading Entities
To load an entity within a task, you can do it as follows:
```csharp
this.Entities.Add(myEntity);
```
### Need a starting point?
- For **.NET Framework 4.8 (Legacy)**, you can find a complete example of a custom task here:
[Wexflow.Tasks.Template (.NET 4.8)](https://github.com/aelassas/wexflow/tree/main/src/net/Wexflow.Tasks.Template)
- For **.NET 8.0+ (Stable)**, check out the full example here:
[Wexflow.Tasks.Template (.NET 8.0+)](https://github.com/aelassas/wexflow/tree/main/src/netcore/Wexflow.Tasks.Template)
## Installing Your Custom Task in Wexflow
### .NET Framework 4.8 (Legacy Version)
Once you've finished coding your custom task, compile the class library project and copy the `Wexflow.Tasks.MyTask.dll` assembly into one of the following folders:
- `C:\Program Files\Wexflow\`
- `C:\Wexflow\Tasks\` *(default for Wexflow .NET 4.8 version)*
The `Tasks` folder path can be configured via the `tasksFolder` setting in the configuration file: `C:\Wexflow\Wexflow.xml`
**Important:** The namespace and DLL filename of your task **must start with `Wexflow.Tasks`**.
### .NET 8.0+ (Stable Version)
If you're using the .NET 8.0+ version of Wexflow, copy `Wexflow.Tasks.MyTask.dll` to the appropriate platform-specific folder:
- **Windows**:
- `.\Wexflow.Server`
- `C:\Wexflow-netcore\Tasks`
- **Linux**:
- `/opt/wexflow/Wexflow.Server`
- `/opt/wexflow/Wexflow/Tasks`
- **macOS**:
- `/Applications/wexflow/Wexflow.Server`
- `/Applications/wexflow/Wexflow/Tasks`
### Referenced Assemblies
If your custom task depends on additional assemblies (DLLs), copy them as follows:
- **.NET 4.8**: `C:\Program Files\Wexflow\`
- **.NET 8.0+**:
- **Windows**: `.\Wexflow.Server` or `C:\Wexflow-netcore\Tasks`
- **Linux**: `/opt/wexflow/Wexflow.Server` or `/opt/wexflow/Wexflow/Tasks`
- **macOS**: `/Applications/wexflow/Wexflow.Server` or `/Applications/wexflow/Wexflow/Tasks`
### Updating a Custom Task
To update an existing custom task:
1. Stop Wexflow Server
1. Replace the old DLL and its referenced assemblies with the new versions in the correct folder.
1. Start Wexflow Server:
- **.NET 4.8**: Start the **Wexflow Windows Service**
- **.NET 8.0+**:
- **Windows**: Run `.\run.bat` or start Wexflow Service if you installed it as a Windows Service
- **Linux**: Run `sudo systemctl start wexflow`
- **macOS**: Run `dotnet /Applications/wexflow/Wexflow.Server/Wexflow.Server.dll`
### Using Your Custom Task
Once installed, your task can be used in workflows like this:
```xml
```
**Important:** Make sure the `name` attribute matches the class name of your task (e.g., `MyTask`).
You can also define settings for your task using the `` elements, which can be accessed in your task code via:
```cs
string settingValue = this.GetSetting("settingName");
string settingValue = this.GetSetting("settingName", defaultValue);
string[] settingValues = this.GetSettings("settingName");
bool settingValue = this.GetSettingBool("settingName", defaultValue);
int settingValue = this.GetSettingInt("settingName", defaultValue);
int[] settingValues = this.GetSettingsInt("settingName", defaultValue);
```
You can then test your custom task by creating a new workflow using either the **Designer** or the **XML editor**.
Example using the XML editor:
```xml
```
This workflow will appear in the Wexflow Manager. You can launch and monitor it from there.
That's it! You're now ready to create, install, and run your own custom tasks in Wexflow.
## Suspend/Resume
For .NET 8.0+, if you want to enable suspend/resume for your custom task you need to use `this.WaitOne();` in your custom task. Here is an example:
```cs
using System;
using System.Xml.Linq;
using Wexflow.Core;
namespace Wexflow.Tasks.MyTask
{
public class MyTask : Task
{
public MyTask(XElement xe, Workflow wf) : base(xe, wf)
{
// Initialize task settings from the XML element if needed.
// Example: string settingValue = GetSetting("mySetting");
}
public async override System.Threading.Tasks.Task RunAsync()
{
try
{
// Check for workflow cancellation at the start of execution.
// Always include this check in any long-running or looped logic.
Workflow.CancellationTokenSource.Token.ThrowIfCancellationRequested();
// Main task logic goes here.
Info("Running my custom task...");
// Simulate work using asynchronous delay.
await System.Threading.Tasks.Task.Delay(2000);
// Support workflow suspension. This call will block if the workflow is paused.
// Only call WaitOne if cancellation hasn't already been requested.
if (!Workflow.CancellationTokenSource.Token.IsCancellationRequested)
{
WaitOne();
}
// Return success when the task completes successfully
return new TaskStatus(Status.Success);
}
catch (OperationCanceledException)
{
// Don't suppress this exception; it allows proper workflow stop handling.
throw;
}
catch (Exception ex)
{
// Log unexpected errors and return error status.
ErrorFormat("An error occurred while executing the task.", ex);
return new TaskStatus(Status.Error);
}
}
}
}
```
## Logging
The following methods are available from the Task class for logging:
```cs
public void Info(string msg);
public void InfoFormat(string msg, params object[] args);
public void Debug(string msg);
public void DebugFormat(string msg, params object[] args);
public void Error(string msg);
public void ErrorFormat(string msg, params object[] args);
public void Error(string msg, Exception e);
public void ErrorFormat(string msg, Exception e, params object[] args);
```
## Files
Files can be loaded in a task by calling the methods `Add` or `AddRange`:
```cs
this.Files.Add(myFile);
this.Files.AddRange(myFiles);
```
Then the files loaded can be selected in other tasks by their task `Id` as follows:
```xml
```
To select the files loaded by the running instance of a workflow through the `selectFiles` settings option, you can do it as follows:
```csharp
FileInf[] files = this.SelectFiles();
```
## Entities
Entity is an abstract class having the `Id` of the task as property:
```cs
namespace Wexflow.Core
{
public abstract class Entity
{
public int TaskId { get; set; }
}
}
```
The `Entity` class is designed to be inherited by other classes such as objects retrieved from a database or a web service or an API or whatever. Then, these objects can be loaded in a task by calling the methods `Add` or `AddRange`:
```cs
this.Entities.Add(myEntity);
this.Entities.AddRange(myEntities);
```
Then, the entities loaded can be selected in other tasks by their task `Id` as follows:
```xml
```
Entities are designed to be used in custom tasks.
To select entities loaded by the running instance of a workflow through the `selectEntities` settings option, you can do it as follows:
```csharp
Entity[] entities = this.SelectEntities();
```
The `Entity` class could be very useful when working with custom tasks that manipulate objects from a database or Web Services for example.
## Shared Memory
Tasks contains a `Hashtable` that can be used as a shared memory between them.
To add an object to the `SharedMemory`, simply proceed as follows:
```cs
this.SharedMemory.Add("myKey", myObject);
```
To retrieve an object from the `SharedMemory`, simply proceed as follows:
```cs
var myObject = this.SharedMemory["myKey"];
```
To remove an object from the `SharedMemory`, simply proceed as follows:
```cs
this.SharedMemory.Remove("myKey");
```
**Important:** Always access `this.SharedMemory` in `RunAsync` or `Run` method of a task to get updated values at runtime.
## Designer Integration
### Registering the Task
To make your custom task `MyTask` appear in the available tasks in the designer, simply open the file `C:\Wexflow\TasksNames.json` and add `MyTask` in it as follows:
```js
[
...
{ "Name": "MyTask", "Description": "MyTask description."},
]
```
If you use the .NET 8.0+ version of Wexflow, you need to edit this file:
* **Windows**: `C:\Wexflow-netcore\TasksNames.json`
* **Linux**: `/opt/wexflow/Wexflow/TasksNames.json`
* **macOS**: `/Applications/wexflow/Wexflow/TasksNames.json`
### Adding Settings
You must also add the settings by opening the file `C:\Wexflow\TasksSettings.json` and adding your custom settings as follows:
```js
{
...
"MyTask": [ {"Name": "settingName", "Required": true, "Type": "string", "List": [], "DefaultValue": ""} ],
}
```
If you use the .NET 8.0+ version of Wexflow, you need to edit this file:
* **Windows**: `C:\Wexflow-netcore\TasksSettings.json`
* **Linux**: `/opt/wexflow/Wexflow/TasksSettings.json`
* **macOS**: `/Applications/wexflow/Wexflow/TasksSettings.json`
The available types are:
* `string`
* `int`
* `bool`
* `password`
* `list`
* `user`
* `record`
`user` type refers to registered users in Wexflow.
`record` type refers to registered records in Wexflow.
If you choose `list` type, you have to set the available list options. Here is an example:
```js
{
...
"MyTask": [ {"Name": "protocol", "Required": true, "Type": "list", "List": ["ftp", "ftps", "sftp"], "DefaultValue": ""} ],
}
```
That's it. `MyTask` will show up in the designer and when selected its settings will show up as well.
## How to Debug a Custom Task?
### 1. Build Your Task DLL in Debug Mode
* Compile your custom task project with Debug configuration.
* Make sure the .pdb symbol files are generated alongside the .dll.
* Copy both .dll and .pdb files to the Wexflow Tasks folder (e.g. C:\Wexflow-netcore\Tasks).
### 2. Attach Visual Studio Debugger to Wexflow Process
* Launch Wexflow server.
* In Visual Studio, go to Debug → Attach to Process...
* Find and select the Wexflow process:
* Enable **Show processes from all users**
* If you're running Wexflow as a Windows Service (legacy), make sure the service is started and select: `Wexflow.Server.exe`
* If you're running Wexflow as a Windows Service (stable via NSSM), make sure the service is started and select: `dotnet.exe` process that's running `Wexflow.Server.dll`.
* If you're running Wexflow from the command prompt using `dotnet Wexflow.Server.dll`, Find and select the `dotnet.exe` process that's running `Wexflow.Server.dll`.
* Click Attach.
### 3. Ensure Symbols (.pdb) Are Loaded
* After attaching, open Modules window (Debug → Windows → Modules).
* Locate your custom DLL (e.g. Wexflow.Tasks.MyTask.dll).
* Check if symbols are loaded:
* If not loaded, right-click the module → Load Symbols and browse to your .pdb file.
* Confirm the symbol path is correct and matches your DLL.
### 4. Set Breakpoints in Your Task Code
* Open your custom task source code in Visual Studio as Admin.
* Set breakpoints inside the `RunAsync` or `Run` methods or anywhere you want to debug.
### 5. Trigger Your Workflow
* Run the workflow that uses your custom task (via Designer or API).
* When execution reaches your breakpoint, Visual Studio will break.
### 6. Additional Tips
* Make sure your DLL in the Tasks folder is the same version you built and debugged.
* If debugging symbols don’t load automatically, try deleting older DLLs and PDBs before copying new ones.
* You can enable detailed logging inside your task with `Info()`, `Debug()`, and `Error()` calls for extra insights.
---
# Document: Docker
> Source: https://github.com/aelassas/wexflow/wiki/Docker
## Docker Hub
You can run Wexflow using Docker from the official image on Docker Hub:
```bash
docker run -d -p 8000:8000 --name wexflow aelassas/wexflow:latest
```
Then access the Wexflow Admin Panel at: http://localhost:8000
- **Username:** `admin`
- **Password:** `wexflow2018`
Using compose, here's a sample `docker-compose.yml`:
```yml
services:
wexflow:
image: aelassas/wexflow:latest
container_name: wexflow
ports:
- "8000:8000"
volumes:
# - ./wexflow-config/Wexflow.xml:/opt/wexflow/Wexflow/Wexflow.xml
# - ./wexflow-config/Database:/opt/wexflow/Wexflow/Database
# - ./wexflow-config/appsettings.json:/opt/wexflow/Wexflow.Server/appsettings.json
# - ./wexflow-config/settings.js:/opt/wexflow/Admin/js/settings.js
restart: unless-stopped
```
To run the compose:
```bash
docker compose up
```
For full Docker usage and available options, see the [Docker Hub page](https://hub.docker.com/r/aelassas/wexflow).
## Walkthroughs
* [Set up SSL in the Docker image](https://github.com/aelassas/wexflow/blob/main/src/docker/ssl-image.md)
* [Set up SSL with Docker Compose](https://github.com/aelassas/wexflow/blob/main/src/docker/ssl-compose.md)
* [Set up SSL with a gateway or reverse proxy](https://github.com/aelassas/wexflow/blob/main/src/docker/ssl-gateway.md)
* [Run Wexflow inside a Windows container](https://github.com/aelassas/wexflow/blob/main/src/docker/windows.md)
* [Change the default port](https://github.com/aelassas/wexflow/blob/main/src/docker/change-port.md)
## Build and Run Docker Image Locally
This section describes how build and run Wexflow Docker image.
* Download and unzip the latest version of [wexflow-x.x-linux-netcore.zip](https://github.com/aelassas/wexflow/releases/latest):
```bash
unzip wexflow-x.x-linux-netcore.zip
```
The folder **./wexflow/** will be created on your current folder.
* Download [Dockerfile and docker-compose.yml](https://github.com/aelassas/wexflow/tree/main/src/docker) files and copy them on your current folder (next to wexflow folder). The folder structure should be like this:
```
./
├── wexflow/
├── Dockerfile
├── docker-compose.yml
```
* Run the following command on your current folder:
```bash
docker compose up
```
The folder **./wexflow/** will be mounted during the compose at runtime so you can have access to **./wexflow/Wexflow** configuration folder and add custom tasks and their references at runtime, access log files and change the configuration if you want.
That's it Wexflow will start and the backend will be accessible from: http://localhost:8011/
If you've already deployed the Wexflow image and want to upgrade to a newer version, run the following commands to ensure you get all the latest updates:
```bash
docker compose build --no-cache
docker compose up
```
If you want to use MongoDB instead of SQLite, follow the instructions in [docker-compose.yml](https://github.com/aelassas/wexflow/blob/main/src/docker/docker-compose.yml) file.
---
# Document: EnvironmentVariable
> Source: https://github.com/aelassas/wexflow/wiki/EnvironmentVariable
```xml
```
---
# Document: ExecCs
> Source: https://github.com/aelassas/wexflow/wiki/ExecCs
```xml
```
---
# Document: ExecPython
> Source: https://github.com/aelassas/wexflow/wiki/ExecPython
```xml
```
---
# Document: ExecVb
> Source: https://github.com/aelassas/wexflow/wiki/ExecVb
```xml
```
---
# Document: FileContentMatch
> Source: https://github.com/aelassas/wexflow/wiki/FileContentMatch
```xml
```
---
# Document: FileExists
> Source: https://github.com/aelassas/wexflow/wiki/FileExists
```xml
```
---
# Document: FileMatch
> Source: https://github.com/aelassas/wexflow/wiki/FileMatch
```xml
```
---
# Document: FileNotExist
> Source: https://github.com/aelassas/wexflow/wiki/FileNotExist
```xml
```
Here is a sample workflow:
```xml
```
---
# Document: FileNotMatch
> Source: https://github.com/aelassas/wexflow/wiki/FileNotMatch
```xml
```
Here is a sample workflow:
```xml
```
---
# Document: FileSystemWatcher
> Source: https://github.com/aelassas/wexflow/wiki/FileSystemWatcher
```xml
```
---
# Document: FilesConcat
> Source: https://github.com/aelassas/wexflow/wiki/FilesConcat
```xml
```
---
# Document: FilesCopier
> Source: https://github.com/aelassas/wexflow/wiki/FilesCopier
```xml
```
---
# Document: FilesDecryptor
> Source: https://github.com/aelassas/wexflow/wiki/FilesDecryptor
```xml
```
---
# Document: FilesDiff
> Source: https://github.com/aelassas/wexflow/wiki/FilesDiff
```xml
```
---
# Document: FilesEncryptor
> Source: https://github.com/aelassas/wexflow/wiki/FilesEncryptor
```xml
```
---
# Document: FilesEqual
> Source: https://github.com/aelassas/wexflow/wiki/FilesEqual
```xml
```
---
# Document: FilesExist
> Source: https://github.com/aelassas/wexflow/wiki/FilesExist
```xml
```
---
# Document: FilesInfo
> Source: https://github.com/aelassas/wexflow/wiki/FilesInfo
```xml
```
---
# Document: FilesJoiner
> Source: https://github.com/aelassas/wexflow/wiki/FilesJoiner
```xml
```
---
# Document: FilesLoader
> Source: https://github.com/aelassas/wexflow/wiki/FilesLoader
```xml
```
---
# Document: FilesLoaderEx
> Source: https://github.com/aelassas/wexflow/wiki/FilesLoaderEx
```xml
-->
```
---
# Document: FilesMover
> Source: https://github.com/aelassas/wexflow/wiki/FilesMover
```xml
```
---
# Document: FilesRemover
> Source: https://github.com/aelassas/wexflow/wiki/FilesRemover
```xml
```
---
# Document: FilesRenamer
> Source: https://github.com/aelassas/wexflow/wiki/FilesRenamer
```xml
```
---
# Document: FilesSplitter
> Source: https://github.com/aelassas/wexflow/wiki/FilesSplitter
```xml
```
---
# Document: FolderExists
> Source: https://github.com/aelassas/wexflow/wiki/FolderExists
```xml
```
---
# Document: Fork, Customize, and Sync
> Source: https://github.com/aelassas/wexflow/wiki/Fork,-Customize,-and-Sync
This guide shows you how to fork the Wexflow repository, make your own changes, and keep your version up to date with the official repository.
## Table of Contents
1. [Fork the Repository](https://github.com/aelassas/wexflow/wiki/Fork,-Customize,-and-Sync#1-fork-the-repository)
2. [Clone Your Fork](https://github.com/aelassas/wexflow/wiki/Fork,-Customize,-and-Sync#2-clone-your-fork)
3. [Add Upstream Remote](https://github.com/aelassas/wexflow/wiki/Fork,-Customize,-and-Sync#3-add-upstream-remote)
4. [Sync Your Main Branch](https://github.com/aelassas/wexflow/wiki/Fork,-Customize,-and-Sync#4-sync-your-main-branch)
5. [Create a Feature Branch](https://github.com/aelassas/wexflow/wiki/Fork,-Customize,-and-Sync#5-create-a-feature-branch)
6. [Keep Your Feature Branch in Sync](https://github.com/aelassas/wexflow/wiki/Fork,-Customize,-and-Sync#6-keep-your-feature-branch-in-sync)
7. [Creating a Pull Request](https://github.com/aelassas/wexflow/wiki/Fork,-Customize,-and-Sync#7-creating-a-pull-request)
## 1. Fork the Repository
**Fork** the repository on GitHub:
[https://github.com/aelassas/wexflow](https://github.com/aelassas/wexflow)
## 2. Clone Your Fork
**Clone** your fork:
```bash
git clone https://github.com/your-username/wexflow.git
cd wexflow
```
## 3. Add Upstream Remote
**Add the original repository as an upstream remote**:
```bash
git remote add upstream https://github.com/aelassas/wexflow.git
```
## 4. Sync Your Main Branch
**Fetch the latest changes** from the original repo and **merge** them into your `main` branch:
```bash
git fetch upstream
git checkout main
git merge upstream/main
```
## 5. Create a Feature Branch
Create a new branch for your custom changes:
```bash
git checkout -b my-custom-feature
```
If you're just making small quick changes, working directly on `main` might be simpler initially. But for ongoing customization or multiple features, branching is the safer, cleaner approach.
## 6. Keep Your Feature Branch in Sync
To keep your custom branch in sync with the latest upstream `main`, do this regularly:
```bash
# Fetch upstream changes
git fetch upstream
# Switch to your main branch and update it
git checkout main
git merge upstream/main
# Switch back to your custom branch
git checkout my-custom-feature
# Merge the updated main into your branch
git merge main
```
This way, your feature branch stays up to date with the official repository without losing your changes.
## 7. Creating a Pull Request
If you've made changes to your fork and want to contribute them back to the official repository:
1. **Push your branch to your GitHub fork:**
```bash
git push origin my-custom-feature
```
2. Go to your fork on GitHub (e.g. `https://github.com/your-username/wexflow`) and you'll see a **"Compare & pull request"** button.
3. Click the button and create a pull request (PR) targeting the `main` branch of the original repository (`aelassas/wexflow`).
4. Include a clear title and description explaining what your PR changes or fixes.
Once submitted, your PR will be reviewed, and if everything looks good, it can be merged into the official repository.
---
# Document: Ftp
> Source: https://github.com/aelassas/wexflow/wiki/Ftp
```xml
```
---
# Document: Functions
> Source: https://github.com/aelassas/wexflow/wiki/Functions
You can use the following functions in your workflow:
* `$DateTime()`: returns the current Unix timestamp in milliseconds
* `$Guid()`: returns a new Guid
You can place these functions wherever you want in your workflow, in your local variables or in task settings.
Here is a sample workflow that uses these functions:
```xml
```
---
# Document: Getting Started
> Source: https://github.com/aelassas/wexflow/wiki/Getting-Started
Welcome to Wexflow! This guide will help you quickly understand how to start using Wexflow for workflow automation. Whether you are new to Wexflow or workflow automation in general, this guide will walk you through the basics step by step.
Wexflow is a powerful and flexible workflow engine that lets you create automated workflows easily. You can design workflows using a visual designer, write them in XML or JSON, and run them on your computer or server.
## Table of Contents
1. [Prerequisites](https://github.com/aelassas/wexflow/wiki/Getting-Started#prerequisites)
1. [Admin Panel Login](https://github.com/aelassas/wexflow/wiki/Getting-Started#admin-panel-login)
1. [Designer Overview](https://github.com/aelassas/wexflow/wiki/Getting-Started#designer-overview)
1. [Workflow Syntax](https://github.com/aelassas/wexflow/wiki/Getting-Started#workflow-syntax)
1. [Workflow Sample](https://github.com/aelassas/wexflow/wiki/Getting-Started#workflow-sample)
1. [Workflow Configuration](https://github.com/aelassas/wexflow/wiki/Getting-Started#workflow-configuration)
1. [Hot Reloading](https://github.com/aelassas/wexflow/wiki/Getting-Started#hot-reloading)
1. [How Tasks Communicate](https://github.com/aelassas/wexflow/wiki/Getting-Started#how-tasks-communicate)
1. [Wexflow Manager](https://github.com/aelassas/wexflow/wiki/Getting-Started#wexflow-manager)
1. [Admin Panel](https://github.com/aelassas/wexflow/wiki/Getting-Started#admin-panel)
1. [Login](https://github.com/aelassas/wexflow/wiki/Getting-Started#login)
1. [Password Reset](https://github.com/aelassas/wexflow/wiki/Getting-Started#password-reset)
1. [Dashboard](https://github.com/aelassas/wexflow/wiki/Getting-Started#dashboard)
1. [Workflow Manager](https://github.com/aelassas/wexflow/wiki/Getting-Started#workflow-manager)
1. [Workflow Designer](https://github.com/aelassas/wexflow/wiki/Getting-Started#workflow-designer)
1. [Approval](https://github.com/aelassas/wexflow/wiki/Getting-Started#approval)
1. [History](https://github.com/aelassas/wexflow/wiki/Getting-Started#history)
1. [Users](https://github.com/aelassas/wexflow/wiki/Getting-Started#users)
1. [Profiles](https://github.com/aelassas/wexflow/wiki/Getting-Started#profiles)
1. [Configuration](https://github.com/aelassas/wexflow/wiki/Getting-Started#configuration)
1. [.NET 4.8](https://github.com/aelassas/wexflow/wiki/Getting-Started#net-48)
1. [.NET 9.0+](https://github.com/aelassas/wexflow/wiki/Getting-Started#net-90)
## Prerequisites
Before you begin, make sure Wexflow is installed on your system.
You can find detailed installation instructions [here](https://github.com/aelassas/wexflow/wiki/Installing).
## Admin Panel Login
Once Wexflow is installed, you can access the admin panel at:
- **URL:** http://localhost:8000/
- **Username:** `admin`
- **Password:** `wexflow2018`
**Important:** For your security, change the default password after your first login.
## Designer Overview
Wexflow makes it easy to create automated workflows using different methods, depending on your preference or technical level.
You can design workflows in the following ways:
- **UI Designer**
This is a visual, drag-and-drop editor built into Wexflow’s web interface. It lets you create and manage workflows without writing any code. Ideal for beginners or users who prefer a user-friendly interface.
- **XML**
You can define workflows manually in XML files. This method gives you full control and flexibility over workflow configuration. It's great for developers or advanced users who want to customize workflows in detail.
- **JSON**
Similar to XML, but using JSON format. This is useful for users who are more comfortable with JSON syntax. It can also be used when integrating Wexflow into other systems or APIs that work with JSON.
Whether you choose the UI Designer or go with XML/JSON files, all workflows follow the same structure and logic. If you're just getting started, the UI Designer is a great place to begin!
## Workflow Syntax
### Workflow Sample
Understanding XML/JSON syntax is essential to mastering Wexflow.
Let's take a quick look at a simple example to understand how Wexflow works.
```xml
```
This sample workflow is named **"Sample"** and is designed to **load files from a folder and move them to another folder**. It consists of two tasks and is triggered manually.
#### Key Components
- **Workflow ID**: `1`
- **Name**: `Sample`
- **Launch Type**: `trigger` — This means the workflow runs manually (e.g., from Wexflow Manager or API).
- **Enabled**: `true` — The workflow is active.
- **Approval**: `false` — No manual approval is required.
- **Parallel Jobs**: `true` — Workflow jobs can run in parallel.
- **Retry Count**: `0` — Tasks won’t be retried on failure.
- **Retry Timeout**: `1500ms` — Time to wait between retries (if retry was enabled).
#### Tasks
1. **FilesLoader** (`id="1"`)
- **Description**: Loads files.
- **Action**: Reads all files from the folder `C:\Input\`.
2. **FilesMover** (`id="2"`)
- **Description**: Moves files.
- **Action**: Moves the files loaded by the first task into the folder `C:\Output\`.
- It uses the `selectFiles` setting to reference the output of Task 1.
##### Task Names
Each task in a workflow must use a valid task name recognized by Wexflow. These task names correspond to built-in or custom tasks that define the specific action to be performed (e.g., file operations, database queries, sending emails, etc.).
In the sample workflow above, we used two tasks:
- `FilesLoader`: loads files from a specified folder.
- `FilesMover`: moves files to another folder.
You can find the full list of available task names, along with their descriptions, required settings, and usage examples in the official documentation:
* [Wexflow Tasks Documentation](https://github.com/aelassas/wexflow/wiki/Tasks)
If you're building [custom tasks](https://github.com/aelassas/wexflow/wiki/Custom-Tasks), make sure to register them properly and use unique names to avoid conflicts.
> Tip: Use the `TasksNames.json` and `TasksSettings.json` files in the Wexflow configuration folder to customize task metadata used by the Designer UI.
#### What This Workflow Does
When triggered, Wexflow:
1. Loads all files from `C:\Input\`.
2. Passes them to the next task.
3. Moves them into `C:\Output\`.
This workflow illustrates the basics of Wexflow: defining a sequence of tasks, configuring settings, and running them in order.
It's a perfect starting point to understand how Wexflow automates file-based operations.
If you don't define an `` in a workflow, the tasks will run sequentially in the order they are listed. To create a custom execution flow, you can define an ``. This allows you to:
- Control the execution order of tasks.
- Use flowchart logic nodes such as `If`, `While`, and `Switch`.
- Nest flowchart nodes within each other to any depth.
- Handle events like `OnSuccess`, `OnWarning`, and `OnError` to run specific flows when the workflow ends.
These features let you build complex, dynamic workflows adapted to your specific requirements.
You can learn more about the Execution Graph [here](https://github.com/aelassas/Wexflow/wiki/Samples#execution-graph).
### Workflow Configuration
Below are all the configuration options of a workflow (XML):
```xml
```
For cron workflows, read the following [documentation](https://github.com/aelassas/Wexflow/wiki/Cron-Scheduling) for more details.
Local variables are explained [here](https://github.com/aelassas/Wexflow/wiki/Local-Variables).
Global variables are explained [here](https://github.com/aelassas/Wexflow/wiki/Global-Variables).
The name option of a Task must be one of the names listed in the following [documentation](https://github.com/aelassas/wexflow/wiki/Tasks). You can find the documentation of each task in the Documentation folder of Wexflow.
The execution graph is explained in the [samples section](https://github.com/aelassas/Wexflow/wiki/Samples#execution-graph).
To learn how to make your own workflows, you can check out the workflow samples availabe in the Designer, in the [samples](https://github.com/aelassas/Wexflow/wiki/Samples) section, and read the tasks documentation available in Configuration folder.
### Hot Reloading
Wexflow detects changes and automatically adds, deletes, or reloads workflows. No service restart required.
To disable a workflow, set:
```xml
```
Wexflow supports hot reloading from a default folder called `Workflows` if you want to work with XML files without using the Designer. If the setting [EnableWorkflowsHotFolder](https://github.com/aelassas/wexflow/wiki/Configuration) is enabled in the configuration file, any XML placed in the `Workflows` folder will be automatically picked up by Wexflow. This allows you to create, update, or remove workflows on the fly by simply editing files in that folder — no need to restart the service or reload manually.
### How Tasks Communicate
State is transferred between tasks through `selectFiles` and `selectEntities` settings.
This works the following way:
1. A task in a workflow does its job and produces files which it stores in a collection.
2. Another task (must be in the same workflow) can afterwards reference those files with the `selectFiles` XML property, specifying the ID of the task that produced the required files. It then can use these files to do its own job.
More visually (from the examples):
```xml
```
`selectFiles` can also load files through custom tags. Refer to [Xslt](https://github.com/aelassas/wexflow/wiki/Xslt) task for this.
`selectEntities` setting works the same way as `selectFiles`. The only difference is that `selectEntities` is designed to be used for tasks that manipulate custom objects from a database or web services in custom tasks. To go further, read this [documentation](https://github.com/aelassas/Wexflow/wiki/Custom-tasks#entities) regarding entities.
## Wexflow Manager

When you open Wexflow Manager for the first time, you will get a login window.
Here are the credentials to sign in:
- **Username**: admin
- **Password**: wexflow2018
You can change the password from the admin panel.
Wexflow Manager is a simple application that allows you to do the following things:
- See all the workflows loaded by Wexflow Engine.
- See the status of the selected workflow (running, suspended, waiting for approval or disabled).
- Start a workflow.
- Stop a workflow.
- Suspend a workflow.
- Resume a workflow.
- Approve an approval workflow.
- Reject an approval workflow.
- The "Backend" button opens the admin panel from which you can manage workflows, design workflows, track workfows and have real-time statistics on workflows.
- The "Logs" button allows to view the logs of the day.
- The "Refresh" button allows to reload the list of workflows.
- The "Restart server" button allows to restart Wexflow Server.
- The "Search" button allows to search for workflows.
- The "Help" menu opens the help page.
- The "About" menu shows the version of Wexflow and checks if a new version is available.
To see what's going on in Wexflow, open the log file C:\Program Files\Wexflow\Wexflow.log in a text editor like [Notepad++](https://notepad-plus-plus.org/). Notepad ++ will update the log file as it fills up.
## Admin Panel
The admin panel is accessible at: http://localhost:8000
The admin panel gives real-time statistics on workflows. It will let you manage, design and track your workflows with ease and flexibility. You can use the admin panel to access, configure, manage, administer, and develop your workflows with ease.
### Login
When you open the admin panel for the first time, you will get a login window.
Here are the credentials to sign in:
- **Username**: admin
- **Password**: wexflow2018
After you sign in, you can change the password from the "Users" page.
### Password reset
If a user forgot his password, he can click on "Forgot password?" link to reset his password.
When the user clicks on "Submit" button, an email is sent to him with a temporary password that he can change after he signs in.
To allow the admin panel sending emails, the SMPT configuration must be set in the [configuration](https://github.com/aelassas/wexflow/wiki/Configuration).
### Dashboard
After you sign in, you will arrive on the dashboard page. Wexflow gives you a beautiful dashboard to view real-time statistics on your workflows. Indeed, the "Dashboard" page gives you real-time statistics on workflows and will let you track your workflow server with ease and detail. From the dashboard, you can also filter the workflow entries by a keyword or by date. You can also order the workflow entries by date, by name, etc.
### Workflow Manager

The "Manager" page will let you manage your workflows. From this page you can start a workflow, suspend a running workflow, resume a suspended workflow, stop a running workflow and search for workflows.
### Workflow Designer

The "Designer" page will let you design your workflows. From this page you can create a new workflow, edit an existing workflow or delete a workflow. Using the "Designer" page, we get a nice visual overview of the dependency graph of the workflow. Each node represents a task which has to be run.
Furthermore, the "Designer" page allows to edit workflow files through its Web XML or JSON editor.
Press **Ctrl+S** to save your workflow.
Press **Ctrl+Alt+H** in XML or JSON view for keyboard shortcuts.
### Approval
The "Approval" page will let you view all approval workflows and will let you approve or disapprove workflows.
### History

The "History" page will let you track all your workflows and everything that happens on the workflow server.From this page you will have an overview of all the workflow instances executed on the workflow server. Furthermore, you can filter the entries by keywords or date. You can also order the entries by date, by name, etc.
### Users
The "Users" page allows to create new users, change passwords and user's informations, and delete users who have restricted access.
A user who has restricted rights has only access to the "Dashboard" page and the "History" page.
### Profiles
The "Profiles" page allows to assign workflows to users. Once the workflow assigned, the user can run it, modify it and delete it.
## Configuration
Wexflow works out of the box with **zero configuration**. You can install it and start running workflows immediately.
However, if you want to customize the behavior of the engine or environment, it’s helpful to know where the configuration files are and what they do. Below is an overview for both .NET 4.8 and .NET 9.0+ versions.
### .NET 4.8
When installing Wexflow on .NET 4.8, the following folders are created:
- `C:\Wexflow\` — Main configuration folder
- `C:\WexflowTesting\` — Contains test data for workflows
Contents of `C:\Wexflow\`:
- **[Wexflow.xml](https://github.com/aelassas/wexflow/wiki/Configuration#wexflowxml)**
Main configuration file of the Wexflow server. Its path can be customized in
`C:\Program Files\Wexflow\Wexflow.Server.exe.config`.
- **Database/**
Contains the internal database used by the Wexflow engine.
- **Workflows/**
Default folder for workflows. Used for hot reloading if
[`EnableWorkflowsHotFolder`](https://github.com/aelassas/wexflow/wiki/Configuration) is enabled.
- **Temp/**
Temporary working directory.
- **Tasks/** *(optional)*
Can contain `.dll` files for [custom tasks](https://github.com/aelassas/Wexflow/wiki/Custom-tasks).
- **Workflow.xsd**
XML Schema Definition file for validating workflows.
- **GlobalVariables.xml**
Stores [global variables](https://github.com/aelassas/Wexflow/wiki/Global-variables) accessible across workflows.
- **TasksNames.json**
Maps task names for use in the Designer interface. Refer to
[Tasks documentation](https://github.com/aelassas/Wexflow/wiki/Tasks-documentation).
- **TasksSettings.json**
Defines default task settings used by the Designer.
Log files:
- Daily logs are written to `C:\Program Files\Wexflow\Wexflow.log`.
- Archived logs follow this pattern: `Wexflow.logyyyyMMdd`.
### .NET 9.0+
On .NET 9.0+, Wexflow supports **cross-platform configuration**:
#### Windows
- Folders:
`C:\Wexflow-dotnet-core\` and `C:\WexflowTesting\`
- Main config:
`C:\Wexflow-dotnet-core\Wexflow.xml` (configured via `Wexflow.Server\appsettings.json`)
- Logs:
Written to `Wexflow.Server\Wexflow.log`
#### Linux
- Folders:
`/opt/wexflow/Wexflow/` and `/opt/wexflow/WexflowTesting/`
- Main config:
`/opt/wexflow/Wexflow/Wexflow.xml` (configured via `/opt/wexflow/Wexflow.Server/appsettings.json`)
- Logs:
Written to `/opt/wexflow/Wexflow.Server/Wexflow.log`
#### macOS
- Folders:
`/Applications/wexflow/Wexflow/` and `/Applications/wexflow/WexflowTesting/`
- Main config:
`/Applications/wexflow/Wexflow/Wexflow.xml` (configured via `/Applications/wexflow/Wexflow.Server/appsettings.json`)
- Logs:
Written to `/Applications/wexflow/Wexflow.Server/Wexflow.log`
For advanced setup, see the full [Configuration documentation](https://github.com/aelassas/Wexflow/wiki/Configuration).
---
# Document: Global Variables
> Source: https://github.com/aelassas/wexflow/wiki/Global-Variables
Global variables are declared by default in the file C:\Wexflow\GlobalVariables.xml
The path of this file can be edited from the configuration file C:\Wexflow\Wexflow.xml
Here is an example of GlobalVariables.xml:
```xml
```
The variables can then be used in workflow files as follow:
```xml
```
When Wexflow server loads the workflow file, the workflow file is parsed so that the global variables are replaced by their values.
---
# Document: Go Client
> Source: https://github.com/aelassas/wexflow/wiki/Go-Client
## Prerequisites
* Install [Go](https://go.dev/)
## Client Sample
Here is a sample Go client `client.go`:
```go
package main
import (
"bytes"
"encoding/json"
"fmt"
"io"
"log"
"net/http"
)
const (
baseURL = "http://localhost:8000/api/v1"
username = "admin"
password = "wexflow2018"
workflowId = 41
)
type loginRequest struct {
Username string `json:"username"`
Password string `json:"password"`
StayConnected bool `json:"stayConnected"`
}
type loginResponse struct {
AccessToken string `json:"access_token"`
}
func login(user, pass string, stayConnected bool) (string, error) {
payload := loginRequest{
Username: user,
Password: pass,
StayConnected: stayConnected,
}
data, err := json.Marshal(payload)
if err != nil {
return "", fmt.Errorf("failed to marshal login request: %w", err)
}
resp, err := http.Post(baseURL+"/login", "application/json", bytes.NewBuffer(data))
if err != nil {
return "", fmt.Errorf("failed to send login request: %w", err)
}
defer resp.Body.Close()
if resp.StatusCode != http.StatusOK {
return "", fmt.Errorf("login failed: HTTP %d %s", resp.StatusCode, resp.Status)
}
var result loginResponse
if err := json.NewDecoder(resp.Body).Decode(&result); err != nil {
return "", fmt.Errorf("failed to decode login response: %w", err)
}
return result.AccessToken, nil
}
func startWorkflow(token string, id int) (string, error) {
url := fmt.Sprintf("%s/start?w=%d", baseURL, id)
req, err := http.NewRequest("POST", url, nil)
if err != nil {
return "", fmt.Errorf("failed to create start request: %w", err)
}
req.Header.Set("Authorization", "Bearer "+token)
client := &http.Client{}
resp, err := client.Do(req)
if err != nil {
return "", fmt.Errorf("failed to send start request: %w", err)
}
defer resp.Body.Close()
if resp.StatusCode != http.StatusOK {
return "", fmt.Errorf("start failed: HTTP %d %s", resp.StatusCode, resp.Status)
}
body, err := io.ReadAll(resp.Body)
if err != nil {
return "", fmt.Errorf("failed to read start response: %w", err)
}
return string(body), nil
}
func main() {
token, err := login(username, password, false)
if err != nil {
log.Fatalf("Login failed: %v", err)
}
jobID, err := startWorkflow(token, workflowId)
if err != nil {
log.Fatalf("Failed to start workflow %d: %v", workflowId, err)
}
fmt.Printf("Workflow %d started successfully. Job ID: %s\n", workflowId, jobID)
}
```
To run the client, use the following command:
```bash
go run client.go
```
---
# Document: Go SSE Client
> Source: https://github.com/aelassas/wexflow/wiki/Go-SSE-Client
## Prerequisites
* Install [Go](https://go.dev/)
## Client Sample
Here is a sample SSE Go client `sse.go`:
```go
package main
import (
"bufio"
"bytes"
"encoding/json"
"fmt"
"io"
"net/http"
)
const (
baseURL = "http://localhost:8000/api/v1"
username = "admin"
password = "wexflow2018"
workflowId = 41
)
type LoginResponse struct {
AccessToken string `json:"access_token"`
}
func login(user, pass string, stayConnected bool) (string, error) {
payload := map[string]interface{}{
"username": user,
"password": pass,
"stayConnected": stayConnected,
}
body, _ := json.Marshal(payload)
req, err := http.NewRequest("POST", baseURL+"/login", bytes.NewBuffer(body))
if err != nil {
return "", err
}
req.Header.Set("Content-Type", "application/json")
client := &http.Client{}
resp, err := client.Do(req)
if err != nil {
return "", err
}
defer resp.Body.Close()
if resp.StatusCode != http.StatusOK {
return "", fmt.Errorf("login failed: %s", resp.Status)
}
var result LoginResponse
if err := json.NewDecoder(resp.Body).Decode(&result); err != nil {
return "", err
}
return result.AccessToken, nil
}
func startWorkflow(token string, workflowId int) (string, error) {
url := fmt.Sprintf("%s/start?w=%d", baseURL, workflowId)
req, err := http.NewRequest("POST", url, nil)
if err != nil {
return "", err
}
req.Header.Set("Authorization", "Bearer "+token)
client := &http.Client{}
resp, err := client.Do(req)
if err != nil {
return "", err
}
defer resp.Body.Close()
if resp.StatusCode != http.StatusOK {
return "", fmt.Errorf("start workflow failed: %s", resp.Status)
}
var jobId string
if err := json.NewDecoder(resp.Body).Decode(&jobId); err != nil {
return "", err
}
return jobId, nil
}
func listenToSSE(url, token string) error {
req, err := http.NewRequest("GET", url, nil)
if err != nil {
return err
}
req.Header.Set("Accept", "text/event-stream")
req.Header.Set("Authorization", "Bearer "+token)
client := &http.Client{}
resp, err := client.Do(req)
if err != nil {
return err
}
defer resp.Body.Close()
fmt.Println("SSE connection opened")
reader := bufio.NewReader(resp.Body)
for {
line, err := reader.ReadString('\n')
if err == io.EOF {
break
}
if err != nil {
return fmt.Errorf("error reading SSE: %v", err)
}
if len(line) > 6 && line[:6] == "data: " {
data := line[6:]
var parsed map[string]interface{}
if err := json.Unmarshal([]byte(data), &parsed); err != nil {
fmt.Println("Failed to parse SSE JSON:", err)
} else {
fmt.Println("Received SSE JSON:")
out, _ := json.MarshalIndent(parsed, "", " ")
fmt.Println(string(out))
}
break // Close after first SSE event
}
}
fmt.Println("SSE connection closed")
return nil
}
func main() {
token, err := login(username, password, false)
if err != nil {
fmt.Println("Login error:", err)
return
}
jobId, err := startWorkflow(token, workflowId)
if err != nil {
fmt.Println("Start workflow error:", err)
return
}
fmt.Printf("Workflow %d started. Job ID: %s\n", workflowId, jobId)
sseUrl := fmt.Sprintf("%s/sse/%d/%s", baseURL, workflowId, jobId)
if err := listenToSSE(sseUrl, token); err != nil {
fmt.Println("SSE error:", err)
}
}
```
To run the client, use the following command:
```bash
go run sse.go
```
---
# Document: Guid
> Source: https://github.com/aelassas/wexflow/wiki/Guid
```xml
```
---
# Document: Home
> Source: https://github.com/aelassas/wexflow/wiki/Home
Wexflow is a workflow automation engine that supports a wide range of tasks, from file operations and system processes to scripting, networking, and more. Wexflow targets both developers and technical users who need automation (file ops, tasks, scheduling, alerts, etc.). Wexflow focuses on automating technical jobs like moving or uploading files, sending emails, running scripts, or scheduling batch processes. For more complex scenarios, you can create your own custom activities, install them, and use them to extend its capabilities.
Use the sidebar to browse installation guides, configuration options, and more.
## Is Wexflow a Business Process Management Solution?
Wexflow is primarily a workflow automation engine, not a full BPM suite. Wexflow does not natively support BPMN, human workflows, or built-in user forms. So if your business processes require a lot of human interaction, approvals, or business rule evaluation, Wexflow would be limited.
Wexflow excels at automating technical tasks, such as moving or transforming files, uploading to FTP/SFTP, running scripts (PowerShell, Bash, Python, etc.), scheduling and chaining tasks, triggering workflows by events, manual input, cron or watchfolders, designing flows visually (Designer UI), integrating with APIs and databases, supporting conditional logic (if/else, switch, while).
You can use Wexflow if your processes are mostly system-based, such as back-office automation (file syncing, reporting, monitoring), ETL pipelines, DevOps or IT operations automation or API integrations between systems.
---
# Document: HtmlToPdf
> Source: https://github.com/aelassas/wexflow/wiki/HtmlToPdf
```xml
```
---
# Document: HtmlToText
> Source: https://github.com/aelassas/wexflow/wiki/HtmlToText
```xml
```
---
# Document: Http
> Source: https://github.com/aelassas/wexflow/wiki/Http
```xml
```
---
# Document: HttpDelete
> Source: https://github.com/aelassas/wexflow/wiki/HttpDelete
```xml
```
---
# Document: HttpGet
> Source: https://github.com/aelassas/wexflow/wiki/HttpGet
```xml
```
---
# Document: HttpPatch
> Source: https://github.com/aelassas/wexflow/wiki/HttpPatch
```xml
```
---
# Document: HttpPost
> Source: https://github.com/aelassas/wexflow/wiki/HttpPost
```xml
```
---
# Document: HttpPut
> Source: https://github.com/aelassas/wexflow/wiki/HttpPut
```xml
```
---
# Document: ImagesConcat
> Source: https://github.com/aelassas/wexflow/wiki/ImagesConcat
```xml
```
---
# Document: ImagesCropper
> Source: https://github.com/aelassas/wexflow/wiki/ImagesCropper
```xml
```
---
# Document: ImagesOverlay
> Source: https://github.com/aelassas/wexflow/wiki/ImagesOverlay
```xml
```
---
# Document: ImagesResizer
> Source: https://github.com/aelassas/wexflow/wiki/ImagesResizer
```xml
```
---
# Document: ImagesTransformer
> Source: https://github.com/aelassas/wexflow/wiki/ImagesTransformer
```xml
```
---
# Document: InstagramUploadImage
> Source: https://github.com/aelassas/wexflow/wiki/InstagramUploadImage
```xml
```
---
# Document: InstagramUploadVideo
> Source: https://github.com/aelassas/wexflow/wiki/InstagramUploadVideo
```xml
```
---
# Document: Installing
> Source: https://github.com/aelassas/wexflow/wiki/Installing
Wexflow is easy to install and requires zero configuration. It can be installed and configured in just a few minutes.
This section explains how to install Wexflow on Windows, Linux, and macOS.
## Table of Contents
1. [Windows (.NET 4.8 - Legacy)](https://github.com/aelassas/wexflow/wiki/Installing#windows-net-48---legacy)
1. [Installation Instructions](https://github.com/aelassas/wexflow/wiki/Installing#installation-instructions)
1. [Windows (.NET 10.0+ - Stable)](https://github.com/aelassas/wexflow/wiki/Installing#windows-net-100---stable)
1. [Accessing the Admin Panel](https://github.com/aelassas/wexflow/wiki/Installing#accessing-the-admin-panel)
1. [Configuration](https://github.com/aelassas/wexflow/wiki/Installing#configuration)
1. [Running Wexflow as a Windows Service using Servy/NSSM](https://github.com/aelassas/wexflow/wiki/Installing#running-wexflow-as-a-windows-service-using-servynssm)
1. [Deleting the Wexflow Windows Service](https://github.com/aelassas/wexflow/wiki/Installing#deleting-the-wexflow-windows-service)
1. [Linux (.NET 10.0+ - Stable)](https://github.com/aelassas/wexflow/wiki/Installing#linux-net-100---stable)
1. [Installing the Admin Panel on NGINX](https://github.com/aelassas/wexflow/wiki/Installing#installing-the-admin-panel-on-nginx)
1. [Installing the Admin Panel on Apache2](https://github.com/aelassas/wexflow/wiki/Installing#installing-the-admin-panel-on-apache2)
1. [MongoDB Configuration](https://github.com/aelassas/wexflow/wiki/Installing#mongodb-configuration)
1. [Updating Wexflow](https://github.com/aelassas/wexflow/wiki/Installing#updating-wexflow)
1. [macOS (.NET 10.0+ - Stable)](https://github.com/aelassas/wexflow/wiki/Installing#macos-net-100---stable)
1. [Installing the Admin Panel on a Web Server](https://github.com/aelassas/wexflow/wiki/Installing#installing-the-admin-panel-on-a-web-server)
1. [.NET 4.8](https://github.com/aelassas/wexflow/wiki/Installing#net-48---legacy)
1. [.NET 10.0+](https://github.com/aelassas/wexflow/wiki/Installing#net-90---stable)
## Windows (.NET 4.8 - Legacy)
You can install Wexflow as a Windows Service (targeting .NET Framework 4.8) using one of the following [installers](https://github.com/aelassas/wexflow/releases/latest):
* wexflow-x.x-windows-x64.exe (64-bit)
* wexflow-x.x-windows-x86.exe (32-bit)
### Installation Instructions
1. Install [.NET Framework 4.8](https://dotnet.microsoft.com/en-us/download/dotnet-framework/net48)
1. Download the latest release of Wexflow
1. Right click on the installer, click on properties, check **Unblock** then click OK.
1. Launch the installer and follow the instructions
After installation, a Windows Service named Wexflow is installed and starts automatically.
The following menus are added in the start menu:
* The "Admin Panel" menu opens the Admin Panel.
* The "Configuration" menu opens the configuration folder of Wexflow.
* The "Documentation" menu opens the documentation folder of Wexflow.
* The "Logs" menu opens the log file of the day.
* The "Manager" menu opens Wexflow Manager GUI.
* The "Install SQLite samples" menu installs SQLite workflow samples.
* The "Install MongoDB samples" menu installs MongoDB workflow samples.
* The "Install SQL Server samples" menu installs SQL Server workflow samples.
* The "Install PostgreSQL samples" menu installs PostgreSQL workflow samples.
* The "Install MySQL samples" menu installs MySQL workflow samples.
* The "Install LiteDB samples" menu installs LiteDB workflow samples.
* The "Install Oracle samples" menu installs Oracle workflow samples.
The admin panel is accessible at: http://localhost:8000/
You can sign in to the admin panel or [Wexflow Manager](https://github.com/aelassas/wexflow/wiki/Getting-Started#wexflow-manager) using the following credentials:
* **Username**: admin
* **Password**: wexflow2018
Once logged in, you can change the password via the Admin Panel.
You can choose from [6 persistence providers](https://github.com/aelassas/wexflow/wiki/Persistence-Providers):
* SQLite (Default)
* MongoDB
* SQLServer
* PostgreSQL
* MySQL
* LiteDB
See [configuration page](https://github.com/aelassas/wexflow/wiki/Configuration#wexflowxml) to see how to change the persistence provider.
## Windows (.NET 10.0+ - Stable)
Follow these steps to run Wexflow using the .NET 10.0+ version on Windows:
1. Install [ASP.NET 10.0 Runtime](https://dotnet.microsoft.com/en-us/download/dotnet/10.0)
1. Download and extract the latest [Wexflow's .NET 10.0+ package](https://github.com/aelassas/wexflow/releases/latest) (wexflow-x.x-windows-netcore.zip)
1. Double-click on `install.bat` to install the configuration files (the database will **not** be overwritten).
That's it! To start the Wexflow workflow server, simply double-click on `run.bat`.
### Accessing the Admin Panel
Once the server is running, the admin panel will be accessible at: http://localhost:8000/
You can sign in to the admin panel using the following credentials:
* **Username**: admin
* **Password**: wexflow2018
### Configuration
You can find detailed instructions about configuration [here](https://github.com/aelassas/wexflow/wiki/Configuration#net-core).
### Running Wexflow as a Windows Service using Servy/NSSM
If you want to run Wexflow as a Windows Service (.NET 10.0+), it is recommended to use [Servy](https://servy-win.github.io/) or [NSSM (Non-Sucking Service Manager)](https://nssm.cc/). Both tools offer improved control over service startup behavior and working directories.
#### Installing the Service
First, [Download Wexflow .NET 10.0+ package](https://github.com/aelassas/wexflow/releases/latest) (wexflow-x.x-windows-netcore.zip), extract it to `C:\Program Files\Wexflow Server\`.
##### Servy
1. Download and install [Servy](https://servy-win.github.io/)
1. Open Servy
1. In the Servy GUI:
* **Service Name**: WexflowServer
* **Service Description**: Wexflow Workflow Automation Engine
* **Process path**: `C:\Program Files\dotnet\dotnet.exe`
* **Startup Directory**: `C:\Program Files\Wexflow Server\Wexflow.Server\`
* **Process Parameters**: `Wexflow.Server.dll`
1. Click **Install**
##### NSSM
1. [Download NSSM](https://nssm.cc/download), extract it to `C:\Program Files\nssm` and add `C:\Program Files\nssm\win64\` to your `PATH` environment variable
1. Open an elevated Command Prompt (Run as Administrator).
1. Run the following command to install the service:
```cmd
nssm install WexflowServer
```
1. In the NSSM GUI:
* **Application path**: `C:\Program Files\dotnet\dotnet.exe`
* **Arguments**: `Wexflow.Server.dll`
* **Startup directory**: `C:\Program Files\Wexflow Server\Wexflow.Server\`
1. Click **Install service**.
1. Set the service description (optional but recommended):
```cmd
sc description WexflowServer "Wexflow Workflow Automation Engine"
```
1. Start the service:
```cmd
nssm start WexflowServer
```
Once started, the Wexflow admin panel will be accessible at:
* **URL**: http://localhost:8000/
* **Username**: admin
* **Password**: wexflow2018
##### Deleting the Wexflow Windows Service
To remove the Wexflow Windows service installed with NSSM:
1. Stop the service:
```cmd
nssm stop WexflowServer
```
1. Remove the service:
```cmd
nssm remove WexflowServer confirm
```
## Linux (.NET 10.0+ - Stable)
**Note:** Installing systemd services, modifying permissions, and firewall rules on Linux require root or sudo privileges. Use `sudo` as needed when running commands.
Follow these steps to run Wexflow using the .NET 10.0+ version on Linux:
1. Download and install [ASP.NET 10.0 Runtime](https://dotnet.microsoft.com/en-us/download/dotnet/10.0)
1. Download and extract [Wexflow's .NET 10.0+ package](https://github.com/aelassas/wexflow/releases/latest) (wexflow-x.x-windows-linux.zip) in `/opt/`
1. Add permissions:
```bash
sudo chown -R $USER:$USER /opt/wexflow
sudo chmod +x /opt/wexflow/install.sh
```
1. Install wexflow systemd service:
```bash
sudo /opt/wexflow/install.sh
```
Wexflow is now installed and the admin panel will be accessible at: http://localhost:8000/
You can sign in to the admin panel using the following credentials:
* **Username**: admin
* **Password**: wexflow2018
### Installing the Admin Panel on NGINX
The admin panel is self-hosted and directly accessible at http://localhost:8000/ when you install wexflow.
However, if you want to install it on NGINX, follow these steps:
First, install NGINX:
```bash
sudo apt update
sudo apt install nginx-full
```
Then, add the admin panel to NGINX:
```bash
sudo nano /etc/nginx/sites-enabled/default
```
Add the following configuration:
```nginx
server {
listen 8011;
root /opt/wexflow/Admin;
index index.html;
access_log /var/log/nginx/wexflow.access.log;
error_log /var/log/nginx/wexflow.error.log;
location / {
# First attempt to serve request as file, then as directory,
# then as index.html, then fall back to displaying a 404.
try_files $uri $uri/ /index.html =404;
}
}
```
Check NGINX configuration and if it is successful restart NGINX:
```bash
sudo nginx -t
sudo systemctl restart nginx.service
```
That's it! the admin panel is installed and accessible from: http://\:8011
### Installing the Admin Panel on Apache2
To install the admin panel on Apache instead of NGINX, install apache2:
```bash
sudo apt update
sudo apt install apache2
```
Create a new site:
```bash
sudo nano /etc/apache2/sites-enabled/wexflow.conf
```
With the following content:
```apache
Listen 8011
# The ServerName directive sets the request scheme, hostname and port that
# the server uses to identify itself. This is used when creating
# redirection URLs. In the context of virtual hosts, the ServerName
# specifies what hostname must appear in the request's Host: header to
# match this virtual host. For the default virtual host (this file) this
# value is not decisive as it is used as a last resort host regardless.
# However, you must set it for any further virtual host explicitly.
#ServerName www.example.com
ServerAdmin webmaster@localhost
DocumentRoot /opt/wexflow/Admin
DirectoryIndex index.html
AllowOverride All
Require all granted
# Available loglevels: trace8, ..., trace1, debug, info, notice, warn,
# error, crit, alert, emerg.
# It is also possible to configure the loglevel for particular
# modules, e.g.
#LogLevel info ssl:warn
ErrorLog ${APACHE_LOG_DIR}/error.log
CustomLog ${APACHE_LOG_DIR}/access.log combined
# For most configuration files from conf-available/, which are
# enabled or disabled at a global level, it is possible to
# include a line for only one particular virtual host. For example the
# following line enables the CGI configuration for this host only
# after it has been globally disabled with "a2disconf".
#Include conf-available/serve-cgi-bin.conf
# vim: syntax=apache ts=4 sw=4 sts=4 sr noet
```
Enable the new site and reload apache2:
```bash
sudo a2ensite wexflow.conf
sudo systemctl reload apache2
```
If you want to install the admin panel on a web server, you'll need to edit the configuration file `js/settings.js`. Check out this [section](https://github.com/aelassas/wexflow/wiki/Installing#installing-the-admin-panel-on-a-web-server) for full guideline.
### MongoDB Configuration
To use MongoDB [persistence provider](https://github.com/aelassas/wexflow/wiki/Persistence-Providers), update `/opt/wexflow/wexflow.service` file as follows:
```
[Unit]
Description=wexflow
Wants=mongod.service
After=mongod.service
[Service]
ExecStart=/usr/bin/dotnet Wexflow.Server.dll
WorkingDirectory=/opt/wexflow/Wexflow.Server
[Install]
WantedBy=multi-user.target
```
Then, run `install.sh` again:
```bash
sudo /opt/wexflow/install.sh
```
If you want to use SQLServer, MySQL or PostgreSQL persistence provider, make sure to update `Wants=` and `After=` options with the matching services.
If you want to update Wexflow to a newer version, proceed as follows:
1. Backup `Wexflow` folder `/opt/wexflow/Wexflow`
1. Remove /opt/wexflow
1. Download and extract [Wexflow's .NET package](https://github.com/aelassas/wexflow/releases/latest) in /opt/
1. Copy `Wexflow` folder that you have saved in /opt/wexflow
1. Add permissions:
```bash
sudo chown -R $USER:$USER /opt/wexflow
sudo chmod +x /opt/wexflow/install.sh
```
1. Update and restart wexflow systemd service:
```bash
sudo /opt/wexflow/install.sh
```
That's it. Wexflow is updated.
For SQL Server, MySQL, or PostgreSQL adjust the `Wants=` and `After=` fields with the corresponding service names.
## Updating Wexflow
To update Wexflow to a newer version, follow these steps:
1. **Back up the existing `Wexflow` folder:**
```bash
cp -r /opt/wexflow/Wexflow ~/Wexflow-backup
```
1. **Remove the current Wexflow installation:**
```bash
sudo rm -rf /opt/wexflow
```
1. **Download and extract the latest [Wexflow .NET Linux package](https://github.com/aelassas/wexflow/releases/latest) into `/opt/`:**
```bash
cd /opt
# download and extract wexflow-x.x-linux-netcore.zip
```
1. **Restore the backed-up `Wexflow` folder:**
```bash
mv ~/Wexflow-backup /opt/wexflow/Wexflow
```
1. **Set the correct permissions:**
```bash
sudo chown -R $USER:$USER /opt/wexflow
sudo chmod +x /opt/wexflow/install.sh
```
1. **Reinstall and restart the systemd service:**
```bash
sudo /opt/wexflow/install.sh
```
Wexflow is now updated and running.
## macOS (.NET 10.0+ - Stable)
Follow these steps to run Wexflow using the .NET 10.0+ version on macOS:
1. Download and install [ASP.NET 10.0 Runtime](https://dotnet.microsoft.com/en-us/download/dotnet/10.0)
1. Download and extract [Wexflow's .NET package](https://github.com/aelassas/wexflow/releases/latest) (wexflow-x.x-macos-netcore.zip) in `/Applications/`
That's it. You can run Wexflow as follows:
```bash
cd /Applications/wexflow/Wexflow.Server
dotnet Wexflow.Server.dll
```
You can open the admin panel at: http://localhost:8000/
You can sign in using the following credentials:
* **Username**: admin
* **Password**: wexflow2018
## Installing the Admin Panel on a Web Server
The admin panel is self-hosted and by default accessible at: http://localhost:8000/
You can also host it on any web server.
### .NET 4.8 - Legacy
To install the admin panel on a web server:
1. Copy the contents of the folder `C:\Program Files\Wexflow\Admin\` to your web server's root or desired directory.
1. If you're hosting the backend (Wexflow server) on a different machine, update the configuration file `js/settings.js` as follows:
```js
window.Settings = (function () {
// Get the current hostname or fallback to 'localhost'
const hostname = window.location.hostname === "" ? "localhost" : window.location.hostname;
// Default Wexflow backend port
const port = 8000;
// Use current protocol (http or https)
const protocol = `${window.location.protocol}//`;
return {
Hostname: hostname,
Port: port,
Uri: `${protocol}${hostname}:${port}/api/v1/`,
/**
* To enable Server-Sent Events (SSE), set `SSE` to true
* and ensure `Version` is set to "netcore"
*/
SSE: false,
/**
* Version of the Wexflow server: "net48" for .NET Framework 4.8,
* or "netcore" for .NET Core / .NET 5+.
*/
Version: "net48",
/**
* Debounce delay in milliseconds for real-time updates.
*/
DebounceDelay: 300,
};
})();
```
1. Replace `hostname` with the IP address or domain name of the machine where the Wexflow server is installed.
1. Ensure that port 8000 (or the port you're using) is open in the firewall and accessible from the client machine.
1. If your Wexflow server uses a different port, update the `port` value accordingly.
1. If you're using HTTPS in Wexflow Server, be sure to use HTTPS on your web server as well.
### .NET 10.0+ - Stable
To install the admin panel on a web server:
1. Copy the contents of the folder `Admin` to your web server's root or desired directory:
* Windows: `.\Admin\`
* Linux: `/opt/wexflow/Admin/`
* macOS: `/Applications/wexflow/Admin/`
1. If you're hosting the backend (Wexflow server) on a different machine, update the configuration file `js/settings.js` as follows:
```js
window.Settings = (function () {
// Get the current hostname or fallback to 'localhost'
const hostname = window.location.hostname === "" ? "localhost" : window.location.hostname;
// Default Wexflow backend port
const port = 8000;
// Use current protocol (http or https)
const protocol = `${window.location.protocol}//`;
return {
Hostname: hostname,
Port: port,
Uri: `${protocol}${hostname}:${port}/api/v1/`,
/**
* To enable Server-Sent Events (SSE), set `SSE` to true
* and ensure `Version` is set to "netcore"
*/
SSE: true,
/**
* Version of the Wexflow server: "net48" for .NET Framework 4.8,
* or "netcore" for .NET Core / .NET 5+.
*/
Version: "netcore",
/**
* Debounce delay in milliseconds for real-time updates.
*/
DebounceDelay: 300,
};
})();
```
1. Replace `hostname` with the IP address or domain name of the machine where the Wexflow server is installed.
1. Ensure that port 8000 (or the port you're using) is open in the firewall and accessible from the client machine.
1. If your Wexflow server uses a different port, update the `port` value accordingly.
1. If you're using HTTPS in Wexflow Server, be sure to use HTTPS on your web server as well.
---
# Document: IsoCreator
> Source: https://github.com/aelassas/wexflow/wiki/IsoCreator
```xml
```
---
# Document: IsoExtractor
> Source: https://github.com/aelassas/wexflow/wiki/IsoExtractor
```xml
```
---
# Document: Java Client
> Source: https://github.com/aelassas/wexflow/wiki/Java-Client
## Prerequisites
* Install [Java JDK](https://www.oracle.com/java/technologies/downloads/)
## Client Sample
Here is a sample Java client `WexflowClient.java`:
```java
import java.io.BufferedReader;
import java.io.InputStreamReader;
import java.io.OutputStream;
import java.net.HttpURLConnection;
import java.net.URL;
public class WexflowClient {
private static final String BASE_URL = "http://localhost:8000/api/v1";
private static final String USERNAME = "admin";
private static final String PASSWORD = "wexflow2018";
private static final int WORKFLOW_ID = 41;
public static void main(String[] args) {
try {
String token = login(USERNAME, PASSWORD);
String jobId = startWorkflow(token, WORKFLOW_ID);
System.out.println("Workflow " + WORKFLOW_ID + " started successfully. Job ID: " + jobId);
} catch (Exception e) {
System.err.println("Error: " + e.getMessage());
e.printStackTrace();
}
}
private static String login(String username, String password) throws Exception {
URL url = new URL(BASE_URL + "/login");
HttpURLConnection conn = (HttpURLConnection) url.openConnection();
conn.setRequestMethod("POST");
conn.setRequestProperty("Content-Type", "application/json");
conn.setDoOutput(true);
String jsonInputString = String.format(
"{\"username\":\"%s\",\"password\":\"%s\",\"stayConnected\":false}",
username, password);
try (OutputStream os = conn.getOutputStream()) {
byte[] input = jsonInputString.getBytes("utf-8");
os.write(input);
}
int code = conn.getResponseCode();
if (code != 200) {
throw new RuntimeException("Login failed: HTTP " + code);
}
BufferedReader br = new BufferedReader(
new InputStreamReader(conn.getInputStream(), "utf-8"));
StringBuilder response = new StringBuilder();
String responseLine;
while ((responseLine = br.readLine()) != null) {
response.append(responseLine.trim());
}
// Response JSON format: { "access_token": "..." }
String json = response.toString();
String token = parseAccessToken(json);
if (token == null) {
throw new RuntimeException("No access_token found in response");
}
return token;
}
private static String startWorkflow(String token, int workflowId) throws Exception {
URL url = new URL(BASE_URL + "/start?w=" + workflowId);
HttpURLConnection conn = (HttpURLConnection) url.openConnection();
conn.setRequestMethod("POST");
conn.setRequestProperty("Authorization", "Bearer " + token);
conn.setDoOutput(true);
int code = conn.getResponseCode();
if (code != 200) {
throw new RuntimeException("Start workflow failed: HTTP " + code);
}
BufferedReader br = new BufferedReader(
new InputStreamReader(conn.getInputStream(), "utf-8"));
StringBuilder response = new StringBuilder();
String responseLine;
while ((responseLine = br.readLine()) != null) {
response.append(responseLine.trim());
}
return response.toString();
}
// Simple method to extract access_token from JSON response
private static String parseAccessToken(String json) {
// This is a naive parse, for production use a JSON library like Jackson or Gson
String tokenKey = "\"access_token\":\"";
int start = json.indexOf(tokenKey);
if (start == -1) return null;
start += tokenKey.length();
int end = json.indexOf("\"", start);
if (end == -1) return null;
return json.substring(start, end);
}
}
```
To run the client, use the following command:
```bash
javac WexflowClient.java
java WexflowClient
```
---
# Document: Java SSE Client
> Source: https://github.com/aelassas/wexflow/wiki/Java-SSE-Client
## Prerequisites
* Install [Java JDK](https://www.oracle.com/java/technologies/downloads/)
* Install [Maven](https://maven.apache.org/)
## Client SSE Sample
Here is a sample Java SSE client `WexflowSSEClient.java`:
```java
package com.example;
import java.io.IOException;
import java.net.URI;
import java.net.http.HttpClient;
import java.net.http.HttpRequest;
import java.net.http.HttpResponse;
import java.time.Duration;
import okhttp3.*;
import okhttp3.sse.EventSource;
import okhttp3.sse.EventSourceListener;
import okhttp3.sse.EventSources;
import com.fasterxml.jackson.databind.ObjectMapper;
import com.fasterxml.jackson.databind.JsonNode;
public class WorkflowSSEClient {
private static final String BASE_URL = "http://localhost:8000/api/v1";
private static final String USERNAME = "admin";
private static final String PASSWORD = "wexflow2018";
private static final int WORKFLOW_ID = 41;
private static final HttpClient httpClient = HttpClient.newHttpClient();
private static final ObjectMapper objectMapper = new ObjectMapper();
public static void main(String[] args) throws Exception {
String token = login(USERNAME, PASSWORD);
String jobId = startWorkflow(token, WORKFLOW_ID);
System.out.printf("Workflow %d started. Job ID: %s%n", WORKFLOW_ID, jobId);
String sseUrl = String.format("%s/sse/%d/%s", BASE_URL, WORKFLOW_ID, jobId);
listenToSse(sseUrl, token);
}
private static String login(String user, String pass) throws IOException, InterruptedException {
String jsonBody = String.format(
"{\"username\":\"%s\", \"password\":\"%s\", \"stayConnected\": false}", user, pass);
HttpRequest request = HttpRequest.newBuilder()
.uri(URI.create(BASE_URL + "/login"))
.header("Content-Type", "application/json")
.POST(HttpRequest.BodyPublishers.ofString(jsonBody))
.timeout(Duration.ofSeconds(10))
.build();
HttpResponse response = httpClient.send(request, HttpResponse.BodyHandlers.ofString());
if (response.statusCode() != 200) {
throw new RuntimeException("Login failed: HTTP " + response.statusCode());
}
JsonNode jsonNode = objectMapper.readTree(response.body());
return jsonNode.get("access_token").asText();
}
private static String startWorkflow(String token, int workflowId) throws IOException, InterruptedException {
HttpRequest request = HttpRequest.newBuilder()
.uri(URI.create(BASE_URL + "/start?w=" + workflowId))
.header("Authorization", "Bearer " + token)
.POST(HttpRequest.BodyPublishers.noBody())
.timeout(Duration.ofSeconds(10))
.build();
HttpResponse response = httpClient.send(request, HttpResponse.BodyHandlers.ofString());
if (response.statusCode() != 200) {
throw new RuntimeException("Start workflow failed: HTTP " + response.statusCode());
}
// The start endpoint returns the jobId as JSON string, e.g. "jobid-uuid-string"
return objectMapper.readTree(response.body()).asText();
}
private static void listenToSse(String sseUrl, String token) {
OkHttpClient client = new OkHttpClient.Builder()
.retryOnConnectionFailure(true)
.build();
Request request = new Request.Builder()
.url(sseUrl)
.addHeader("Authorization", "Bearer " + token)
.build();
EventSourceListener listener = new EventSourceListener() {
@Override
public void onOpen(EventSource eventSource, Response response) {
System.out.println("SSE connection opened");
}
@Override
public void onEvent(EventSource eventSource, String id, String type, String data) {
System.out.println("Received event:");
System.out.println("Type: " + type);
System.out.println("Data: " + data);
try {
JsonNode json = objectMapper.readTree(data);
System.out.println("Parsed JSON:");
System.out.println(objectMapper.writerWithDefaultPrettyPrinter().writeValueAsString(json));
} catch (Exception e) {
System.err.println("Failed to parse SSE JSON: " + e.getMessage());
}
// Close connection if you want after first event:
eventSource.cancel();
}
@Override
public void onClosed(EventSource eventSource) {
System.out.println("SSE connection closed");
}
@Override
public void onFailure(EventSource eventSource, Throwable t, Response response) {
System.err.println("SSE connection error: " + t.getMessage());
if (response != null) {
System.err.println("Response code: " + response.code());
}
}
};
EventSource.Factory factory = EventSources.createFactory(client);
factory.newEventSource(request, listener);
// Prevent JVM from exiting immediately to keep SSE alive:
try {
Thread.sleep(10 * 60 * 1000); // 10 minutes; adjust as needed
} catch (InterruptedException ignored) {}
}
}
```
To run the client, download [samples/clients/sse/java](https://github.com/aelassas/wexflow/tree/main/samples/clients/sse/java) example from GitHub and run the following commands:
```bash
cd java
mvn clean package
mvn clean compile
mvn exec:java -X
```
---
# Document: JavaScript Client
> Source: https://github.com/aelassas/wexflow/wiki/JavaScript-Client
Here is a sample JavaScript client:
```js
const baseUrl = 'http://localhost:8000/api/v1'
const username = 'admin'
const password = 'wexflow2018'
const workflowId = 1
async function login(user, pass, stayConnected = false) {
const res = await fetch(`${baseUrl}/login`, {
method: 'POST',
headers: { 'Content-Type': 'application/json' },
body: JSON.stringify({ username: user, password: pass, stayConnected })
})
if (!res.ok) {
throw new Error(`HTTP ${res.status} - ${res.statusText}`)
}
const data = await res.json()
return data.access_token
}
try {
const token = await login(username, password)
const res = await fetch(`${baseUrl}/start?w=${workflowId}`, {
method: 'POST',
headers: { 'Authorization': `Bearer ${token}` }
})
if (!res.ok) {
throw new Error(`HTTP ${res.status} - ${res.statusText}`)
}
const jobId = await res.json()
console.log(`Workflow ${workflowId} started successfully. Job ID:`, jobId)
} catch (err) {
console.error(`Failed to start workflow ${workflowId}:`, err)
}
```
---
# Document: JavaScript SSE Client
> Source: https://github.com/aelassas/wexflow/wiki/JavaScript-SSE-Client
## Steps to Consume the SSE Event
1. **Start the workflow** using the REST API and get the `jobId`.
2. **Connect to the SSE endpoint** using `workflowId` and `jobId`:
```
GET http://localhost:8000/api/v1/sse/{workflowId}/{jobId}
```
3. **Use this example Node.js code** with the `eventsource` package to listen for the final job status:
* Initialize a new Node.js project with default settings:
```bash
npm init -y
```
* Open the generated `package.json` file and add `"type": "module"` to enable ES module support:
```js
{
"name": "wexflow",
"version": "1.0.0",
"type": "module",
...
}
```
* Install the `eventsource` package to handle Server-Sent Events:
```bash
npm install eventsource
```
* Create your main script file `index.js` and add your SSE client code:
```js
import * as eventsource from 'eventsource'
const baseUrl = 'http://localhost:8000/api/v1'
const username = 'admin'
const password = 'wexflow2018'
const workflowId = 41
async function login(user, pass, stayConnected = false) {
const res = await fetch(`${baseUrl}/login`, {
method: 'POST',
headers: { 'Content-Type': 'application/json' },
body: JSON.stringify({ username: user, password: pass, stayConnected })
})
if (!res.ok) {
throw new Error(`HTTP ${res.status} - ${res.statusText}`)
}
const data = await res.json()
return data.access_token
}
async function startWorkflow(token, workflowId) {
const res = await fetch(`${baseUrl}/start?w=${workflowId}`, {
method: 'POST',
headers: { 'Authorization': `Bearer ${token}` }
})
if (!res.ok) {
throw new Error(`HTTP ${res.status} - ${res.statusText}`)
}
const jobId = await res.json()
return jobId
}
try {
const token = await login(username, password)
const jobId = await startWorkflow(token, workflowId)
console.log(`Workflow ${workflowId} started. Job ID: ${jobId}`)
const sseUrl = `${baseUrl}/sse/${workflowId}/${jobId}`
const es = new eventsource.EventSource(sseUrl, {
fetch: (input, init) =>
fetch(input, {
...init,
headers: {
...init.headers,
Authorization: `Bearer ${token}`
},
}),
})
es.onopen = () => {
console.log('SSE connection opened')
}
es.onmessage = (event) => {
try {
// This event is triggered when the workflow job finishes or stops.
// The SSE data arrives as a JSON-formatted string in event.data.
// Parse this string into a JavaScript object for easy access to properties.
// For the complete list of workflow statuses, see:
// https://github.com/aelassas/wexflow/wiki/Workflow-Notifications-via-SSE#statuses
const data = JSON.parse(event.data)
console.log('Received SSE JSON:', data)
// Access properties like data.workflowId, data.jobId, data.status, data.name, data.description
// Close connection if needed, e.g. after final status received
es.close()
} catch (err) {
console.error('Failed to parse SSE JSON:', err)
}
}
es.onerror = (err) => {
console.error('SSE error:', err)
es.close()
}
} catch (err) {
console.error('Error:', err)
}
```
* Run your Node.js program:
```bash
node index.js
```
Use `Workflow_Wait` with a period of 10 secs for instance to test.
Here is a sample output result:
```js
{
workflowId: 41,
jobId: '66aae8f4-e3ab-4fdc-8db2-a0a7692d8906',
status: 'Done',
name: 'Workflow_Wait',
description: 'Workflow_Wait'
}
```
## Summary
* The SSE event sends JSON with `{ workflowId, jobId, status, name, description }`.
* The connection closes automatically after the job finishes.
* Ensure your requests include proper JWT authorization.
---
# Document: JsonToYaml
> Source: https://github.com/aelassas/wexflow/wiki/JsonToYaml
```xml
```
---
# Document: ListEntities
> Source: https://github.com/aelassas/wexflow/wiki/ListEntities
```xml
```
---
# Document: ListFiles
> Source: https://github.com/aelassas/wexflow/wiki/ListFiles
```xml
```
---
# Document: Local Variables
> Source: https://github.com/aelassas/wexflow/wiki/Local-Variables
It is possible to declare local variables in a workflow.
The syntax is as follows:
```xml
```
When Wexflow server loads the workflow file, the workflow file will be parsed and thus the local variables will be replaced by their respective values.
It is also possible to combine global variables with local variables, here is an example:
GlobalVariables.xml:
```xml
```
Below a sample workflow which contains global variables and local variables:
```xml
```
---
# Document: Logging
> Source: https://github.com/aelassas/wexflow/wiki/Logging
Everything that happens in Wexflow is traced and logged. With Wexflow's logging system, you can track your workflows with ease and stay informed with real-time monitoring and email notifications.
Wexflow's logs are written in C:\Program Files\Wexflow\Wexflow.log. There is one log file per day. The old log files are saved in following format: Wexflow.logyyyyMMdd
It is possible to configure Wexflow to send incident reports when an error occurs by using log4net.Appender.SmtpAppender in the configuration file of Wexflow C:\Program Files\Wexflow\Wexflow.Clients.WindowsService.exe.config. Below a sample configuration:
```xml
```
Wexflow gives you a beautiful Dashboard to view real-time statistics on your workflows. The Dashboard will let you track your workflow server with ease.
The History page in the backend will also let you track all your workflows and everything that happens on the workflow server. Indeed, from this page you will have an overview of all the workflow instances executed on the workflow server.
---
# Document: MailsReceiver
> Source: https://github.com/aelassas/wexflow/wiki/MailsReceiver
```xml
```
---
# Document: MailsSender
> Source: https://github.com/aelassas/wexflow/wiki/MailsSender
```xml
```
---
# Document: Md5
> Source: https://github.com/aelassas/wexflow/wiki/Md5
```xml
```
---
# Document: MediaInfo
> Source: https://github.com/aelassas/wexflow/wiki/MediaInfo
```xml
```
---
# Document: MessageCorrect
> Source: https://github.com/aelassas/wexflow/wiki/MessageCorrect
```xml
```
---
# Document: Migration Guide to v10.0
> Source: https://github.com/aelassas/wexflow/wiki/Migration-Guide-to-v10.0
To migrate from Wexflow 9.0 and below to v10.0, follow these instructions.
# .NET 4.8
1. Backup the folder `C:\Wexflow`
1. Download the installer wexflow-10.0-windows-x64.exe
1. Run the installer
1. Login to http://localhost:8000
* Username: `admin`
* Password: `wexflow2018`
# .NET 10.0
## Windows
1. Backup the folder `C:\Wexflow-netcore`
1. Download the package wexflow-10.0-windows-netcore.zip
1. Unzip the package
1. Run `install.bat`
1. Run `run.bat`
1. Login to http://localhost:8000
* Username: `admin`
* Password: `wexflow2018`
## Linux
1. Backup the folder `/opt/wexflow/Wexflow`
1. Install ASP.NET Core Runtime 10.0
1. Remove `/opt/wexflow`
1. Download the package wexflow-10.0-linux-netcore.zip
1. Unzip the package in `/opt/`
1. Remove `/opt/wexflow/Wexflow`
1. Copy the backup `/opt/wexflow/Wexflow` in `/opt/wexflow/`
1. Add permissions:
```bash
sudo chown -R $USER:$USER /opt/wexflow
sudo chmod +x /opt/wexflow/install.sh
```
1. Install wexflow systemd service:
```bash
sudo /opt/wexflow/install.sh
```
1. Login to http://localhost:8000
* Username: `admin`
* Password: `wexflow2018`
## macOS
1. Backup the folder `/Applications/wexflow/Wexflow`
1. Install ASP.NET Core Runtime 10.0
1. Remove `/Applications/wexflow`
1. Download the package wexflow-10.0-macos-netcore.zip
1. Unzip the package in `/Applications/`
1. Remove `/Applications/wexflow/Wexflow`
1. Copy the backup `/Applications/wexflow/Wexflow` in `/Applications/wexflow/`
1. Run Wexflow:
```bash
cd /Applications/wexflow/Wexflow.Server
dotnet Wexflow.Server.dll
```
1. Login to http://localhost:8000
* Username: `admin`
* Password: `wexflow2018`
# Wexflow API
The authentication has changed to JWT. You need to update all your clients to use JWT:
* [Authentication](https://github.com/aelassas/wexflow/wiki/RESTful-API#authentication)
* [Sample Clients](https://github.com/aelassas/wexflow/wiki/RESTful-API#sample-clients)
---
# Document: Mkdir
> Source: https://github.com/aelassas/wexflow/wiki/Mkdir
```xml
```
---
# Document: Movedir
> Source: https://github.com/aelassas/wexflow/wiki/Movedir
```xml
```
---
# Document: Now
> Source: https://github.com/aelassas/wexflow/wiki/Now
```xml
```
---
# Document: PHP SSE Client
> Source: https://github.com/aelassas/wexflow/wiki/PHP-SSE-Client
## Prerequisites
* Install [PHP](https://www.php.net/)
* On Windows, enable `curl` in `php.ini`:
```
extension_dir = "ext"
extension=curl
```
# SSE Client Sample
Here is a sample PHP SSE client `sse.php`:
```php
$username,
'password' => $password,
'stayConnected' => $stayConnected
]);
$ch = curl_init($url);
curl_setopt_array($ch, [
CURLOPT_RETURNTRANSFER => true,
CURLOPT_POST => true,
CURLOPT_HTTPHEADER => ['Content-Type: application/json'],
CURLOPT_POSTFIELDS => $data
]);
$response = curl_exec($ch);
$statusCode = curl_getinfo($ch, CURLINFO_HTTP_CODE);
curl_close($ch);
if ($statusCode !== 200) {
throw new Exception("Login failed: HTTP $statusCode");
}
$json = json_decode($response, true);
return $json['access_token'];
}
function startWorkflow($token, $workflowId) {
$url = "http://localhost:8000/api/v1/start?w=$workflowId";
$ch = curl_init($url);
curl_setopt_array($ch, [
CURLOPT_RETURNTRANSFER => true,
CURLOPT_POST => true,
CURLOPT_HTTPHEADER => [
"Authorization: Bearer $token"
]
]);
$response = curl_exec($ch);
$statusCode = curl_getinfo($ch, CURLINFO_HTTP_CODE);
curl_close($ch);
if ($statusCode !== 200) {
throw new Exception("Start workflow failed: HTTP $statusCode");
}
return json_decode($response, true);
}
function listenToSse($url, $token) {
$headers = [
"Authorization: Bearer $token",
"Accept: text/event-stream"
];
$ch = curl_init($url);
curl_setopt_array($ch, [
CURLOPT_HTTPHEADER => $headers,
CURLOPT_WRITEFUNCTION => function($ch, $data) {
if (strpos($data, "data: ") === 0) {
$json = trim(substr($data, 6));
$decoded = json_decode($json, true);
if ($decoded !== null) {
echo "Received SSE JSON:\n";
print_r($decoded);
} else {
echo "Invalid SSE JSON\n";
}
}
return strlen($data);
},
CURLOPT_TIMEOUT => 0,
CURLOPT_RETURNTRANSFER => false,
]);
echo "Opening SSE connection...\n";
curl_exec($ch);
if (curl_errno($ch)) {
echo "SSE error: " . curl_error($ch) . "\n";
}
curl_close($ch);
}
// ---- Main execution ----
try {
$username = 'admin';
$password = 'wexflow2018';
$workflowId = 41;
$baseUrl = 'http://localhost:8000/api/v1';
$token = login($username, $password);
$jobId = startWorkflow($token, $workflowId);
echo "Workflow $workflowId started. Job ID: $jobId\n";
$sseUrl = "$baseUrl/sse/$workflowId/$jobId";
listenToSse($sseUrl, $token);
} catch (Exception $e) {
echo 'Error: ' . $e->getMessage() . "\n";
}
```
To run the client, use the following command:
```bash
php sse.php
```
---
# Document: PHP client
> Source: https://github.com/aelassas/wexflow/wiki/PHP-client
## Prerequisites
* Install [PHP](https://www.php.net/)
* On Windows, enable `curl` in `php.ini`:
```
extension_dir = "ext"
extension=curl
```
# Client Sample
Here is a sample PHP client `client.php`:
```php
$username,
'password' => $password,
'stayConnected' => $stayConnected
]);
$ch = curl_init($url);
curl_setopt_array($ch, [
CURLOPT_RETURNTRANSFER => true,
CURLOPT_POST => true,
CURLOPT_ENCODING => "",
CURLOPT_MAXREDIRS => 10,
CURLOPT_TIMEOUT => 0,
CURLOPT_FOLLOWLOCATION => true,
CURLOPT_HTTP_VERSION => CURL_HTTP_VERSION_1_1,
CURLOPT_HTTPHEADER => ['Content-Type: application/json'],
CURLOPT_POSTFIELDS => $payload
]);
$response = curl_exec($ch);
$httpCode = curl_getinfo($ch, CURLINFO_HTTP_CODE);
curl_close($ch);
if ($httpCode !== 200) {
throw new Exception("Login failed: HTTP $httpCode - $response");
}
$data = json_decode($response, true);
return $data['access_token'] ?? null;
}
/**
* Starts the workflow with the given ID using the access token.
*/
function startWorkflow($workflowId, $token)
{
global $baseUrl;
$url = $baseUrl . '/start?w=' . urlencode($workflowId);
$ch = curl_init($url);
curl_setopt_array($ch, [
CURLOPT_RETURNTRANSFER => true,
CURLOPT_POST => true,
CURLOPT_ENCODING => "",
CURLOPT_MAXREDIRS => 10,
CURLOPT_TIMEOUT => 0,
CURLOPT_FOLLOWLOCATION => true,
CURLOPT_HTTP_VERSION => CURL_HTTP_VERSION_1_1,
CURLOPT_HTTPHEADER => array(
"Content-Type: application/json",
"Content-Length: 0",
"Authorization: Bearer $token"
),
]);
$response = curl_exec($ch);
$httpCode = curl_getinfo($ch, CURLINFO_HTTP_CODE);
curl_close($ch);
if ($httpCode !== 200) {
throw new Exception("Start workflow failed: HTTP $httpCode - $response");
}
$data = json_decode($response, true);
return $data;
}
try {
$token = login($username, $password);
$jobId = startWorkflow($workflowId, $token);
echo "Workflow $workflowId started successfully. Job ID: " . json_encode($jobId) . "\n";
} catch (Exception $e) {
echo "Error: " . $e->getMessage() . "\n";
}
?>
```
To run the client, use the following command:
```bash
php client.php
```
---
# Document: PdfToText
> Source: https://github.com/aelassas/wexflow/wiki/PdfToText
```xml
```
---
# Document: Persistence Providers
> Source: https://github.com/aelassas/wexflow/wiki/Persistence-Providers
Wexflow ships with 6 persistence providers. You can choose from the following options:
* SQLite (Default)
* MongoDB
* SQLServer
* PostgreSQL
* MySQL
* LiteDB
If you want to change the persistence provider, you'll need to update `dbType` and `connectionString` settings in [Wexflow.xml](https://github.com/aelassas/wexflow/wiki/Configuration#wexflowxml) configuration file.
If you want to use SQL Server `Trusted_Connection=true` in the connection string, you have to run Wexflow Windows Service as a user who has privileges to connect to SQL Server.
Once you change the persistence provider, restart Wexflow server. Then, you can install workflow samples:
* .NET: `Start > Wexflow > Install [dbType] Samples`
* .NET Core Windows: `./install-[dbType].bat`
* .NET Core Linux: `cd /opt/wexflow/Wexflow.Scripts.[dbType] && dotnet Wexflow.Scripts.[dbType].dll`
* .NET Core macOS: `cd /Application/wexflow/Wexflow.Scripts.[dbType] && dotnet Wexflow.Scripts.[dbType].dll`
Don't forget to check and update the connection string of the samples script if necessary:
* .NET: `C:\Program Files\Wexflow\Wexflow.Scripts.[dbType]\Wexflow.Scripts.[dbType].exe.config`
* .NET Core Windows: `./Wexflow.Scripts.[dbType]/appsettings.json`
* .NET Core Linux: `/opt/wexflow/Wexflow.Scripts.[dbType]/appsettings.json`
* .NET Core macOS: `/Application/wexflow/Wexflow.Scripts.[dbType]/appsettings.json`
---
# Document: Ping
> Source: https://github.com/aelassas/wexflow/wiki/Ping
```xml
```
---
# Document: PowerShell Client
> Source: https://github.com/aelassas/wexflow/wiki/PowerShell-Client
# Client Sample
Here is a sample PowerShell client `client.ps1`:
```powershell
# Login and get JWT token
$loginPayload = @{
username = 'admin'
password = 'wexflow2018'
stayConnected = $false
} | ConvertTo-Json
$res = Invoke-WebRequest -Uri "http://localhost:8000/api/v1/login" -Method Post -Body $loginPayload -ContentType "application/json"
$token = ($res.Content | ConvertFrom-Json).access_token
# Build headers
$headers = @{
Authorization = "Bearer $token"
"Content-Type" = "application/json"
}
# Start workflow
$workflowId=1
$res = Invoke-WebRequest -Uri "http://localhost:8000/api/v1/start?w=$workflowId" -Method Post -Headers $headers
# Parse JSON response
$jobId = ($res.Content | ConvertFrom-Json)
Write-Host "Workflow $workflowId started successfully. Job ID: $jobId"
```
# Client Sending XML as rest variable
```powershell
$xmlFile = "C:\WexflowTesting\Xml\Products.xml"
# Explicitly read the file as plain text with no PowerShell object wrapping
$WorkflowXMLString = [System.IO.File]::ReadAllText($xmlFile)
# Build JSON payload
$xmlFile = "C:\WexflowTesting\Xml\Products.xml"
# Explicitly read the file as plain text with no PowerShell object wrapping
$WorkflowXMLString = [System.IO.File]::ReadAllText($xmlFile)
# Build JSON payload
$jsonPayload = @{
WorkflowId = 138
Variables = @(
@{
Name = "xml"
Value = $WorkflowXMLString
}
)
} | ConvertTo-Json
# Login and get JWT token
$loginPayload = @{
username = 'admin'
password = 'wexflow2018'
stayConnected = $false
} | ConvertTo-Json
$res = Invoke-WebRequest -Uri "http://localhost:8000/api/v1/login" -Method Post -Body $loginPayload -ContentType "application/json"
$token = ($res.Content | ConvertFrom-Json).access_token
# Build headers
$headers = @{
Authorization = "Bearer $token"
"Content-Type" = "application/json"
}
# Start workflow with variables
$res = Invoke-WebRequest -Uri "http://localhost:8000/api/v1/start-with-variables" -Method Post -Headers $headers -Body $jsonPayload
# Parse JSON response
$jobId = ($res.Content | ConvertFrom-Json)
Write-Host "Workflow $workflowId started successfully. Job ID: $jobId"
```
---
# Document: PowerShell SSE Client
> Source: https://github.com/aelassas/wexflow/wiki/PowerShell-SSE-Client
## Prerequisites
* Install [PowerShell 5.1+](https://docs.microsoft.com/powershell/scripting/install/installing-powershell) (pre-installed on modern Windows versions).
* Open a PowerShell terminal or ISE session.
## Long-Running Workflows & JWT Authentication
When monitoring workflows that run for extended periods (such as 2 days or more), standard authentication and connection handling require specific configurations:
### 1. Preventing JWT Token Expiration
By default, short-lived JWT tokens will expire before a multi-day workflow finishes. When authenticating via the `/login` endpoint, pass `"stayConnected": true` in the request body:
```json
{
"username": "admin",
"password": "your_password",
"stayConnected": true
}
```
* **`stayConnected: false`**: Produces a standard, short-lived JWT token (suitable for quick API operations).
* **`stayConnected: true`**: Produces a persistent, non-expiring JWT token necessary for long-running monitoring operations spanning days or weeks.
### 2. Stream Resiliency for Multi-Day Execution
Even with a persistent token, HTTP connections across local networks or the internet will periodically drop over 48+ hours due to proxy timeouts, firewall session resets, or transient network hiccups. The sample client handles this automatically:
* **Automatic Re-authentication:** If the server returns `401 Unauthorized` during a reconnection attempt, the script automatically calls `Get-WexflowToken` to fetch a fresh JWT token before retrying.
* **Idle Read Timeouts:** Uses a 5-minute timeout window via `CancellationTokenSource`. If an intermediate network proxy silently drops the connection without sending a TCP disconnect frame, the script detects the quiet socket and re-establishes the SSE stream seamlessly.
* **Terminal Status Detection:** The client stays connected through transient non-terminal states (`Pending`, `Running`) and only terminates the loop when a final status frame (`Done`, `Failed`, `Warning`, `Stopped`, or `Rejected`) is received.
## SSE Client Sample
Here is a sample PowerShell SSE client `sse.ps1`:
```powershell
#Requires -Version 5.1
<#
.SYNOPSIS
Wexflow Server-Sent Events (SSE) Client script for PowerShell 5.1+.
.DESCRIPTION
Authenticates with the Wexflow REST API, starts a specified workflow job,
subscribes to the corresponding SSE endpoint, and streams status updates until completion.
.PARAMETER BaseUrl
The base API endpoint URL for the Wexflow instance (default: "http://localhost:8000/api/v1").
.PARAMETER Username
The Wexflow username for authentication (default: "admin").
.PARAMETER Password
The Wexflow password for authentication.
.PARAMETER WorkflowId
The integer ID of the workflow to execute and monitor (default: 41).
.EXAMPLE
.\Invoke-WexflowSseClient.ps1 -Username "admin" -Password "wexflow2018" -WorkflowId 41
#>
[CmdletBinding()]
param(
[string]$BaseUrl = "http://localhost:8000/api/v1",
[string]$Username = "admin",
[string]$Password = "wexflow2018",
[int]$WorkflowId = 41
)
# Enforce TLS 1.2 for modern HTTP operations
[Net.ServicePointManager]::SecurityProtocol = [Net.SecurityProtocolType]::Tls12
# Assembly load for HttpClient
Add-Type -AssemblyName System.Net.Http
# Functions
function Get-WexflowToken {
param(
[string]$Url,
[string]$User,
[string]$Pass
)
$loginUrl = "$Url/login"
# stayConnected set to $true ensures the JWT token never expires (essential for multi-day jobs)
$body = @{
username = $User
password = $Pass
stayConnected = $true
} | ConvertTo-Json
# Perform REST Login
$response = Invoke-RestMethod -Uri $loginUrl -Method Post -Body $body -ContentType "application/json"
if (-not $response.access_token) {
throw "Failed to acquire JWT access token from response."
}
return $response.access_token
}
function Start-WexflowJob {
param(
[string]$Url,
[string]$Token,
[int]$WfId
)
$startUrl = "$Url/start?w=$WfId"
$headers = @{
Authorization = "Bearer $Token"
}
# Start the workflow via POST request
$jobId = Invoke-RestMethod -Uri $startUrl -Method Post -Headers $headers
return $jobId
}
function Watch-WexflowSse {
<#
.SYNOPSIS
Connects to the Server-Sent Events (SSE) endpoint and reads streamed lines.
.DESCRIPTION
Uses System.Net.Http.HttpClient to establish an HTTP GET request with
HttpCompletionOption.ResponseHeadersRead. This allows line-by-line streaming of
data payload lines prefixed with 'data: '.
#>
param(
[string]$BaseUrl,
[string]$Username,
[string]$Password,
[string]$SseUrl,
[string]$InitialToken
)
# Terminal workflow states that signal job completion
$terminalStatuses = @("Done", "Failed", "Warning", "Stopped", "Rejected")
$isTerminalStateReached = $false
$currentToken = $InitialToken
# Reconnection loop to handle network drops on multi-day running workflows
while (-not $isTerminalStateReached) {
$handler = New-Object System.Net.Http.HttpClientHandler
$client = New-Object System.Net.Http.HttpClient($handler)
# Prevent client-side timeout for multi-day operations
$client.Timeout = [System.TimeSpan]::FromMilliseconds([System.Threading.Timeout]::Infinite)
# Configure required HTTP Headers for SSE stream listening
$request = New-Object System.Net.Http.HttpRequestMessage([System.Net.Http.HttpMethod]::Get, $SseUrl)
$request.Headers.Accept.Add((New-Object System.Net.Http.Headers.MediaTypeWithQualityHeaderValue("text/event-stream")))
$request.Headers.Authorization = New-Object System.Net.Http.Headers.AuthenticationHeaderValue("Bearer", $currentToken)
Write-Host "[SSE] Connecting to SSE stream..." -ForegroundColor Cyan
try {
# ResponseHeadersRead is crucial: it prevents HttpClient from buffering the whole stream into memory
$responseTask = $client.SendAsync($request, [System.Net.Http.HttpCompletionOption]::ResponseHeadersRead)
$response = $responseTask.Result
# Handle edge cases where server session resets or invalidates the token
if ($response.StatusCode -eq [System.Net.HttpStatusCode]::Unauthorized) {
Write-Warning "JWT token unauthorized. Re-authenticating with stayConnected=$true..."
$currentToken = Get-WexflowToken -Url $BaseUrl -User $Username -Pass $Password
continue
}
if (-not $response.IsSuccessStatusCode) {
Write-Warning "SSE Request failed with HTTP Status: $($response.StatusCode) - $($response.ReasonPhrase). Retrying in 10 seconds..."
Start-Sleep -Seconds 10
continue
}
$streamTask = $response.Content.ReadAsStreamAsync()
$stream = $streamTask.Result
$reader = New-Object System.IO.StreamReader($stream)
Write-Host "[SSE] Connection established. Listening for events..." -ForegroundColor Green
# Loop through stream line-by-line as data events arrive
while (-not $reader.EndOfStream) {
# Protect against silent TCP deadlocks from intermediate proxies during idle days
$cts = New-Object System.Threading.CancellationTokenSource([TimeSpan]::FromMinutes(5))
try {
$lineTask = $reader.ReadLineAsync()
[System.Threading.Tasks.Task]::WaitAll(@($lineTask), $cts.Token)
$line = $lineTask.Result
}
catch {
Write-Warning "[SSE] Connection idle ping timeout (5 mins without frame). Re-establishing stream connection..."
break
}
finally {
$cts.Dispose()
}
if (-not [string]::IsNullOrWhiteSpace($line) -and $line.StartsWith("data: ")) {
# Extract JSON payload after 'data: ' prefix
$jsonString = $line.Substring("data: ".Length)
Write-Host "`n[SSE Event Received: $(Get-Date -Format 'yyyy-MM-dd HH:mm:ss')]" -ForegroundColor Yellow
try {
$eventData = $jsonString | ConvertFrom-Json
# Display structured output properties
Write-Host " Workflow ID : $($eventData.workflowId)"
Write-Host " Job ID : $($eventData.jobId)"
Write-Host " Name : $($eventData.name)"
Write-Host " Status : $($eventData.status)" -ForegroundColor Magenta
Write-Host " Description : $($eventData.description)"
# Break loop ONLY after reading a terminal status frame
if ($terminalStatuses -contains $eventData.status) {
$isTerminalStateReached = $true
break
}
}
catch {
Write-Warning "Failed to parse raw SSE JSON payload: $_"
Write-Host "Raw Payload: $jsonString"
}
}
}
}
catch {
if (-not $isTerminalStateReached) {
Write-Warning "SSE connection disconnected or timed out: $_. Reconnecting in 10 seconds..."
Start-Sleep -Seconds 10
}
}
finally {
# Cleanup HTTP connections
if ($null -ne $reader) { $reader.Dispose() }
if ($null -ne $stream) { $stream.Dispose() }
if ($null -ne $client) { $client.Dispose() }
if ($isTerminalStateReached) {
Write-Host "`n[SSE] Terminal status reached. Connection closed." -ForegroundColor Cyan
}
}
}
}
# Main Execution Script Logic
try {
Write-Host "1. Logging into Wexflow ($BaseUrl)..." -ForegroundColor White
$jwtToken = Get-WexflowToken -Url $BaseUrl -User $Username -Pass $Password
Write-Host " Token retrieved successfully (stayConnected = true)." -ForegroundColor Green
Write-Host "2. Starting Workflow ID: $WorkflowId..." -ForegroundColor White
$jobId = Start-WexflowJob -Url $BaseUrl -Token $jwtToken -WfId $WorkflowId
Write-Host " Job started successfully. Job ID: $jobId" -ForegroundColor Green
# Construct SSE URL endpoint: /api/v1/sse/{workflowId}/{jobId}
$sseEndpoint = "$BaseUrl/sse/$WorkflowId/$jobId"
Write-Host "3. Subscribing to Wexflow SSE Endpoint..." -ForegroundColor White
Watch-WexflowSse -BaseUrl $BaseUrl -Username $Username -Password $Password -SseUrl $sseEndpoint -InitialToken $jwtToken
}
catch {
Write-Error "Execution Failed: $_"
}
```
To run the client, execute the script in PowerShell:
```powershell
.\sse.ps1
```
---
# Document: ProcessInfo
> Source: https://github.com/aelassas/wexflow/wiki/ProcessInfo
```xml
```
---
# Document: ProcessKiller
> Source: https://github.com/aelassas/wexflow/wiki/ProcessKiller
```xml
```
---
# Document: ProcessLauncher
> Source: https://github.com/aelassas/wexflow/wiki/ProcessLauncher
```xml
```
---
# Document: Python Client
> Source: https://github.com/aelassas/wexflow/wiki/Python-Client
## Prerequisites
* Install [Python](https://www.python.org/)
* Install [pip](https://pip.pypa.io/)
* Install `requests`:
```bash
pip install requests
```
## Client Sample
Here is a sample Python client `client.py`:
```py
import requests
base_url = 'http://localhost:8000/api/v1'
username = 'admin'
password = 'wexflow2018'
workflow_id = 41
def login(user, passwd, stay_connected=False):
url = f'{base_url}/login'
headers = {'Content-Type': 'application/json'}
payload = {
'username': user,
'password': passwd,
'stayConnected': stay_connected
}
response = requests.post(url, json=payload, headers=headers)
if response.status_code != 200:
raise Exception(f'HTTP {response.status_code} - {response.reason}')
return response.json()['access_token']
try:
token = login(username, password)
headers = {
'Authorization': f'Bearer {token}'
}
response = requests.post(f'{base_url}/start?w={workflow_id}', headers=headers)
if response.status_code != 200:
raise Exception(f'HTTP {response.status_code} - {response.reason}')
job_id = response.json()
print(f'Workflow {workflow_id} started successfully. Job ID: {job_id}')
except Exception as e:
print(f'Failed to start workflow {workflow_id}: {e}')
```
To run the client, use the following command:
```bash
py client.py
```
---
# Document: Python SSE Client
> Source: https://github.com/aelassas/wexflow/wiki/Python-SSE-Client
## Prerequisites
* Install [Python](https://www.python.org/)
* Install [pip](https://pip.pypa.io/)
* Install `requests` and `sseclient-py`:
```bash
pip install requests sseclient-py
```
## SSE Client Sample
Here is a sample Python client `sse.py`:
```py
import requests
import sseclient
import json
base_url = 'http://localhost:8000/api/v1'
username = 'admin'
password = 'wexflow2018'
workflow_id = 41
def login(user, passwd, stay_connected=False):
url = f'{base_url}/login'
headers = {'Content-Type': 'application/json'}
payload = {
'username': user,
'password': passwd,
'stayConnected': stay_connected
}
response = requests.post(url, json=payload, headers=headers)
if response.status_code != 200:
raise Exception(f'HTTP {response.status_code} - {response.reason}')
return response.json()['access_token']
def start_workflow(token, workflow_id):
url = f'{base_url}/start?w={workflow_id}'
headers = {
'Authorization': f'Bearer {token}'
}
response = requests.post(url, headers=headers)
if response.status_code != 200:
raise Exception(f'HTTP {response.status_code} - {response.reason}')
return response.json()
def listen_to_sse(url, token):
headers = {
'Authorization': f'Bearer {token}',
'Accept': 'text/event-stream'
}
response = requests.get(url, headers=headers, stream=True)
client = sseclient.SSEClient(response)
print('SSE connection opened')
for event in client.events():
try:
data = json.loads(event.data)
print('Received SSE JSON:')
print(json.dumps(data, indent=2))
break # Stop after first message
except Exception as e:
print(f'Failed to parse SSE JSON: {e}')
break
print('SSE connection closed')
# Main execution
try:
token = login(username, password)
job_id = start_workflow(token, workflow_id)
print(f'Workflow {workflow_id} started successfully. Job ID: {job_id}')
sse_url = f'{base_url}/sse/{workflow_id}/{job_id}'
listen_to_sse(sse_url, token)
except Exception as e:
print(f'Error: {e}')
```
To run the client, use the following command:
```bash
py sse.py
```
---
# Document: REST Variables
> Source: https://github.com/aelassas/wexflow/wiki/REST-Variables
Local variables and global variables values are set before the workflow is started.
With REST variables, you can set values at runtime when you start a workflow.
REST variables cannot be set from the dashboard at the moment. You need to use Wexflow API from your application or through Swagger: http://localhost:8000/
To send variables when starting a workflow, use the following endpoint:
**POST** http://localhost:8000/api/v1/start-with-variables
Here is a sample payload:
```json
{
"WorkflowId":131,
"Variables":[
{
"Name":"restVar1",
"Value":"C:\\WexflowTesting\\file1.txt"
},
{
"Name":"restVar2",
"Value":"C:\\WexflowTesting\\file2.txt"
}
]
}
```
Here is a sample workflow:
```xml
```
---
# Document: RESTful API
> Source: https://github.com/aelassas/wexflow/wiki/RESTful-API
# Table of Contents
1. [Introduction](https://github.com/aelassas/wexflow/wiki/RESTful-API#introduction)
1. [Authentication](https://github.com/aelassas/wexflow/wiki/RESTful-API#authentication)
1. [Sample Clients](https://github.com/aelassas/wexflow/wiki/RESTful-API#sample-clients)
1. [Security Considerations](https://github.com/aelassas/wexflow/wiki/RESTful-API#security-considerations)
1. [Swagger](https://github.com/aelassas/wexflow/wiki/RESTful-API#swagger)
1. [Workflow Notifications via SSE](https://github.com/aelassas/wexflow/wiki/RESTful-API#workflow-notifications-via-sse)
1. [Endpoints](https://github.com/aelassas/wexflow/wiki/RESTful-API#endpoints)
# Introduction
Wexflow Server is a standalone workflow engine that helps automate tasks such as file handling, data processing, report generation, and more. It is language-independent, which means you can use it with any technology—whether your app is built in PHP, Node.js, .NET, Python, Ruby, or something else. Wexflow provides a RESTful API so your application can communicate with it over HTTP.
Beyond standard request-response operations, you can receive real-time workflow job status updates through **Server-Sent Events (SSE)**. For detailed instructions on how to subscribe to workflow status notifications via SSE, see the [Workflow Notifications via SSE](https://github.com/aelassas/wexflow/wiki/Workflow-Notifications-via-SSE) page.
This API lets you control workflows from your own software. You can start, stop, and monitor workflows, view logs, manage users, and access system information. Wexflow handles all the execution, so you can focus on your application logic while automating background processes with ease.
# Authentication
All Wexflow API endpoints are secured with JWT authentication. Every API request must include an `Authorization` header containing a valid **Bearer token**.
To get a JWT token, call the following endpoint:
```
POST http://localhost:8000/api/v1/login
```
With this JSON payload:
```js
{
'username': 'username',
'password': 'password',
'stayConnected': false,
}
```
If the credentials are valid, you'll receive a response like:
```js
{
"access_token": "eyJhbGciOiJIUzI1NiIsInR5cCI6IkpXVCJ9..."
}
```
Include the token in your `Authorization` header for all subsequent requests:
```
Authorization: Bearer eyJhbGciOiJIUzI1NiIsInR5cCI6IkpXVCJ9...
```
The default password of the user `admin` is `wexflow2018`. For security reasons, change it after your first login.
# Sample Clients
Wexflow provides a RESTful API that can be consumed from any programming language. Below are sample clients demonstrating how to authenticate, use access tokens, trigger workflows, and interact with the API:
- [C# Client](https://github.com/aelassas/wexflow/wiki/C%23-Client)
- [PowerShell Client](https://github.com/aelassas/wexflow/wiki/PowerShell-Client)
- [JavaScript Client](https://github.com/aelassas/wexflow/wiki/JavaScript-Client)
- [PHP Client](https://github.com/aelassas/wexflow/wiki/PHP-client)
- [Python Client](https://github.com/aelassas/wexflow/wiki/Python-Client)
- [Go Client](https://github.com/aelassas/wexflow/wiki/Go-Client)
- [Rust Client](https://github.com/aelassas/wexflow/wiki/Rust-Client)
- [Ruby Client](https://github.com/aelassas/wexflow/wiki/Ruby-Client)
- [Java Client](https://github.com/aelassas/wexflow/wiki/Java-Client)
- [C++ Client](https://github.com/aelassas/wexflow/wiki/CPP-Client)
You can find the source code for all these clients in the [samples/clients](https://github.com/aelassas/wexflow/tree/main/samples/clients/client) directory of the main Wexflow repository.
These examples serve as practical starting points to integrate Wexflow into your own applications regardless of the tech stack you're using.
# Security Considerations
Wexflow uses a secure authentication mechanism based on **JWT (JSON Web Tokens)**, **PBKDF2-hashed passwords**, HttpOnly secure cookies and HTTPS/SSL.
For production environments, it is strongly recommended to use [HTTPS/SSL](https://github.com/aelassas/wexflow/wiki/SSL) to encrypt all communication between clients and the Wexflow server.
Securing Wexflow behind **HTTPS** and using strong credentials is essential for reducing potential vulnerabilities.
These measures help protect against XSS, XST, CSRF, MITM, token theft, and insecure password storage.
# Swagger
Wexflow provides a built-in Swagger interface for exploring and testing the API: http://localhost:8000/swagger-ui/
Some api routes may not be listed here, check Swagger UI for full list.
# Workflow Notifications via SSE
You can subscribe to a Server-Sent Events (SSE) endpoint that notifies your client when a workflow job finishes or stops.
For detailed instructions on how to subscribe to workflow status notifications via SSE, see the [Workflow Notifications via SSE](https://github.com/aelassas/wexflow/wiki/Workflow-Notifications-via-SSE) page.
# Endpoints
## Dashboard
**GET** http://localhost:8000/api/v1/status-count
The Android app allows you to do the following things:
- See all the workflows loaded by Wexflow Engine
- See the status of the selected workflow (running, suspended, waiting for approval or disabled)
- Start a workflow
- Stop a workflow
- Suspend a workflow
- Resume a workflow
- Approve a workflow
- Reject a workflow
When you open the Android App, the first thing you'll need to do is to set up Wexflow API URL in the settings.
Then, you will get a login screen.
Here are the credentials to sign in:
- **Username**: admin
- **Password**: wexflow2018
You can change the password from the backend.
---
# Document: Approval
> Source: https://github.com/aelassas/wexflow/wiki/Approval
```xml
```
---
# Document: ApprovalRecordsCreator
> Source: https://github.com/aelassas/wexflow/wiki/ApprovalRecordsCreator
```xml
```
---
# Document: ApprovalWorkflowsCreator
> Source: https://github.com/aelassas/wexflow/wiki/ApprovalWorkflowsCreator
```xml
```
---
# Document: ApproveRecord
> Source: https://github.com/aelassas/wexflow/wiki/ApproveRecord
```xml
```
---
# Document: C# Client
> Source: https://github.com/aelassas/wexflow/wiki/C#-Client
Here is a sample C# client:
```csharp
using Newtonsoft.Json;
using System;
using System.Net.Http;
using System.Text;
using System.Threading.Tasks;
using Wexflow.Core.Service.Contracts;
namespace Wexflow.Core.Service.Client
{
public class WexflowServiceClient(string uri)
{
public string Uri { get; } = uri.TrimEnd('/');
private static async Task DownloadStringAsync(HttpClient client, string url, string token)
{
HttpRequestMessage request = new(HttpMethod.Get, url);
if (!string.IsNullOrEmpty(token))
{
request.Headers.Add("Authorization", $"Bearer {token}");
}
var response = await client.SendAsync(request);
var byteArray = await response.Content.ReadAsByteArrayAsync();
var responseString = Encoding.UTF8.GetString(byteArray, 0, byteArray.Length);
return responseString;
}
private static async Task UploadStringAsync(HttpClient client, string url, string token, string body = "")
{
HttpRequestMessage request = new(HttpMethod.Post, url);
if (!string.IsNullOrEmpty(token))
{
request.Headers.Add("Authorization", $"Bearer {token}");
}
if (!string.IsNullOrEmpty(body))
{
request.Content = new StringContent(body, Encoding.UTF8, "application/json");
}
var response = await client.SendAsync(request);
var byteArray = await response.Content.ReadAsByteArrayAsync();
var responseString = Encoding.UTF8.GetString(byteArray, 0, byteArray.Length);
return responseString;
}
public async Task Login(string username, string password)
{
var uri = $"{Uri}/login";
using HttpClient webClient = new();
var requestBody = JsonConvert.SerializeObject(new { username, password });
var response = await UploadStringAsync(webClient, uri, null, requestBody);
// Deserialize response JSON into a dynamic object
dynamic res = JsonConvert.DeserializeObject(response);
// Return the access_token property
return res?.access_token;
}
public async Task Search(string keyword, string token)
{
var uri = $"{Uri}/search?s={keyword}";
using HttpClient webClient = new();
var response = await DownloadStringAsync(webClient, uri, token);
var workflows = JsonConvert.DeserializeObject(response);
return workflows;
}
public async Task StartWorkflow(int id, string token)
{
var uri = $"{Uri}/start?w={id}";
using HttpClient webClient = new();
var instanceId = await UploadStringAsync(webClient, uri, token);
return Guid.Parse(instanceId.Replace("\"", string.Empty));
}
public async Task StartWorkflowWithVariables(string payload, string token)
{
var uri = $"{Uri}/start-with-variables";
using HttpClient webClient = new();
var instanceId = await UploadStringAsync(webClient, uri, token, payload);
return Guid.Parse(instanceId.Replace("\"", string.Empty));
}
public async Task StopWorkflow(int id, Guid instanceId, string token)
{
var uri = $"{Uri}/stop?w={id}&i={instanceId}";
using HttpClient webClient = new();
_ = await UploadStringAsync(webClient, uri, token);
}
public async Task SuspendWorkflow(int id, Guid instanceId, string token)
{
var uri = $"{Uri}/suspend?w={id}&i={instanceId}";
using HttpClient webClient = new();
_ = await UploadStringAsync(webClient, uri, token);
}
public async Task ResumeWorkflow(int id, Guid instanceId, string token)
{
var uri = $"{Uri}/resume?w={id}&i={instanceId}";
using HttpClient webClient = new();
_ = await UploadStringAsync(webClient, uri, token);
}
public async Task ApproveWorkflow(int id, Guid instanceId, string token)
{
var uri = $"{Uri}/approve?w={id}&i={instanceId}";
using HttpClient webClient = new();
_ = await UploadStringAsync(webClient, uri, token);
}
public async Task RejectWorkflow(int id, Guid instanceId, string token)
{
var uri = $"{Uri}/reject?w={id}&i={instanceId}";
using HttpClient webClient = new();
_ = await UploadStringAsync(webClient, uri, token);
}
public async Task GetWorkflow(string token, int id)
{
var uri = $"{Uri}/workflow?w={id}";
using HttpClient webClient = new();
var response = await DownloadStringAsync(webClient, uri, token);
var workflow = JsonConvert.DeserializeObject(response);
return workflow;
}
public async Task GetUser(string username, string token)
{
var uri = $"{Uri}/user?username={System.Uri.EscapeDataString(username)}";
using HttpClient webClient = new();
var response = await DownloadStringAsync(webClient, uri, token);
var user = JsonConvert.DeserializeObject(response);
return user;
}
}
}
```
---
# Document: C# SSE Client
> Source: https://github.com/aelassas/wexflow/wiki/C#-SSE-Client
## Prerequisites
* Install [.NET](https://dotnet.microsoft.com/)
* Create a new console app:
```
dotnet new console -n dotnet
```
# SSE Client Sample
Here is a sample C# SSE client `Program.cs`:
```cs
using System;
using System.Net.Http;
using System.Net.Http.Headers;
using System.Text.Json;
using System.Text;
using System.IO;
var baseUrl = "http://localhost:8000/api/v1";
var username = "admin";
var password = "wexflow2018";
var workflowId = 41;
using var httpClient = new HttpClient();
async Task LoginAsync(string user, string pass, bool stayConnected = false)
{
var payload = new
{
username = user,
password = pass,
stayConnected = stayConnected
};
var content = new StringContent(JsonSerializer.Serialize(payload), Encoding.UTF8, "application/json");
var response = await httpClient.PostAsync($"{baseUrl}/login", content);
if (!response.IsSuccessStatusCode)
throw new Exception($"Login failed: HTTP {response.StatusCode} - {response.ReasonPhrase}");
var json = await response.Content.ReadAsStringAsync();
var doc = JsonDocument.Parse(json);
return doc.RootElement.GetProperty("access_token").GetString();
}
async Task StartWorkflowAsync(string token, int workflowId)
{
var request = new HttpRequestMessage(HttpMethod.Post, $"{baseUrl}/start?w={workflowId}");
request.Headers.Authorization = new AuthenticationHeaderValue("Bearer", token);
var response = await httpClient.SendAsync(request);
if (!response.IsSuccessStatusCode)
throw new Exception($"Start failed: HTTP {response.StatusCode} - {response.ReasonPhrase}");
var json = await response.Content.ReadAsStringAsync();
return JsonSerializer.Deserialize(json);
}
async Task ListenToSseAsync(string url, string token)
{
var request = new HttpRequestMessage(HttpMethod.Get, url);
request.Headers.Accept.Add(new MediaTypeWithQualityHeaderValue("text/event-stream"));
request.Headers.Authorization = new AuthenticationHeaderValue("Bearer", token);
var response = await httpClient.SendAsync(request, HttpCompletionOption.ResponseHeadersRead);
using var stream = await response.Content.ReadAsStreamAsync();
using var reader = new StreamReader(stream);
Console.WriteLine("SSE connection opened");
while (!reader.EndOfStream)
{
var line = await reader.ReadLineAsync();
if (!string.IsNullOrWhiteSpace(line) && line.StartsWith("data: "))
{
var json = line.Substring("data: ".Length);
try
{
var doc = JsonDocument.Parse(json);
Console.WriteLine("Received SSE JSON:");
Console.WriteLine(doc.RootElement.ToString());
break; // Close after first message
}
catch (Exception ex)
{
Console.WriteLine("Failed to parse SSE JSON: " + ex.Message);
}
}
}
Console.WriteLine("SSE connection closed");
}
try
{
var token = await LoginAsync(username, password);
var jobId = await StartWorkflowAsync(token, workflowId);
Console.WriteLine($"Workflow {workflowId} started. Job ID: {jobId}");
var sseUrl = $"{baseUrl}/sse/{workflowId}/{jobId}";
await ListenToSseAsync(sseUrl, token);
}
catch (Exception ex)
{
Console.WriteLine("Error: " + ex.Message);
}
```
To run the client, use the following command:
```bash
cd dotnet
dotnet run
```
---
# Document: CPP Client
> Source: https://github.com/aelassas/wexflow/wiki/CPP-Client
## Prerequisites
### Windows
* Install [MSYS2](https://www.msys2.org/)
* Open the MSYS2 MinGW 64-bit shell and run:
```
pacman -Syu # Update package database and core system
pacman -Su # Finish update (may require closing/reopening terminal)
pacman -S mingw-w64-x86_64-gcc mingw-w64-x86_64-curl
```
### Linux
On Debian/Ubuntu:
```bash
sudo apt update
sudo apt install libcurl4-openssl-dev build-essential
```
On Fedora:
```bash
sudo dnf install libcurl-devel gcc-c++
```
On Arch Linux:
```bash
sudo pacman -S curl
```
## Client Sample
Here is a sample C++ client `client.cpp`:
```cpp
#include
#include
#include
static size_t WriteCallback(void *contents, size_t size, size_t nmemb, std::string *s)
{
size_t totalSize = size * nmemb;
s->append((char *)contents, totalSize);
return totalSize;
}
std::string login(const std::string &baseUrl, const std::string &username, const std::string &password)
{
CURL *curl = curl_easy_init();
if (!curl)
throw std::runtime_error("Failed to init curl");
std::string url = baseUrl + "/login";
std::string readBuffer;
std::string jsonData = "{\"username\":\"" + username + "\",\"password\":\"" + password + "\",\"stayConnected\":false}";
struct curl_slist *headers = nullptr;
headers = curl_slist_append(headers, "Content-Type: application/json");
curl_easy_setopt(curl, CURLOPT_URL, url.c_str());
curl_easy_setopt(curl, CURLOPT_HTTPHEADER, headers);
curl_easy_setopt(curl, CURLOPT_POSTFIELDS, jsonData.c_str());
curl_easy_setopt(curl, CURLOPT_WRITEFUNCTION, WriteCallback);
curl_easy_setopt(curl, CURLOPT_WRITEDATA, &readBuffer);
CURLcode res = curl_easy_perform(curl);
if (res != CURLE_OK)
{
curl_slist_free_all(headers);
curl_easy_cleanup(curl);
throw std::runtime_error(std::string("curl_easy_perform() failed: ") + curl_easy_strerror(res));
}
long http_code = 0;
curl_easy_getinfo(curl, CURLINFO_RESPONSE_CODE, &http_code);
curl_slist_free_all(headers);
curl_easy_cleanup(curl);
if (http_code != 200)
throw std::runtime_error("Login failed with HTTP code " + std::to_string(http_code));
// Simple parsing to extract access_token value from JSON response
// For production, use a JSON parser like nlohmann/json
auto startPos = readBuffer.find("\"access_token\":\"");
if (startPos == std::string::npos)
throw std::runtime_error("access_token not found in response");
startPos += strlen("\"access_token\":\"");
auto endPos = readBuffer.find("\"", startPos);
if (endPos == std::string::npos)
throw std::runtime_error("Malformed access_token in response");
return readBuffer.substr(startPos, endPos - startPos);
}
std::string startWorkflow(const std::string &baseUrl, const std::string &token, int workflowId)
{
CURL *curl = curl_easy_init();
if (!curl)
throw std::runtime_error("Failed to init curl");
std::string url = baseUrl + "/start?w=" + std::to_string(workflowId);
std::string readBuffer;
struct curl_slist *headers = nullptr;
std::string authHeader = "Authorization: Bearer " + token;
headers = curl_slist_append(headers, authHeader.c_str());
headers = curl_slist_append(headers, "Content-Type: application/json");
headers = curl_slist_append(headers, "Content-Length: 0");
curl_easy_setopt(curl, CURLOPT_URL, url.c_str());
curl_easy_setopt(curl, CURLOPT_HTTPHEADER, headers);
curl_easy_setopt(curl, CURLOPT_POST, 1L);
curl_easy_setopt(curl, CURLOPT_WRITEFUNCTION, WriteCallback);
curl_easy_setopt(curl, CURLOPT_WRITEDATA, &readBuffer);
CURLcode res = curl_easy_perform(curl);
if (res != CURLE_OK)
{
curl_slist_free_all(headers);
curl_easy_cleanup(curl);
throw std::runtime_error(std::string("curl_easy_perform() failed: ") + curl_easy_strerror(res));
}
long http_code = 0;
curl_easy_getinfo(curl, CURLINFO_RESPONSE_CODE, &http_code);
curl_slist_free_all(headers);
curl_easy_cleanup(curl);
if (http_code != 200)
throw std::runtime_error("Start workflow failed with HTTP code " + std::to_string(http_code));
return readBuffer;
}
int main()
{
const std::string baseUrl = "http://localhost:8000/api/v1";
const std::string username = "admin";
const std::string password = "wexflow2018";
const int workflowId = 41;
try
{
std::string token = login(baseUrl, username, password);
std::string jobId = startWorkflow(baseUrl, token, workflowId);
std::cout << "Workflow " << workflowId << " started successfully. Job ID: " << jobId << std::endl;
}
catch (const std::exception &e)
{
std::cerr << "Error: " << e.what() << std::endl;
return 1;
}
return 0;
}
```
## Run the Client
### Windows
Open the MSYS2 MinGW 64-bit shell (not the default MSYS shell) and run:
```bash
g++ client.cpp -o wexflow_client.exe -lcurl -lws2_32 -lcrypt32
./wexflow_client.exe
```
### Linux
```bash
g++ client.cpp -o wexflow_client -lcurl
./wexflow_client
```
---
# Document: CPP SSE Client
> Source: https://github.com/aelassas/wexflow/wiki/CPP-SSE-Client
## Prerequisites
### Windows
* Install [MSYS2](https://www.msys2.org/)
* Open the MSYS2 MinGW 64-bit shell and run:
```
pacman -Syu # Update package database and core system
pacman -Su # Finish update (may require closing/reopening terminal)
pacman -S mingw-w64-x86_64-gcc mingw-w64-x86_64-curl
```
### Linux
On Debian/Ubuntu:
```bash
sudo apt update
sudo apt install libcurl4-openssl-dev build-essential
```
On Fedora:
```bash
sudo dnf install libcurl-devel gcc-c++
```
On Arch Linux:
```bash
sudo pacman -S curl
```
## SSE Client Sample
Here is a sample C++ SSE client `sse.cpp`:
```cpp
#include
#include
#include
#include
#include
#include
using json = nlohmann::json;
static std::string baseUrl = "http://localhost:8000/api/v1";
static std::string username = "admin";
static std::string password = "wexflow2018";
static int workflowId = 41;
// Helper for libcurl response data
static size_t WriteCallback(void *contents, size_t size, size_t nmemb, void *userp)
{
((std::string *)userp)->append((char *)contents, size * nmemb);
return size * nmemb;
}
// Perform HTTP POST with JSON payload, return response body as string
std::string httpPost(const std::string &url, const std::string &jsonPayload, const std::string &bearerToken = "")
{
CURL *curl = curl_easy_init();
if (!curl)
throw std::runtime_error("Failed to init curl");
std::string readBuffer;
struct curl_slist *headers = nullptr;
headers = curl_slist_append(headers, "Content-Type: application/json");
if (!bearerToken.empty())
{
std::string authHeader = "Authorization: Bearer " + bearerToken;
headers = curl_slist_append(headers, authHeader.c_str());
}
curl_easy_setopt(curl, CURLOPT_URL, url.c_str());
curl_easy_setopt(curl, CURLOPT_HTTPHEADER, headers);
curl_easy_setopt(curl, CURLOPT_POSTFIELDS, jsonPayload.c_str());
curl_easy_setopt(curl, CURLOPT_WRITEFUNCTION, WriteCallback);
curl_easy_setopt(curl, CURLOPT_WRITEDATA, &readBuffer);
CURLcode res = curl_easy_perform(curl);
long httpCode = 0;
curl_easy_getinfo(curl, CURLINFO_RESPONSE_CODE, &httpCode);
curl_slist_free_all(headers);
curl_easy_cleanup(curl);
if (res != CURLE_OK)
{
throw std::runtime_error(std::string("curl_easy_perform() failed: ") + curl_easy_strerror(res));
}
if (httpCode < 200 || httpCode >= 300)
{
throw std::runtime_error("HTTP error code: " + std::to_string(httpCode));
}
return readBuffer;
}
// Login to get token
std::string login(const std::string &user, const std::string &pass)
{
json j;
j["username"] = user;
j["password"] = pass;
j["stayConnected"] = false;
std::string url = baseUrl + "/login";
return json::parse(httpPost(url, j.dump()))["access_token"];
}
// Start workflow, returns jobId string
std::string startWorkflow(const std::string &token, int workflowId)
{
std::string url = baseUrl + "/start?w=" + std::to_string(workflowId);
// POST empty body for start
std::string raw = httpPost(url, "", token);
json j = json::parse(raw);
return j.get();
}
// SSE event handler
size_t sseWriteCallback(char *ptr, size_t size, size_t nmemb, void *userdata)
{
size_t totalSize = size * nmemb;
std::string chunk(ptr, totalSize);
std::cout << ">>> SSE Chunk received:\n"
<< chunk << std::endl;
static std::string buffer;
buffer += chunk;
size_t pos;
while ((pos = buffer.find("\n\n")) != std::string::npos)
{
std::string eventBlock = buffer.substr(0, pos);
buffer.erase(0, pos + 2);
size_t dataPos = eventBlock.find("data: ");
if (dataPos != std::string::npos)
{
std::string jsonData = eventBlock.substr(dataPos + 6);
std::cout << "Received SSE data: " << jsonData << std::endl;
try
{
auto j = json::parse(jsonData);
if (j.contains("status") && j["status"] == "Done")
{
std::cout << "Workflow status Done received, exiting SSE loop." << std::endl;
std::atomic *doneFlag = static_cast *>(userdata);
doneFlag->store(true);
}
}
catch (const std::exception &e)
{
std::cerr << "JSON parse error: " << e.what() << std::endl;
}
}
}
return totalSize;
}
// Listen to SSE stream until "Done" status
void listenToSse(const std::string &sseUrl, const std::string &token)
{
CURL *curl = curl_easy_init();
if (!curl)
{
throw std::runtime_error("Failed to init curl");
}
std::atomic done(false);
struct curl_slist *headers = nullptr;
headers = curl_slist_append(headers, "Accept: text/event-stream");
headers = curl_slist_append(headers, ("Authorization: Bearer " + token).c_str());
headers = curl_slist_append(headers, "Expect:"); // Disable 'Expect: 100-continue'
curl_easy_setopt(curl, CURLOPT_URL, sseUrl.c_str());
curl_easy_setopt(curl, CURLOPT_HTTPHEADER, headers);
curl_easy_setopt(curl, CURLOPT_WRITEFUNCTION, sseWriteCallback);
curl_easy_setopt(curl, CURLOPT_WRITEDATA, &done);
curl_easy_setopt(curl, CURLOPT_TIMEOUT, 0L); // Keep connection open indefinitely
curl_easy_setopt(curl, CURLOPT_TCP_KEEPALIVE, 1L); // Keep connection alive
curl_easy_setopt(curl, CURLOPT_NOSIGNAL, 1L); // Required for multithreaded / Windows apps
curl_easy_setopt(curl, CURLOPT_VERBOSE, 1L); // Optional: enable debug output
CURLcode res = curl_easy_perform(curl);
if (res != CURLE_OK)
{
std::cerr << "SSE connection error: " << curl_easy_strerror(res) << std::endl;
}
curl_slist_free_all(headers);
curl_easy_cleanup(curl);
}
int main()
{
try
{
std::string token = login(username, password);
std::string jobId = startWorkflow(token, workflowId);
std::cout << "Workflow " << workflowId << " started. Job ID: " << jobId << std::endl;
std::string sseUrl = baseUrl + "/sse/" + std::to_string(workflowId) + "/" + jobId;
listenToSse(sseUrl, token);
std::cout << "SSE listening finished. Exiting." << std::endl;
}
catch (const std::exception &e)
{
std::cerr << "Error: " << e.what() << std::endl;
}
return 0;
}
```
## Run the Client
Download [samples/clients/sse/cpp](https://github.com/aelassas/wexflow/tree/main/samples/clients/sse/cpp) example from GitHub repo.
### Windows
Open the MSYS2 MinGW 64-bit shell (not the default MSYS shell), and run:
```bash
cd cpp
g++ sse.cpp -o wexflow_sse.exe -Iinclude -lcurl -lws2_32 -lcrypt32
./wexflow_sse.exe
```
### Linux
```bash
cd cpp
g++ sse.cpp -o wexflow_sse -Iinclude -lcurl -pthread
./wexflow_sse
```
---
# Document: Command Line Client
> Source: https://github.com/aelassas/wexflow/wiki/Command-Line-Client
Wexflow provides a command line client for querying Wexflow server. The command line tool is available for both .NET and .NET Core and works on Windows, Linux and macOS.
# Windows (.NET)
The command line tool is located in C:\Program Files\Wexflow\Wexflow.Clients.CommandLine. To run the command line tool, just run the executable C:\Program Files\Wexflow\Wexflow.Clients.CommandLine\Wexflow.Clients.CommandLine.exe
The configuration file C:\Program Files\Wexflow\Wexflow.Clients.CommandLine\Wexflow.Clients.CommandLine.exe.config contains WexflowWebServiceUri, Username and Password settings.
# Windows (.NET Core)
The command line tool is located in .\Wexflow.Clients.CommandLine. To run the command line tool, just run the following command
```bash
cd .\Wexflow.Clients.CommandLine
dotnet Wexflow.Clients.CommandLine.dll
```
The configuration file .\Wexflow.Clients.CommandLine\appsettings.json contains WexflowWebServiceUri, Username and Password settings.
# Linux
After installing Wexflow on Linux, the command line tool is located in /opt/wexflow/Wexflow.Clients.CommandLine. To run the command line tool, just run the following command
```bash
cd /opt/wexflow/Wexflow.Clients.CommandLine
dotnet Wexflow.Clients.CommandLine.dll
```
The configuration file /opt/wexflow/Wexflow.Clients.CommandLine/appsettings.json contains WexflowWebServiceUri, Username and Password settings.
# macOS
After installing Wexflow on macOS, the command line tool is located in /Applications/wexflow/Wexflow.Clients.CommandLine. To run the command line tool, just run the following command
```bash
cd /Applications/wexflow/Wexflow.Clients.CommandLine
dotnet Wexflow.Clients.CommandLine.dll
```
The configuration file /Applications/wexflow/Wexflow.Clients.CommandLine/appsettings.json contains WexflowWebServiceUri, Username and Password settings.
# Options
```
-o, --operation Required. start|suspend|resume|stop|approve|reject
-i, --workflowId Required. Workflow Id
-j, --jobId Job instance id (Guid)
-w, --wait (Default: false) Wait until workflow finishes
--help Display this help screen.
--version Display version information.
```
# Examples
## Fire and wait
The following command starts the workflow 41 and waits until it finishes its jobs:
```bash
Wexflow.Clients.CommandLine.exe -o start -i 41 -w
```
## Fire and forget
The following command starts the workflow 41:
```bash
Wexflow.Clients.CommandLine.exe -o start -i 41
```
## Stop
The following command stops the workflow 41:
```bash
Wexflow.Clients.CommandLine.exe -o stop -i 41 -j 9144e328-dde3-468e-a8ba-913e3d5b7b92
```
## Suspend
The following command suspends the workflow 41:
```bash
Wexflow.Clients.CommandLine.exe -o suspend -i 41 -j 9144e328-dde3-468e-a8ba-913e3d5b7b92
```
## Resume
The following command resumes the workflow 41:
```bash
Wexflow.Clients.CommandLine.exe -o resume -i 41 -j 9144e328-dde3-468e-a8ba-913e3d5b7b92
```
## Approve
The following command approves the workflow 126:
```bash
Wexflow.Clients.CommandLine.exe -o approve -i 126 -j 9144e328-dde3-468e-a8ba-913e3d5b7b92
```
## Reject
The following command rejects the workflow 126:
```bash
Wexflow.Clients.CommandLine.exe -o reject -i 126 -j 9144e328-dde3-468e-a8ba-913e3d5b7b92
```
---
# Document: Configuration
> Source: https://github.com/aelassas/wexflow/wiki/Configuration
# Wexflow Configuration Guide
Wexflow works out of the box with zero configuration. However, if you want to customize settings, this page explains how to configure Wexflow server and its main configuration files.
## Table of Contents
1. [Wexflow Server Configuration](https://github.com/aelassas/wexflow/wiki/Configuration#wexflow-server-configuration)
1. [.NET 4.8](https://github.com/aelassas/wexflow/wiki/Configuration#net-48)
1. [.NET 9.0+](https://github.com/aelassas/wexflow/wiki/Configuration#net-90)
1. [Wexflow.xml Configuration File](https://github.com/aelassas/wexflow/wiki/Configuration#wexflowxml-configuration-file)
1. [.NET 4.8](https://github.com/aelassas/wexflow/wiki/Configuration#net-48-1)
1. [.NET 9.0+](https://github.com/aelassas/wexflow/wiki/Configuration#net-90-1)
1. [Windows](https://github.com/aelassas/wexflow/wiki/Configuration#windows)
1. [Linux](https://github.com/aelassas/wexflow/wiki/Configuration#linux)
1. [macOS](https://github.com/aelassas/wexflow/wiki/Configuration#macos)
1. [Admin Panel Configuration](https://github.com/aelassas/wexflow/wiki/Configuration#admin-panel-configuration)
1. [.NET 4.8](https://github.com/aelassas/wexflow/wiki/Configuration#net-48-2)
1. [.NET 9.0+](https://github.com/aelassas/wexflow/wiki/Configuration#net-90-2)
## Wexflow Server Configuration
### .NET 4.8
You can configure Wexflow Server from C:\Program Files\Wexflow\Wexflow.Server.exe.config:
```xml
...
```
LogLevel options:
* Debug: All logs and debug logs.
* All: All logs without debug logs (Default).
* Severely: Only last workflow log and error logs.
* Minimum: Only last workflow log.
* None: No logs.
### .NET 9.0+
You can configure Wexflow Server from Wexflow.Server/appsettings.json:
```js
{
"WexflowSettingsFile": "C:\\Wexflow-netcore\\Wexflow.xml",
"LogLevel": "All",
"WexflowServicePort": 8000,
"SuperAdminUsername": "admin",
"EnableWorkflowsHotFolder": false,
"EnableRecordsHotFolder": true,
"EnableEmailNotifications": false,
"DateTimeFormat": "dd-MM-yyyy HH:mm:ss", /* Date and time format in the backend. */
"Smtp.Host": "smtp.gmail.com",
"Smtp.Port": 587,
"Smtp.EnableSsl": true,
"Smtp.User": "user",
"Smtp.Password": "password",
"Smtp.From": "user",
"AdminFolder": "..\\Admin",
"HTTPS": false,
"PfxFile": "C:\\Wexflow-netcore\\wexflow.pfx",
"PfxPassword": "wexflow2018"
}
```
> [!NOTE]
> To change Wexflow's server and API port, change `WexflowServicePort` and `port` in `Admin\js\settings.js`. Then restart Wexflow server to apply changes.
## Wexflow.xml Configuration File
Wexflow.xml is the main configuration file of Wexflow server. Its path is configured from:
* .NET 4.8 — in `C:\Program Files\Wexflow\Wexflow.Server.exe.config`
* .NET 9.0+ — in `Wexflow.Server/appsettings.json`
### .NET 4.8
Wexflow.xml is located in: C:\Wexflow\Wexflow.xml
Below is the configuration file Wexflow.xml for the .NET version:
```xml
```
Wexflow ships with 6 persistence providers. You can choose from the following `dbType` options:
* SQLite (Default)
* MongoDB
* SQLServer
* PostgreSQL
* MySQL
* LiteDB
If you change the persistence provider, don't forget to update `connectionString` setting.
### .NET 9.0+
#### Windows
For the .NET 9.0+ version on Windows, Wexflow.xml is located in: C:\Wexflow-netcore\Wexflow.xml
Below is the configuration file Wexflow.xml for the .NET 9.0+ version:
```xml
```
#### Linux
For the .NET 9.0+ version on Linux, Wexflow.xml is located in: /opt/wexflow/Wexflow/Wexflow.xml
Below is the configuration file Wexflow.xml for the .NET 9.0+ version:
```xml
```
#### macOS
For the .NET 9.0+ version on Linux, Wexflow.xml is located in: /Applications/wexflow/Wexflow/Wexflow.xml
Below is the configuration file Wexflow.xml for the .NET 9.0+ version:
```xml
```
## Admin Panel Configuration
It is possible to format date and time in the backend through **DateTimeFormat** setting option. The date is local and can be formatted however you want. The default format is **dd-MM-yyyy HH:mm:ss**.
If you modify this setting, you must restart the Wexflow server to apply changes.
### .NET 4.8
To change the setting option **DateTimeFormat** simply open the settings file C:\Program Files\Wexflow\Wexflow.Server.exe.config and edit the setting option.
### .NET 9.0+
To change the setting option **DateTimeFormat** simply open the settings file Wexflow.Server/appsettings.json and edit the setting option.
---
# Document: Cron Scheduling
> Source: https://github.com/aelassas/wexflow/wiki/Cron-Scheduling
# Introduction
cron is a UNIX tool that has been around for a long time, so its scheduling capabilities are powerful and proven. Wexflow provides the ability to create workflows that start depending on a cron expression.
Cron workflows are often more useful than trigger or periodic workflows, if you need a job-firing schedule that recurs based on calendar-like notions, rather than on the exactly specified intervals.
With cron workflows, you can specify firing-schedules such as "every Friday at noon", or "every weekday and 9:30 am", or even "every 5 minutes between 9:00 am and 10:00 am on every Monday, Wednesday and Friday".
A cron expression is a string comprised of 6 or 7 fields separated by white space. Fields can contain any of the allowed values, along with various combinations of the allowed special characters for that field. The fields are as follows:
```
* * * * * * *
┬ ┬ ┬ ┬ ┬ ┬ ┬
│ │ │ │ │ │ └ Year (1970 - 2099) (Optional) (Allowed Special Characters: , - * /)
│ │ │ │ │ └────── Day of week (1 - 7) (Sunday=1) (Allowed Special Characters: , - * ? / L #)
│ │ │ │ └─────────── Month (1 - 12) (Jan=1) (Allowed Special Characters: , - * /)
│ │ │ └──────────────── Day of month (1 - 31) (Allowed Special Characters: , - * ? / L W)
│ │ └───────────────────── Hours (0 - 23) (Allowed Special Characters: , - * /)
│ └────────────────────────── Minutes (0 - 59) (Allowed Special Characters: , - * /)
└─────────────────────────────── Seconds (0 - 59) (Allowed Special Characters: , - * /)
```
So cron expressions can be as simple as this: * * * * ? *
or more complex, like this: 0/5 14,18,3-39,52 * ? JAN,MAR,SEP MON-FRI 2002-2010
# Pay attention
Wexflow is using [Quartz.NET](https://www.quartz-scheduler.net/) cron expressions. UNIX Cron expressions and Quartz ones are different. Simply:
- In Unix:
```
(minute, hour, day, month, day_of_week, year)
```
- In Quartz:
```
(second, minute, hour, day, month, day_of_week, year)
```
# Special characters
- **""** (“all values”) - used to select all values within a field. For example, "" in the minute field means * “every minute”.
- **?** (“no specific value”) - useful when you need to specify something in one of the two fields in which the character is allowed, but not the other. For example, if I want my workflow to fire on a particular day of the month (say, the 10th), but don’t care what day of the week that happens to be, I would put “10” in the day-of-month field, and “?” in the day-of-week field. See the examples below for clarification.
- **-** used to specify ranges. For example, “10-12” in the hour field means “the hours 10, 11 and 12”.
- **,** used to specify additional values. For example, “MON,WED,FRI” in the day-of-week field means “the days Monday, Wednesday, and Friday”.
- **/** - used to specify increments. For example, “0/15” in the seconds field means “the seconds 0, 15, 30, and 45”. And “5/15” in the seconds field means “the seconds 5, 20, 35, and 50”. You can also specify ‘/’ after the ‘’ character - in this case ‘’ is equivalent to having ‘0’ before the ‘/’. ‘1/3’ in the day-of-month field means “fire every 3 days starting on the first day of the month”.
- **L** (“last”) - has different meaning in each of the two fields in which it is allowed. For example, the value “L” in the day-of-month field means “the last day of the month” - day 31 for January, day 28 for February on non-leap years. If used in the day-of-week field by itself, it simply means “7” or “SAT”. But if used in the day-of-week field after another value, it means “the last xxx day of the month” - for example “6L” means “the last friday of the month”. You can also specify an offset from the last day of the month, such as “L-3” which would mean the third-to-last day of the calendar month. When using the ‘L’ option, it is important not to specify lists, or ranges of values, as you’ll get confusing/unexpected results.
- **W** (“weekday”) - used to specify the weekday (Monday-Friday) nearest the given day. As an example, if you were to specify “15W” as the value for the day-of-month field, the meaning is: “the nearest weekday to the 15th of the month”. So if the 15th is a Saturday, the workflow will fire on Friday the 14th. If the 15th is a Sunday, the workflow will fire on Monday the 16th. If the 15th is a Tuesday, then it will fire on Tuesday the 15th. However if you specify “1W” as the value for day-of-month, and the 1st is a Saturday, the workflow will fire on Monday the 3rd, as it will not ‘jump’ over the boundary of a month’s days. The ‘W’ character can only be specified when the day-of-month is a single day, not a range or list of days. ** The ‘L’ and ‘W’ characters can also be combined in the day-of-month field to yield ‘LW’, which translates to “last weekday of the month”.
- **#** used to specify “the nth” XXX day of the month. For example, the value of “6#3” in the day-of-week field means “the third Friday of the month” (day 6 = Friday and “#3” = the 3rd one in the month). Other examples: “2#1” = the first Monday of the month and “4#5” = the fifth Wednesday of the month. Note that if you specify “#5” and there is not 5 of the given day-of-week in the month, then no firing will occur that month. ** The legal characters and the names of months and days of the week are not case sensitive. MON is the same as mon.
# Examples
Here are some examples:
```
0 0 12 * * ? Fire at 12pm (noon) every day.
0 15 10 ? * * Fire at 10:15am every day.
0 15 10 * * ? Fire at 10:15am every day.
0 15 10 * * ? * Fire at 10:15am every day.
0 15 10 * * ? 2019 Fire at 10:15am every day during the year 2019.
0 * 14 * * ? Fire every minute starting at 2pm and ending at 2:59pm, every day.
0 0/5 14 * * ? Fire every 5 minutes starting at 2pm and ending at 2:55pm, every day.
0 0/5 14,18 * * ? Fire every 5 minutes starting at 2pm and ending at 2:55pm, AND fire every 5 minutes starting at 6pm and ending at 6:55pm, every day.
0 0-5 14 * * ? Fire every minute starting at 2pm and ending at 2:05pm, every day.
0 10,44 14 ? 3 WED Fire at 2:10pm and at 2:44pm every Wednesday in the month of March.
0 15 10 ? * MON-FRI Fire at 10:15am every Monday, Tuesday, Wednesday, Thursday and Friday.
0 15 10 15 * ? Fire at 10:15am on the 15th day of every month.
0 15 10 L * ? Fire at 10:15am on the last day of every month.
0 15 10 L-2 * ? Fire at 10:15am on the 2nd-to-last last day of every month.
0 15 10 ? * 6L Fire at 10:15am on the last Friday of every month.
0 15 10 ? * 6L Fire at 10:15am on the last Friday of every month.
0 15 10 ? * 6L 2019-2020 Fire at 10:15am on every last friday of every month during the years 2019 and 2020.
0 15 10 ? * 6#3 Fire at 10:15am on the third Friday of every month.
0 0 12 1/5 * ? Fire at 12pm (noon) every 5 days every month, starting on the first day of the month.
0 11 11 11 11 ? Fire every November 11th at 11:11am.
0 0 * ? * * * Fire the top of every hour of every day.
*/10 * * * * ? Fire every ten seconds.
0 0 8-10 * * ? 2020 Fire at 8, 9 and 10 o'clock of every day during the year 2020.
0 0 6,19 ? * * Fire at 6:00 AM and 7:00 PM every day.
0 0/30 8-10 ? * * Fire at 8:00, 8:30, 9:00, 9:30, 10:00 and 10:30 every day.
0 0 9-17 * * MON-FRI Fire on the hour nine-to-five weekdays.
0 0 0 25 12 ? Fire at every Christmas Day at midnight, no matter what day of the week it is.
0 15 10 ? * 6L 2022-2025 Fire at 10:15 AM on every Friday of every month during the years 2022, 2023, 2024 and 2025.
0 30 11 ? * 6#2 Fire at 11:30 AM on the second Friday of every month.
```
Pay attention to the effects of ‘?’ and ‘*’ in the day-of-week and day-of-month fields!
# Cron launch type
It is possible to create this type of workflows from Wexflow Designer or through XML editing. However, here is a sample workflow that starts every two minutes:
```xml
```
---
# Document: CsvToJson
> Source: https://github.com/aelassas/wexflow/wiki/CsvToJson
```xml
```
---
# Document: CsvToSql
> Source: https://github.com/aelassas/wexflow/wiki/CsvToSql
```xml
```
---
# Document: CsvToXml
> Source: https://github.com/aelassas/wexflow/wiki/CsvToXml
```xml
```
---
# Document: CsvToYaml
> Source: https://github.com/aelassas/wexflow/wiki/CsvToYaml
```xml
```
---
# Document: Custom Tasks
> Source: https://github.com/aelassas/wexflow/wiki/Custom-Tasks
## Table of Contents
1. [Introduction](https://github.com/aelassas/wexflow/wiki/Custom-Tasks#introduction)
1. [General](https://github.com/aelassas/wexflow/wiki/Custom-Tasks#general)
1. [Creating a Custom Task](https://github.com/aelassas/wexflow/wiki/Custom-Tasks#creating-a-custom-task)
1. [Wexflow Task Class Example](https://github.com/aelassas/wexflow/wiki/Custom-Tasks#wexflow-task-class-example)
1. [Task Status](https://github.com/aelassas/wexflow/wiki/Custom-Tasks#task-status)
1. [Settings](https://github.com/aelassas/wexflow/wiki/Custom-Tasks#settings)
1. [Loading Files](https://github.com/aelassas/wexflow/wiki/Custom-Tasks#loading-files)
1. [Loading Entities](https://github.com/aelassas/wexflow/wiki/Custom-Tasks#loading-entities)
1. [Need A Starting Point?](https://github.com/aelassas/wexflow/wiki/Custom-Tasks#need-a-starting-point)
1. [Installing Your Custom Task in Wexflow](https://github.com/aelassas/wexflow/wiki/Custom-Tasks#installing-your-custom-task-in-wexflow)
1. [.NET Framework 4.8 (Legacy Version)](https://github.com/aelassas/wexflow/wiki/Custom-Tasks#net-framework-48-legacy-version)
1. [.NET 8.0+ (Stable Version)](https://github.com/aelassas/wexflow/wiki/Custom-Tasks#net-80-stable-version)
1. [Referenced Assemblies](https://github.com/aelassas/wexflow/wiki/Custom-Tasks#referenced-assemblies)
1. [Updating a Custom Task](https://github.com/aelassas/wexflow/wiki/Custom-Tasks#updating-a-custom-task)
1. [Using Your Custom Task](https://github.com/aelassas/wexflow/wiki/Custom-Tasks#using-your-custom-task)
1. [Suspend/Resume](https://github.com/aelassas/wexflow/wiki/Custom-Tasks#suspendresume)
1. [Logging](https://github.com/aelassas/wexflow/wiki/Custom-Tasks#logging)
1. [Files](https://github.com/aelassas/wexflow/wiki/Custom-Tasks#files)
1. [Entities](https://github.com/aelassas/wexflow/wiki/Custom-Tasks#entities)
1. [Shared Memory](https://github.com/aelassas/wexflow/wiki/Custom-Tasks#shared-memory)
1. [Designer Integration](https://github.com/aelassas/wexflow/wiki/Custom-Tasks#designer-integration)
1. [Registering the Task](https://github.com/aelassas/wexflow/wiki/Custom-Tasks#registering-the-task)
1. [Adding Settings](https://github.com/aelassas/wexflow/wiki/Custom-Tasks#adding-settings)
1. [How to Debug a Custom Task?](https://github.com/aelassas/wexflow/wiki/Custom-Tasks#how-to-debug-a-custom-task)
## Introduction
Custom tasks are essential in any workflow engine, and Wexflow is no exception.
They allow you to extend the capabilities of Wexflow by integrating your own logic, operations, or external system interactions directly into workflows. Whether you're calling an API, processing files, querying a database, sending notifications, or triggering other services, custom tasks give you the flexibility to automate and orchestrate exactly what your application needs.
In Wexflow, tasks are modular building blocks. While Wexflow includes many built-in tasks, custom tasks empower you to build domain-specific solutions tailored to your environment or business logic.
By creating your own task class that inherits from `Wexflow.Core.Task`, you can plug into Wexflow's engine and leverage features such as:
- Configuration through XML settings
- File and entity sharing across tasks
- Cross-task communication via shared memory
- Logging and debugging integration
- Suspend/resume/stop support
- Flow control using conditions and switch values
This guide walks you through everything you need to know to build, register, and run your own custom tasks in Wexflow.
## General
### Creating a Custom Task
To create a custom task—for example, `MyTask`—follow these steps:
1. **Create a Class Library Project**
- For the **legacy version** (Wexflow on .NET Framework 4.8):
Create a new **Class Library (.NET Framework)** project in **Visual Studio** and name it `Wexflow.Tasks.MyTask`.
Make sure the target framework is set to **.NET Framework 4.8**.
- For the **stable version** (Wexflow on .NET 8.0+):
Use the .NET CLI to create the project:
```bash
dotnet new classlib -n Wexflow.Tasks.MyTask
```
Then edit the `.csproj` file to target .NET 8.0 or later:
```xml
net8.0
```
2. **Add the Wexflow NuGet Package**
You can add the Wexflow package using the NuGet Package Manager in Visual Studio:
```ps1
Install-Package Wexflow
```
Or via the CLI:
```bash
dotnet add package Wexflow
```
**Important:** The project name must start with `Wexflow.Tasks.` and the output DLL file **must also** begin with `Wexflow.Tasks.` for Wexflow to recognize and load it.
### Wexflow Task Class Example
To define your own task, inherit from the `Task` class and override either `RunAsync` (asynchronous) or`Run` (synchronous).
#### Example using `RunAsync`
If you want to use `async/await` functionality, override `RunAsync` instead of `Run`. Here's a simple example of a custom task:
```cs
using System;
using System.Xml.Linq;
using Wexflow.Core;
using Task = Wexflow.Core.Task;
using TaskStatus = Wexflow.Core.TaskStatus;
namespace Wexflow.Tasks.MyTask
{
public class MyTask : Task
{
public MyTask(XElement xe, Workflow wf) : base(xe, wf)
{
// Initialize task settings from the XML element if needed.
// Example: string settingValue = GetSetting("mySetting");
}
public async override System.Threading.Tasks.Task RunAsync()
{
try
{
// Check for workflow cancellation at the start of execution.
// Always include this check in any long-running or looped logic.
Workflow.CancellationTokenSource.Token.ThrowIfCancellationRequested();
// Main task logic goes here.
Info("Running my custom task...");
// Simulate work using asynchronous delay.
await System.Threading.Tasks.Task.Delay(2000);
// Support workflow suspension. This call will block if the workflow is paused.
// Only call WaitOne if cancellation hasn't already been requested.
if (!Workflow.CancellationTokenSource.Token.IsCancellationRequested)
{
WaitOne();
}
// Return success when the task completes successfully
return new TaskStatus(Status.Success);
}
catch (OperationCanceledException)
{
// Don't suppress this exception; it allows proper workflow stop handling.
throw;
}
catch (Exception ex)
{
// Log unexpected errors and return error status.
ErrorFormat("An error occurred while executing the task.", ex);
return new TaskStatus(Status.Error);
}
}
}
}
```
#### Example using `Run`
If you don't need `async/await` functionality, you can use the synchronous `Run` method instead. Here's how the same task would look using `Run`:
```cs
using System;
using System.Threading;
using System.Xml.Linq;
using Wexflow.Core;
using Task = Wexflow.Core.Task;
using TaskStatus = Wexflow.Core.TaskStatus;
namespace Wexflow.Tasks.MyTask
{
public class MyTask : Task
{
public MyTask(XElement xe, Workflow wf) : base(xe, wf)
{
// Initialize task settings from the XML element if needed
// Example: string settingValue = GetSetting("mySetting");
}
public override TaskStatus Run()
{
try
{
// Check for workflow cancellation at the start of execution.
// Always include this check in any long-running or looped logic.
// Required for .NET 8.0+ stable version.
Workflow.CancellationTokenSource.Token.ThrowIfCancellationRequested();
// Main task logic goes here.
Info("Running my custom task...");
// WaitOne() enables suspend/resume support in .NET 8.0+.
// Call this to pause the task when the workflow is suspended.
// Only call WaitOne if cancellation hasn't already been requested.
if (!Workflow.CancellationTokenSource.Token.IsCancellationRequested)
{
WaitOne();
}
// Return success when the task completes successfully
return new TaskStatus(Status.Success);
}
catch (ThreadInterruptedException)
{
// Required for .NET 4.8 legacy version.
// Don't suppress this exception; it allows proper workflow stop handling.
throw;
}
catch (OperationCanceledException)
{
// Required for .NET 8.0+ stable version.
// Don't suppress this exception; it allows proper workflow stop handling.
throw;
}
catch (Exception ex)
{
// Log unexpected errors and return error status.
ErrorFormat("An error occurred while executing the task.", ex);
return new TaskStatus(Status.Error);
}
}
}
}
```
### Task Status
Each task returns a `TaskStatus` object when it finishes performing its job. `TaskStatus` is composed of the following elements:
```csharp
public Status Status { get; set; }
public bool Condition { get; set; }
public string SwitchValue { get; set; }
```
The `Status` can be one of the followings:
```csharp
public enum Status
{
Success,
Warning,
Error
}
```
For example, if a task performs an opetation on a collection of files and if this operation succeeds for all the files then its `Status` should be `Success`. Otherwise, if this operation succeeds for some files and fails for others then its `Status` should be `Warning`. Otherwise, if this operation fails for all the files then its `Status` should be `Error`.
The `Condition` property is designed for flowchart tasks (`If` and `While`). In addition to the `Status` of the task, a flowchart task returns either `true` or `false` after performing its operation.
The `Condition` property should always be set to `false` for sequential tasks.
The `SwitchValue` is designed to be used by `Switch` flowchart nodes. If you set a value in the `SwitchValue` property and use this task in a `Switch` flowchart node, the case corresponding to the value will be executed. Otherwise, if the `Default` case is set, it will be executed.
You can use the `TaskStatus` constructor that suits your needs.
### Settings
To retrieve settings, you can use the following methods:
```csharp
string settingValue = this.GetSetting("settingName");
string settingValue = this.GetSetting("settingName", defaultValue);
string[] settingValues = this.GetSettings("settingName");
bool settingValue = this.GetSettingBool("settingName", defaultValue);
int settingValue = this.GetSettingInt("settingName", defaultValue);
int[] settingValues = this.GetSettingsInt("settingName", defaultValue);
```
### Loading Files
To load a file within a task, you can do it as follows:
```csharp
this.Files.Add(new FileInf(path, this.Id));
```
### Loading Entities
To load an entity within a task, you can do it as follows:
```csharp
this.Entities.Add(myEntity);
```
### Need a starting point?
- For **.NET Framework 4.8 (Legacy)**, you can find a complete example of a custom task here:
[Wexflow.Tasks.Template (.NET 4.8)](https://github.com/aelassas/wexflow/tree/main/src/net/Wexflow.Tasks.Template)
- For **.NET 8.0+ (Stable)**, check out the full example here:
[Wexflow.Tasks.Template (.NET 8.0+)](https://github.com/aelassas/wexflow/tree/main/src/netcore/Wexflow.Tasks.Template)
## Installing Your Custom Task in Wexflow
### .NET Framework 4.8 (Legacy Version)
Once you've finished coding your custom task, compile the class library project and copy the `Wexflow.Tasks.MyTask.dll` assembly into one of the following folders:
- `C:\Program Files\Wexflow\`
- `C:\Wexflow\Tasks\` *(default for Wexflow .NET 4.8 version)*
The `Tasks` folder path can be configured via the `tasksFolder` setting in the configuration file: `C:\Wexflow\Wexflow.xml`
**Important:** The namespace and DLL filename of your task **must start with `Wexflow.Tasks`**.
### .NET 8.0+ (Stable Version)
If you're using the .NET 8.0+ version of Wexflow, copy `Wexflow.Tasks.MyTask.dll` to the appropriate platform-specific folder:
- **Windows**:
- `.\Wexflow.Server`
- `C:\Wexflow-netcore\Tasks`
- **Linux**:
- `/opt/wexflow/Wexflow.Server`
- `/opt/wexflow/Wexflow/Tasks`
- **macOS**:
- `/Applications/wexflow/Wexflow.Server`
- `/Applications/wexflow/Wexflow/Tasks`
### Referenced Assemblies
If your custom task depends on additional assemblies (DLLs), copy them as follows:
- **.NET 4.8**: `C:\Program Files\Wexflow\`
- **.NET 8.0+**:
- **Windows**: `.\Wexflow.Server` or `C:\Wexflow-netcore\Tasks`
- **Linux**: `/opt/wexflow/Wexflow.Server` or `/opt/wexflow/Wexflow/Tasks`
- **macOS**: `/Applications/wexflow/Wexflow.Server` or `/Applications/wexflow/Wexflow/Tasks`
### Updating a Custom Task
To update an existing custom task:
1. Stop Wexflow Server
1. Replace the old DLL and its referenced assemblies with the new versions in the correct folder.
1. Start Wexflow Server:
- **.NET 4.8**: Start the **Wexflow Windows Service**
- **.NET 8.0+**:
- **Windows**: Run `.\run.bat` or start Wexflow Service if you installed it as a Windows Service
- **Linux**: Run `sudo systemctl start wexflow`
- **macOS**: Run `dotnet /Applications/wexflow/Wexflow.Server/Wexflow.Server.dll`
### Using Your Custom Task
Once installed, your task can be used in workflows like this:
```xml
```
**Important:** Make sure the `name` attribute matches the class name of your task (e.g., `MyTask`).
You can also define settings for your task using the `` elements, which can be accessed in your task code via:
```cs
string settingValue = this.GetSetting("settingName");
string settingValue = this.GetSetting("settingName", defaultValue);
string[] settingValues = this.GetSettings("settingName");
bool settingValue = this.GetSettingBool("settingName", defaultValue);
int settingValue = this.GetSettingInt("settingName", defaultValue);
int[] settingValues = this.GetSettingsInt("settingName", defaultValue);
```
You can then test your custom task by creating a new workflow using either the **Designer** or the **XML editor**.
Example using the XML editor:
```xml
```
This workflow will appear in the Wexflow Manager. You can launch and monitor it from there.
That's it! You're now ready to create, install, and run your own custom tasks in Wexflow.
## Suspend/Resume
For .NET 8.0+, if you want to enable suspend/resume for your custom task you need to use `this.WaitOne();` in your custom task. Here is an example:
```cs
using System;
using System.Xml.Linq;
using Wexflow.Core;
namespace Wexflow.Tasks.MyTask
{
public class MyTask : Task
{
public MyTask(XElement xe, Workflow wf) : base(xe, wf)
{
// Initialize task settings from the XML element if needed.
// Example: string settingValue = GetSetting("mySetting");
}
public async override System.Threading.Tasks.Task RunAsync()
{
try
{
// Check for workflow cancellation at the start of execution.
// Always include this check in any long-running or looped logic.
Workflow.CancellationTokenSource.Token.ThrowIfCancellationRequested();
// Main task logic goes here.
Info("Running my custom task...");
// Simulate work using asynchronous delay.
await System.Threading.Tasks.Task.Delay(2000);
// Support workflow suspension. This call will block if the workflow is paused.
// Only call WaitOne if cancellation hasn't already been requested.
if (!Workflow.CancellationTokenSource.Token.IsCancellationRequested)
{
WaitOne();
}
// Return success when the task completes successfully
return new TaskStatus(Status.Success);
}
catch (OperationCanceledException)
{
// Don't suppress this exception; it allows proper workflow stop handling.
throw;
}
catch (Exception ex)
{
// Log unexpected errors and return error status.
ErrorFormat("An error occurred while executing the task.", ex);
return new TaskStatus(Status.Error);
}
}
}
}
```
## Logging
The following methods are available from the Task class for logging:
```cs
public void Info(string msg);
public void InfoFormat(string msg, params object[] args);
public void Debug(string msg);
public void DebugFormat(string msg, params object[] args);
public void Error(string msg);
public void ErrorFormat(string msg, params object[] args);
public void Error(string msg, Exception e);
public void ErrorFormat(string msg, Exception e, params object[] args);
```
## Files
Files can be loaded in a task by calling the methods `Add` or `AddRange`:
```cs
this.Files.Add(myFile);
this.Files.AddRange(myFiles);
```
Then the files loaded can be selected in other tasks by their task `Id` as follows:
```xml
```
To select the files loaded by the running instance of a workflow through the `selectFiles` settings option, you can do it as follows:
```csharp
FileInf[] files = this.SelectFiles();
```
## Entities
Entity is an abstract class having the `Id` of the task as property:
```cs
namespace Wexflow.Core
{
public abstract class Entity
{
public int TaskId { get; set; }
}
}
```
The `Entity` class is designed to be inherited by other classes such as objects retrieved from a database or a web service or an API or whatever. Then, these objects can be loaded in a task by calling the methods `Add` or `AddRange`:
```cs
this.Entities.Add(myEntity);
this.Entities.AddRange(myEntities);
```
Then, the entities loaded can be selected in other tasks by their task `Id` as follows:
```xml
```
Entities are designed to be used in custom tasks.
To select entities loaded by the running instance of a workflow through the `selectEntities` settings option, you can do it as follows:
```csharp
Entity[] entities = this.SelectEntities();
```
The `Entity` class could be very useful when working with custom tasks that manipulate objects from a database or Web Services for example.
## Shared Memory
Tasks contains a `Hashtable` that can be used as a shared memory between them.
To add an object to the `SharedMemory`, simply proceed as follows:
```cs
this.SharedMemory.Add("myKey", myObject);
```
To retrieve an object from the `SharedMemory`, simply proceed as follows:
```cs
var myObject = this.SharedMemory["myKey"];
```
To remove an object from the `SharedMemory`, simply proceed as follows:
```cs
this.SharedMemory.Remove("myKey");
```
**Important:** Always access `this.SharedMemory` in `RunAsync` or `Run` method of a task to get updated values at runtime.
## Designer Integration
### Registering the Task
To make your custom task `MyTask` appear in the available tasks in the designer, simply open the file `C:\Wexflow\TasksNames.json` and add `MyTask` in it as follows:
```js
[
...
{ "Name": "MyTask", "Description": "MyTask description."},
]
```
If you use the .NET 8.0+ version of Wexflow, you need to edit this file:
* **Windows**: `C:\Wexflow-netcore\TasksNames.json`
* **Linux**: `/opt/wexflow/Wexflow/TasksNames.json`
* **macOS**: `/Applications/wexflow/Wexflow/TasksNames.json`
### Adding Settings
You must also add the settings by opening the file `C:\Wexflow\TasksSettings.json` and adding your custom settings as follows:
```js
{
...
"MyTask": [ {"Name": "settingName", "Required": true, "Type": "string", "List": [], "DefaultValue": ""} ],
}
```
If you use the .NET 8.0+ version of Wexflow, you need to edit this file:
* **Windows**: `C:\Wexflow-netcore\TasksSettings.json`
* **Linux**: `/opt/wexflow/Wexflow/TasksSettings.json`
* **macOS**: `/Applications/wexflow/Wexflow/TasksSettings.json`
The available types are:
* `string`
* `int`
* `bool`
* `password`
* `list`
* `user`
* `record`
`user` type refers to registered users in Wexflow.
`record` type refers to registered records in Wexflow.
If you choose `list` type, you have to set the available list options. Here is an example:
```js
{
...
"MyTask": [ {"Name": "protocol", "Required": true, "Type": "list", "List": ["ftp", "ftps", "sftp"], "DefaultValue": ""} ],
}
```
That's it. `MyTask` will show up in the designer and when selected its settings will show up as well.
## How to Debug a Custom Task?
### 1. Build Your Task DLL in Debug Mode
* Compile your custom task project with Debug configuration.
* Make sure the .pdb symbol files are generated alongside the .dll.
* Copy both .dll and .pdb files to the Wexflow Tasks folder (e.g. C:\Wexflow-netcore\Tasks).
### 2. Attach Visual Studio Debugger to Wexflow Process
* Launch Wexflow server.
* In Visual Studio, go to Debug → Attach to Process...
* Find and select the Wexflow process:
* Enable **Show processes from all users**
* If you're running Wexflow as a Windows Service (legacy), make sure the service is started and select: `Wexflow.Server.exe`
* If you're running Wexflow as a Windows Service (stable via NSSM), make sure the service is started and select: `dotnet.exe` process that's running `Wexflow.Server.dll`.
* If you're running Wexflow from the command prompt using `dotnet Wexflow.Server.dll`, Find and select the `dotnet.exe` process that's running `Wexflow.Server.dll`.
* Click Attach.
### 3. Ensure Symbols (.pdb) Are Loaded
* After attaching, open Modules window (Debug → Windows → Modules).
* Locate your custom DLL (e.g. Wexflow.Tasks.MyTask.dll).
* Check if symbols are loaded:
* If not loaded, right-click the module → Load Symbols and browse to your .pdb file.
* Confirm the symbol path is correct and matches your DLL.
### 4. Set Breakpoints in Your Task Code
* Open your custom task source code in Visual Studio as Admin.
* Set breakpoints inside the `RunAsync` or `Run` methods or anywhere you want to debug.
### 5. Trigger Your Workflow
* Run the workflow that uses your custom task (via Designer or API).
* When execution reaches your breakpoint, Visual Studio will break.
### 6. Additional Tips
* Make sure your DLL in the Tasks folder is the same version you built and debugged.
* If debugging symbols don’t load automatically, try deleting older DLLs and PDBs before copying new ones.
* You can enable detailed logging inside your task with `Info()`, `Debug()`, and `Error()` calls for extra insights.
---
# Document: Docker
> Source: https://github.com/aelassas/wexflow/wiki/Docker
## Docker Hub
You can run Wexflow using Docker from the official image on Docker Hub:
```bash
docker run -d -p 8000:8000 --name wexflow aelassas/wexflow:latest
```
Then access the Wexflow Admin Panel at: http://localhost:8000
- **Username:** `admin`
- **Password:** `wexflow2018`
Using compose, here's a sample `docker-compose.yml`:
```yml
services:
wexflow:
image: aelassas/wexflow:latest
container_name: wexflow
ports:
- "8000:8000"
volumes:
# - ./wexflow-config/Wexflow.xml:/opt/wexflow/Wexflow/Wexflow.xml
# - ./wexflow-config/Database:/opt/wexflow/Wexflow/Database
# - ./wexflow-config/appsettings.json:/opt/wexflow/Wexflow.Server/appsettings.json
# - ./wexflow-config/settings.js:/opt/wexflow/Admin/js/settings.js
restart: unless-stopped
```
To run the compose:
```bash
docker compose up
```
For full Docker usage and available options, see the [Docker Hub page](https://hub.docker.com/r/aelassas/wexflow).
## Walkthroughs
* [Set up SSL in the Docker image](https://github.com/aelassas/wexflow/blob/main/src/docker/ssl-image.md)
* [Set up SSL with Docker Compose](https://github.com/aelassas/wexflow/blob/main/src/docker/ssl-compose.md)
* [Set up SSL with a gateway or reverse proxy](https://github.com/aelassas/wexflow/blob/main/src/docker/ssl-gateway.md)
* [Run Wexflow inside a Windows container](https://github.com/aelassas/wexflow/blob/main/src/docker/windows.md)
* [Change the default port](https://github.com/aelassas/wexflow/blob/main/src/docker/change-port.md)
## Build and Run Docker Image Locally
This section describes how build and run Wexflow Docker image.
* Download and unzip the latest version of [wexflow-x.x-linux-netcore.zip](https://github.com/aelassas/wexflow/releases/latest):
```bash
unzip wexflow-x.x-linux-netcore.zip
```
The folder **./wexflow/** will be created on your current folder.
* Download [Dockerfile and docker-compose.yml](https://github.com/aelassas/wexflow/tree/main/src/docker) files and copy them on your current folder (next to wexflow folder). The folder structure should be like this:
```
./
├── wexflow/
├── Dockerfile
├── docker-compose.yml
```
* Run the following command on your current folder:
```bash
docker compose up
```
The folder **./wexflow/** will be mounted during the compose at runtime so you can have access to **./wexflow/Wexflow** configuration folder and add custom tasks and their references at runtime, access log files and change the configuration if you want.
That's it Wexflow will start and the backend will be accessible from: http://localhost:8011/
If you've already deployed the Wexflow image and want to upgrade to a newer version, run the following commands to ensure you get all the latest updates:
```bash
docker compose build --no-cache
docker compose up
```
If you want to use MongoDB instead of SQLite, follow the instructions in [docker-compose.yml](https://github.com/aelassas/wexflow/blob/main/src/docker/docker-compose.yml) file.
---
# Document: EnvironmentVariable
> Source: https://github.com/aelassas/wexflow/wiki/EnvironmentVariable
```xml
```
---
# Document: ExecCs
> Source: https://github.com/aelassas/wexflow/wiki/ExecCs
```xml
```
---
# Document: ExecPython
> Source: https://github.com/aelassas/wexflow/wiki/ExecPython
```xml
```
---
# Document: ExecVb
> Source: https://github.com/aelassas/wexflow/wiki/ExecVb
```xml
```
---
# Document: FileContentMatch
> Source: https://github.com/aelassas/wexflow/wiki/FileContentMatch
```xml
```
---
# Document: FileExists
> Source: https://github.com/aelassas/wexflow/wiki/FileExists
```xml
```
---
# Document: FileMatch
> Source: https://github.com/aelassas/wexflow/wiki/FileMatch
```xml
```
---
# Document: FileNotExist
> Source: https://github.com/aelassas/wexflow/wiki/FileNotExist
```xml
```
Here is a sample workflow:
```xml
```
---
# Document: FileNotMatch
> Source: https://github.com/aelassas/wexflow/wiki/FileNotMatch
```xml
```
Here is a sample workflow:
```xml
```
---
# Document: FileSystemWatcher
> Source: https://github.com/aelassas/wexflow/wiki/FileSystemWatcher
```xml
```
---
# Document: FilesConcat
> Source: https://github.com/aelassas/wexflow/wiki/FilesConcat
```xml
```
---
# Document: FilesCopier
> Source: https://github.com/aelassas/wexflow/wiki/FilesCopier
```xml
```
---
# Document: FilesDecryptor
> Source: https://github.com/aelassas/wexflow/wiki/FilesDecryptor
```xml
```
---
# Document: FilesDiff
> Source: https://github.com/aelassas/wexflow/wiki/FilesDiff
```xml
```
---
# Document: FilesEncryptor
> Source: https://github.com/aelassas/wexflow/wiki/FilesEncryptor
```xml
```
---
# Document: FilesEqual
> Source: https://github.com/aelassas/wexflow/wiki/FilesEqual
```xml
```
---
# Document: FilesExist
> Source: https://github.com/aelassas/wexflow/wiki/FilesExist
```xml
```
---
# Document: FilesInfo
> Source: https://github.com/aelassas/wexflow/wiki/FilesInfo
```xml
```
---
# Document: FilesJoiner
> Source: https://github.com/aelassas/wexflow/wiki/FilesJoiner
```xml
```
---
# Document: FilesLoader
> Source: https://github.com/aelassas/wexflow/wiki/FilesLoader
```xml
```
---
# Document: FilesLoaderEx
> Source: https://github.com/aelassas/wexflow/wiki/FilesLoaderEx
```xml
-->
```
---
# Document: FilesMover
> Source: https://github.com/aelassas/wexflow/wiki/FilesMover
```xml
```
---
# Document: FilesRemover
> Source: https://github.com/aelassas/wexflow/wiki/FilesRemover
```xml
```
---
# Document: FilesRenamer
> Source: https://github.com/aelassas/wexflow/wiki/FilesRenamer
```xml
```
---
# Document: FilesSplitter
> Source: https://github.com/aelassas/wexflow/wiki/FilesSplitter
```xml
```
---
# Document: FolderExists
> Source: https://github.com/aelassas/wexflow/wiki/FolderExists
```xml
```
---
# Document: Fork, Customize, and Sync
> Source: https://github.com/aelassas/wexflow/wiki/Fork,-Customize,-and-Sync
This guide shows you how to fork the Wexflow repository, make your own changes, and keep your version up to date with the official repository.
## Table of Contents
1. [Fork the Repository](https://github.com/aelassas/wexflow/wiki/Fork,-Customize,-and-Sync#1-fork-the-repository)
2. [Clone Your Fork](https://github.com/aelassas/wexflow/wiki/Fork,-Customize,-and-Sync#2-clone-your-fork)
3. [Add Upstream Remote](https://github.com/aelassas/wexflow/wiki/Fork,-Customize,-and-Sync#3-add-upstream-remote)
4. [Sync Your Main Branch](https://github.com/aelassas/wexflow/wiki/Fork,-Customize,-and-Sync#4-sync-your-main-branch)
5. [Create a Feature Branch](https://github.com/aelassas/wexflow/wiki/Fork,-Customize,-and-Sync#5-create-a-feature-branch)
6. [Keep Your Feature Branch in Sync](https://github.com/aelassas/wexflow/wiki/Fork,-Customize,-and-Sync#6-keep-your-feature-branch-in-sync)
7. [Creating a Pull Request](https://github.com/aelassas/wexflow/wiki/Fork,-Customize,-and-Sync#7-creating-a-pull-request)
## 1. Fork the Repository
**Fork** the repository on GitHub:
[https://github.com/aelassas/wexflow](https://github.com/aelassas/wexflow)
## 2. Clone Your Fork
**Clone** your fork:
```bash
git clone https://github.com/your-username/wexflow.git
cd wexflow
```
## 3. Add Upstream Remote
**Add the original repository as an upstream remote**:
```bash
git remote add upstream https://github.com/aelassas/wexflow.git
```
## 4. Sync Your Main Branch
**Fetch the latest changes** from the original repo and **merge** them into your `main` branch:
```bash
git fetch upstream
git checkout main
git merge upstream/main
```
## 5. Create a Feature Branch
Create a new branch for your custom changes:
```bash
git checkout -b my-custom-feature
```
If you're just making small quick changes, working directly on `main` might be simpler initially. But for ongoing customization or multiple features, branching is the safer, cleaner approach.
## 6. Keep Your Feature Branch in Sync
To keep your custom branch in sync with the latest upstream `main`, do this regularly:
```bash
# Fetch upstream changes
git fetch upstream
# Switch to your main branch and update it
git checkout main
git merge upstream/main
# Switch back to your custom branch
git checkout my-custom-feature
# Merge the updated main into your branch
git merge main
```
This way, your feature branch stays up to date with the official repository without losing your changes.
## 7. Creating a Pull Request
If you've made changes to your fork and want to contribute them back to the official repository:
1. **Push your branch to your GitHub fork:**
```bash
git push origin my-custom-feature
```
2. Go to your fork on GitHub (e.g. `https://github.com/your-username/wexflow`) and you'll see a **"Compare & pull request"** button.
3. Click the button and create a pull request (PR) targeting the `main` branch of the original repository (`aelassas/wexflow`).
4. Include a clear title and description explaining what your PR changes or fixes.
Once submitted, your PR will be reviewed, and if everything looks good, it can be merged into the official repository.
---
# Document: Ftp
> Source: https://github.com/aelassas/wexflow/wiki/Ftp
```xml
```
---
# Document: Functions
> Source: https://github.com/aelassas/wexflow/wiki/Functions
You can use the following functions in your workflow:
* `$DateTime()`: returns the current Unix timestamp in milliseconds
* `$Guid()`: returns a new Guid
You can place these functions wherever you want in your workflow, in your local variables or in task settings.
Here is a sample workflow that uses these functions:
```xml
```
---
# Document: Getting Started
> Source: https://github.com/aelassas/wexflow/wiki/Getting-Started
Welcome to Wexflow! This guide will help you quickly understand how to start using Wexflow for workflow automation. Whether you are new to Wexflow or workflow automation in general, this guide will walk you through the basics step by step.
Wexflow is a powerful and flexible workflow engine that lets you create automated workflows easily. You can design workflows using a visual designer, write them in XML or JSON, and run them on your computer or server.
## Table of Contents
1. [Prerequisites](https://github.com/aelassas/wexflow/wiki/Getting-Started#prerequisites)
1. [Admin Panel Login](https://github.com/aelassas/wexflow/wiki/Getting-Started#admin-panel-login)
1. [Designer Overview](https://github.com/aelassas/wexflow/wiki/Getting-Started#designer-overview)
1. [Workflow Syntax](https://github.com/aelassas/wexflow/wiki/Getting-Started#workflow-syntax)
1. [Workflow Sample](https://github.com/aelassas/wexflow/wiki/Getting-Started#workflow-sample)
1. [Workflow Configuration](https://github.com/aelassas/wexflow/wiki/Getting-Started#workflow-configuration)
1. [Hot Reloading](https://github.com/aelassas/wexflow/wiki/Getting-Started#hot-reloading)
1. [How Tasks Communicate](https://github.com/aelassas/wexflow/wiki/Getting-Started#how-tasks-communicate)
1. [Wexflow Manager](https://github.com/aelassas/wexflow/wiki/Getting-Started#wexflow-manager)
1. [Admin Panel](https://github.com/aelassas/wexflow/wiki/Getting-Started#admin-panel)
1. [Login](https://github.com/aelassas/wexflow/wiki/Getting-Started#login)
1. [Password Reset](https://github.com/aelassas/wexflow/wiki/Getting-Started#password-reset)
1. [Dashboard](https://github.com/aelassas/wexflow/wiki/Getting-Started#dashboard)
1. [Workflow Manager](https://github.com/aelassas/wexflow/wiki/Getting-Started#workflow-manager)
1. [Workflow Designer](https://github.com/aelassas/wexflow/wiki/Getting-Started#workflow-designer)
1. [Approval](https://github.com/aelassas/wexflow/wiki/Getting-Started#approval)
1. [History](https://github.com/aelassas/wexflow/wiki/Getting-Started#history)
1. [Users](https://github.com/aelassas/wexflow/wiki/Getting-Started#users)
1. [Profiles](https://github.com/aelassas/wexflow/wiki/Getting-Started#profiles)
1. [Configuration](https://github.com/aelassas/wexflow/wiki/Getting-Started#configuration)
1. [.NET 4.8](https://github.com/aelassas/wexflow/wiki/Getting-Started#net-48)
1. [.NET 9.0+](https://github.com/aelassas/wexflow/wiki/Getting-Started#net-90)
## Prerequisites
Before you begin, make sure Wexflow is installed on your system.
You can find detailed installation instructions [here](https://github.com/aelassas/wexflow/wiki/Installing).
## Admin Panel Login
Once Wexflow is installed, you can access the admin panel at:
- **URL:** http://localhost:8000/
- **Username:** `admin`
- **Password:** `wexflow2018`
**Important:** For your security, change the default password after your first login.
## Designer Overview
Wexflow makes it easy to create automated workflows using different methods, depending on your preference or technical level.
You can design workflows in the following ways:
- **UI Designer**
This is a visual, drag-and-drop editor built into Wexflow’s web interface. It lets you create and manage workflows without writing any code. Ideal for beginners or users who prefer a user-friendly interface.
- **XML**
You can define workflows manually in XML files. This method gives you full control and flexibility over workflow configuration. It's great for developers or advanced users who want to customize workflows in detail.
- **JSON**
Similar to XML, but using JSON format. This is useful for users who are more comfortable with JSON syntax. It can also be used when integrating Wexflow into other systems or APIs that work with JSON.
Whether you choose the UI Designer or go with XML/JSON files, all workflows follow the same structure and logic. If you're just getting started, the UI Designer is a great place to begin!
## Workflow Syntax
### Workflow Sample
Understanding XML/JSON syntax is essential to mastering Wexflow.
Let's take a quick look at a simple example to understand how Wexflow works.
```xml
```
This sample workflow is named **"Sample"** and is designed to **load files from a folder and move them to another folder**. It consists of two tasks and is triggered manually.
#### Key Components
- **Workflow ID**: `1`
- **Name**: `Sample`
- **Launch Type**: `trigger` — This means the workflow runs manually (e.g., from Wexflow Manager or API).
- **Enabled**: `true` — The workflow is active.
- **Approval**: `false` — No manual approval is required.
- **Parallel Jobs**: `true` — Workflow jobs can run in parallel.
- **Retry Count**: `0` — Tasks won’t be retried on failure.
- **Retry Timeout**: `1500ms` — Time to wait between retries (if retry was enabled).
#### Tasks
1. **FilesLoader** (`id="1"`)
- **Description**: Loads files.
- **Action**: Reads all files from the folder `C:\Input\`.
2. **FilesMover** (`id="2"`)
- **Description**: Moves files.
- **Action**: Moves the files loaded by the first task into the folder `C:\Output\`.
- It uses the `selectFiles` setting to reference the output of Task 1.
##### Task Names
Each task in a workflow must use a valid task name recognized by Wexflow. These task names correspond to built-in or custom tasks that define the specific action to be performed (e.g., file operations, database queries, sending emails, etc.).
In the sample workflow above, we used two tasks:
- `FilesLoader`: loads files from a specified folder.
- `FilesMover`: moves files to another folder.
You can find the full list of available task names, along with their descriptions, required settings, and usage examples in the official documentation:
* [Wexflow Tasks Documentation](https://github.com/aelassas/wexflow/wiki/Tasks)
If you're building [custom tasks](https://github.com/aelassas/wexflow/wiki/Custom-Tasks), make sure to register them properly and use unique names to avoid conflicts.
> Tip: Use the `TasksNames.json` and `TasksSettings.json` files in the Wexflow configuration folder to customize task metadata used by the Designer UI.
#### What This Workflow Does
When triggered, Wexflow:
1. Loads all files from `C:\Input\`.
2. Passes them to the next task.
3. Moves them into `C:\Output\`.
This workflow illustrates the basics of Wexflow: defining a sequence of tasks, configuring settings, and running them in order.
It's a perfect starting point to understand how Wexflow automates file-based operations.
If you don't define an `` in a workflow, the tasks will run sequentially in the order they are listed. To create a custom execution flow, you can define an ``. This allows you to:
- Control the execution order of tasks.
- Use flowchart logic nodes such as `If`, `While`, and `Switch`.
- Nest flowchart nodes within each other to any depth.
- Handle events like `OnSuccess`, `OnWarning`, and `OnError` to run specific flows when the workflow ends.
These features let you build complex, dynamic workflows adapted to your specific requirements.
You can learn more about the Execution Graph [here](https://github.com/aelassas/Wexflow/wiki/Samples#execution-graph).
### Workflow Configuration
Below are all the configuration options of a workflow (XML):
```xml
```
For cron workflows, read the following [documentation](https://github.com/aelassas/Wexflow/wiki/Cron-Scheduling) for more details.
Local variables are explained [here](https://github.com/aelassas/Wexflow/wiki/Local-Variables).
Global variables are explained [here](https://github.com/aelassas/Wexflow/wiki/Global-Variables).
The name option of a Task must be one of the names listed in the following [documentation](https://github.com/aelassas/wexflow/wiki/Tasks). You can find the documentation of each task in the Documentation folder of Wexflow.
The execution graph is explained in the [samples section](https://github.com/aelassas/Wexflow/wiki/Samples#execution-graph).
To learn how to make your own workflows, you can check out the workflow samples availabe in the Designer, in the [samples](https://github.com/aelassas/Wexflow/wiki/Samples) section, and read the tasks documentation available in Configuration folder.
### Hot Reloading
Wexflow detects changes and automatically adds, deletes, or reloads workflows. No service restart required.
To disable a workflow, set:
```xml
```
Wexflow supports hot reloading from a default folder called `Workflows` if you want to work with XML files without using the Designer. If the setting [EnableWorkflowsHotFolder](https://github.com/aelassas/wexflow/wiki/Configuration) is enabled in the configuration file, any XML placed in the `Workflows` folder will be automatically picked up by Wexflow. This allows you to create, update, or remove workflows on the fly by simply editing files in that folder — no need to restart the service or reload manually.
### How Tasks Communicate
State is transferred between tasks through `selectFiles` and `selectEntities` settings.
This works the following way:
1. A task in a workflow does its job and produces files which it stores in a collection.
2. Another task (must be in the same workflow) can afterwards reference those files with the `selectFiles` XML property, specifying the ID of the task that produced the required files. It then can use these files to do its own job.
More visually (from the examples):
```xml
```
`selectFiles` can also load files through custom tags. Refer to [Xslt](https://github.com/aelassas/wexflow/wiki/Xslt) task for this.
`selectEntities` setting works the same way as `selectFiles`. The only difference is that `selectEntities` is designed to be used for tasks that manipulate custom objects from a database or web services in custom tasks. To go further, read this [documentation](https://github.com/aelassas/Wexflow/wiki/Custom-tasks#entities) regarding entities.
## Wexflow Manager

When you open Wexflow Manager for the first time, you will get a login window.
Here are the credentials to sign in:
- **Username**: admin
- **Password**: wexflow2018
You can change the password from the admin panel.
Wexflow Manager is a simple application that allows you to do the following things:
- See all the workflows loaded by Wexflow Engine.
- See the status of the selected workflow (running, suspended, waiting for approval or disabled).
- Start a workflow.
- Stop a workflow.
- Suspend a workflow.
- Resume a workflow.
- Approve an approval workflow.
- Reject an approval workflow.
- The "Backend" button opens the admin panel from which you can manage workflows, design workflows, track workfows and have real-time statistics on workflows.
- The "Logs" button allows to view the logs of the day.
- The "Refresh" button allows to reload the list of workflows.
- The "Restart server" button allows to restart Wexflow Server.
- The "Search" button allows to search for workflows.
- The "Help" menu opens the help page.
- The "About" menu shows the version of Wexflow and checks if a new version is available.
To see what's going on in Wexflow, open the log file C:\Program Files\Wexflow\Wexflow.log in a text editor like [Notepad++](https://notepad-plus-plus.org/). Notepad ++ will update the log file as it fills up.
## Admin Panel
The admin panel is accessible at: http://localhost:8000
The admin panel gives real-time statistics on workflows. It will let you manage, design and track your workflows with ease and flexibility. You can use the admin panel to access, configure, manage, administer, and develop your workflows with ease.
### Login
When you open the admin panel for the first time, you will get a login window.
Here are the credentials to sign in:
- **Username**: admin
- **Password**: wexflow2018
After you sign in, you can change the password from the "Users" page.
### Password reset
If a user forgot his password, he can click on "Forgot password?" link to reset his password.
When the user clicks on "Submit" button, an email is sent to him with a temporary password that he can change after he signs in.
To allow the admin panel sending emails, the SMPT configuration must be set in the [configuration](https://github.com/aelassas/wexflow/wiki/Configuration).
### Dashboard

After you sign in, you will arrive on the dashboard page. Wexflow gives you a beautiful dashboard to view real-time statistics on your workflows. Indeed, the "Dashboard" page gives you real-time statistics on workflows and will let you track your workflow server with ease and detail. From the dashboard, you can also filter the workflow entries by a keyword or by date. You can also order the workflow entries by date, by name, etc.
### Workflow Manager

The "Manager" page will let you manage your workflows. From this page you can start a workflow, suspend a running workflow, resume a suspended workflow, stop a running workflow and search for workflows.
### Workflow Designer

The "Designer" page will let you design your workflows. From this page you can create a new workflow, edit an existing workflow or delete a workflow. Using the "Designer" page, we get a nice visual overview of the dependency graph of the workflow. Each node represents a task which has to be run.
Furthermore, the "Designer" page allows to edit workflow files through its Web XML or JSON editor.
Press **Ctrl+S** to save your workflow.
Press **Ctrl+Alt+H** in XML or JSON view for keyboard shortcuts.
### Approval
The "Approval" page will let you view all approval workflows and will let you approve or disapprove workflows.
### History

The "History" page will let you track all your workflows and everything that happens on the workflow server.From this page you will have an overview of all the workflow instances executed on the workflow server. Furthermore, you can filter the entries by keywords or date. You can also order the entries by date, by name, etc.
### Users
The "Users" page allows to create new users, change passwords and user's informations, and delete users who have restricted access.
A user who has restricted rights has only access to the "Dashboard" page and the "History" page.
### Profiles
The "Profiles" page allows to assign workflows to users. Once the workflow assigned, the user can run it, modify it and delete it.
## Configuration
Wexflow works out of the box with **zero configuration**. You can install it and start running workflows immediately.
However, if you want to customize the behavior of the engine or environment, it’s helpful to know where the configuration files are and what they do. Below is an overview for both .NET 4.8 and .NET 9.0+ versions.
### .NET 4.8
When installing Wexflow on .NET 4.8, the following folders are created:
- `C:\Wexflow\` — Main configuration folder
- `C:\WexflowTesting\` — Contains test data for workflows
Contents of `C:\Wexflow\`:
- **[Wexflow.xml](https://github.com/aelassas/wexflow/wiki/Configuration#wexflowxml)**
Main configuration file of the Wexflow server. Its path can be customized in
`C:\Program Files\Wexflow\Wexflow.Server.exe.config`.
- **Database/**
Contains the internal database used by the Wexflow engine.
- **Workflows/**
Default folder for workflows. Used for hot reloading if
[`EnableWorkflowsHotFolder`](https://github.com/aelassas/wexflow/wiki/Configuration) is enabled.
- **Temp/**
Temporary working directory.
- **Tasks/** *(optional)*
Can contain `.dll` files for [custom tasks](https://github.com/aelassas/Wexflow/wiki/Custom-tasks).
- **Workflow.xsd**
XML Schema Definition file for validating workflows.
- **GlobalVariables.xml**
Stores [global variables](https://github.com/aelassas/Wexflow/wiki/Global-variables) accessible across workflows.
- **TasksNames.json**
Maps task names for use in the Designer interface. Refer to
[Tasks documentation](https://github.com/aelassas/Wexflow/wiki/Tasks-documentation).
- **TasksSettings.json**
Defines default task settings used by the Designer.
Log files:
- Daily logs are written to `C:\Program Files\Wexflow\Wexflow.log`.
- Archived logs follow this pattern: `Wexflow.logyyyyMMdd`.
### .NET 9.0+
On .NET 9.0+, Wexflow supports **cross-platform configuration**:
#### Windows
- Folders:
`C:\Wexflow-dotnet-core\` and `C:\WexflowTesting\`
- Main config:
`C:\Wexflow-dotnet-core\Wexflow.xml` (configured via `Wexflow.Server\appsettings.json`)
- Logs:
Written to `Wexflow.Server\Wexflow.log`
#### Linux
- Folders:
`/opt/wexflow/Wexflow/` and `/opt/wexflow/WexflowTesting/`
- Main config:
`/opt/wexflow/Wexflow/Wexflow.xml` (configured via `/opt/wexflow/Wexflow.Server/appsettings.json`)
- Logs:
Written to `/opt/wexflow/Wexflow.Server/Wexflow.log`
#### macOS
- Folders:
`/Applications/wexflow/Wexflow/` and `/Applications/wexflow/WexflowTesting/`
- Main config:
`/Applications/wexflow/Wexflow/Wexflow.xml` (configured via `/Applications/wexflow/Wexflow.Server/appsettings.json`)
- Logs:
Written to `/Applications/wexflow/Wexflow.Server/Wexflow.log`
For advanced setup, see the full [Configuration documentation](https://github.com/aelassas/Wexflow/wiki/Configuration).
---
# Document: Global Variables
> Source: https://github.com/aelassas/wexflow/wiki/Global-Variables
Global variables are declared by default in the file C:\Wexflow\GlobalVariables.xml
The path of this file can be edited from the configuration file C:\Wexflow\Wexflow.xml
Here is an example of GlobalVariables.xml:
```xml
```
The variables can then be used in workflow files as follow:
```xml
```
When Wexflow server loads the workflow file, the workflow file is parsed so that the global variables are replaced by their values.
---
# Document: Go Client
> Source: https://github.com/aelassas/wexflow/wiki/Go-Client
## Prerequisites
* Install [Go](https://go.dev/)
## Client Sample
Here is a sample Go client `client.go`:
```go
package main
import (
"bytes"
"encoding/json"
"fmt"
"io"
"log"
"net/http"
)
const (
baseURL = "http://localhost:8000/api/v1"
username = "admin"
password = "wexflow2018"
workflowId = 41
)
type loginRequest struct {
Username string `json:"username"`
Password string `json:"password"`
StayConnected bool `json:"stayConnected"`
}
type loginResponse struct {
AccessToken string `json:"access_token"`
}
func login(user, pass string, stayConnected bool) (string, error) {
payload := loginRequest{
Username: user,
Password: pass,
StayConnected: stayConnected,
}
data, err := json.Marshal(payload)
if err != nil {
return "", fmt.Errorf("failed to marshal login request: %w", err)
}
resp, err := http.Post(baseURL+"/login", "application/json", bytes.NewBuffer(data))
if err != nil {
return "", fmt.Errorf("failed to send login request: %w", err)
}
defer resp.Body.Close()
if resp.StatusCode != http.StatusOK {
return "", fmt.Errorf("login failed: HTTP %d %s", resp.StatusCode, resp.Status)
}
var result loginResponse
if err := json.NewDecoder(resp.Body).Decode(&result); err != nil {
return "", fmt.Errorf("failed to decode login response: %w", err)
}
return result.AccessToken, nil
}
func startWorkflow(token string, id int) (string, error) {
url := fmt.Sprintf("%s/start?w=%d", baseURL, id)
req, err := http.NewRequest("POST", url, nil)
if err != nil {
return "", fmt.Errorf("failed to create start request: %w", err)
}
req.Header.Set("Authorization", "Bearer "+token)
client := &http.Client{}
resp, err := client.Do(req)
if err != nil {
return "", fmt.Errorf("failed to send start request: %w", err)
}
defer resp.Body.Close()
if resp.StatusCode != http.StatusOK {
return "", fmt.Errorf("start failed: HTTP %d %s", resp.StatusCode, resp.Status)
}
body, err := io.ReadAll(resp.Body)
if err != nil {
return "", fmt.Errorf("failed to read start response: %w", err)
}
return string(body), nil
}
func main() {
token, err := login(username, password, false)
if err != nil {
log.Fatalf("Login failed: %v", err)
}
jobID, err := startWorkflow(token, workflowId)
if err != nil {
log.Fatalf("Failed to start workflow %d: %v", workflowId, err)
}
fmt.Printf("Workflow %d started successfully. Job ID: %s\n", workflowId, jobID)
}
```
To run the client, use the following command:
```bash
go run client.go
```
---
# Document: Go SSE Client
> Source: https://github.com/aelassas/wexflow/wiki/Go-SSE-Client
## Prerequisites
* Install [Go](https://go.dev/)
## Client Sample
Here is a sample SSE Go client `sse.go`:
```go
package main
import (
"bufio"
"bytes"
"encoding/json"
"fmt"
"io"
"net/http"
)
const (
baseURL = "http://localhost:8000/api/v1"
username = "admin"
password = "wexflow2018"
workflowId = 41
)
type LoginResponse struct {
AccessToken string `json:"access_token"`
}
func login(user, pass string, stayConnected bool) (string, error) {
payload := map[string]interface{}{
"username": user,
"password": pass,
"stayConnected": stayConnected,
}
body, _ := json.Marshal(payload)
req, err := http.NewRequest("POST", baseURL+"/login", bytes.NewBuffer(body))
if err != nil {
return "", err
}
req.Header.Set("Content-Type", "application/json")
client := &http.Client{}
resp, err := client.Do(req)
if err != nil {
return "", err
}
defer resp.Body.Close()
if resp.StatusCode != http.StatusOK {
return "", fmt.Errorf("login failed: %s", resp.Status)
}
var result LoginResponse
if err := json.NewDecoder(resp.Body).Decode(&result); err != nil {
return "", err
}
return result.AccessToken, nil
}
func startWorkflow(token string, workflowId int) (string, error) {
url := fmt.Sprintf("%s/start?w=%d", baseURL, workflowId)
req, err := http.NewRequest("POST", url, nil)
if err != nil {
return "", err
}
req.Header.Set("Authorization", "Bearer "+token)
client := &http.Client{}
resp, err := client.Do(req)
if err != nil {
return "", err
}
defer resp.Body.Close()
if resp.StatusCode != http.StatusOK {
return "", fmt.Errorf("start workflow failed: %s", resp.Status)
}
var jobId string
if err := json.NewDecoder(resp.Body).Decode(&jobId); err != nil {
return "", err
}
return jobId, nil
}
func listenToSSE(url, token string) error {
req, err := http.NewRequest("GET", url, nil)
if err != nil {
return err
}
req.Header.Set("Accept", "text/event-stream")
req.Header.Set("Authorization", "Bearer "+token)
client := &http.Client{}
resp, err := client.Do(req)
if err != nil {
return err
}
defer resp.Body.Close()
fmt.Println("SSE connection opened")
reader := bufio.NewReader(resp.Body)
for {
line, err := reader.ReadString('\n')
if err == io.EOF {
break
}
if err != nil {
return fmt.Errorf("error reading SSE: %v", err)
}
if len(line) > 6 && line[:6] == "data: " {
data := line[6:]
var parsed map[string]interface{}
if err := json.Unmarshal([]byte(data), &parsed); err != nil {
fmt.Println("Failed to parse SSE JSON:", err)
} else {
fmt.Println("Received SSE JSON:")
out, _ := json.MarshalIndent(parsed, "", " ")
fmt.Println(string(out))
}
break // Close after first SSE event
}
}
fmt.Println("SSE connection closed")
return nil
}
func main() {
token, err := login(username, password, false)
if err != nil {
fmt.Println("Login error:", err)
return
}
jobId, err := startWorkflow(token, workflowId)
if err != nil {
fmt.Println("Start workflow error:", err)
return
}
fmt.Printf("Workflow %d started. Job ID: %s\n", workflowId, jobId)
sseUrl := fmt.Sprintf("%s/sse/%d/%s", baseURL, workflowId, jobId)
if err := listenToSSE(sseUrl, token); err != nil {
fmt.Println("SSE error:", err)
}
}
```
To run the client, use the following command:
```bash
go run sse.go
```
---
# Document: Guid
> Source: https://github.com/aelassas/wexflow/wiki/Guid
```xml
```
---
# Document: Home
> Source: https://github.com/aelassas/wexflow/wiki/Home
Wexflow is a workflow automation engine that supports a wide range of tasks, from file operations and system processes to scripting, networking, and more. Wexflow targets both developers and technical users who need automation (file ops, tasks, scheduling, alerts, etc.). Wexflow focuses on automating technical jobs like moving or uploading files, sending emails, running scripts, or scheduling batch processes. For more complex scenarios, you can create your own custom activities, install them, and use them to extend its capabilities.
Use the sidebar to browse installation guides, configuration options, and more.
## Is Wexflow a Business Process Management Solution?
Wexflow is primarily a workflow automation engine, not a full BPM suite. Wexflow does not natively support BPMN, human workflows, or built-in user forms. So if your business processes require a lot of human interaction, approvals, or business rule evaluation, Wexflow would be limited.
Wexflow excels at automating technical tasks, such as moving or transforming files, uploading to FTP/SFTP, running scripts (PowerShell, Bash, Python, etc.), scheduling and chaining tasks, triggering workflows by events, manual input, cron or watchfolders, designing flows visually (Designer UI), integrating with APIs and databases, supporting conditional logic (if/else, switch, while).
You can use Wexflow if your processes are mostly system-based, such as back-office automation (file syncing, reporting, monitoring), ETL pipelines, DevOps or IT operations automation or API integrations between systems.
---
# Document: HtmlToPdf
> Source: https://github.com/aelassas/wexflow/wiki/HtmlToPdf
```xml
```
---
# Document: HtmlToText
> Source: https://github.com/aelassas/wexflow/wiki/HtmlToText
```xml
```
---
# Document: Http
> Source: https://github.com/aelassas/wexflow/wiki/Http
```xml
```
---
# Document: HttpDelete
> Source: https://github.com/aelassas/wexflow/wiki/HttpDelete
```xml
```
---
# Document: HttpGet
> Source: https://github.com/aelassas/wexflow/wiki/HttpGet
```xml
```
---
# Document: HttpPatch
> Source: https://github.com/aelassas/wexflow/wiki/HttpPatch
```xml
```
---
# Document: HttpPost
> Source: https://github.com/aelassas/wexflow/wiki/HttpPost
```xml
```
---
# Document: HttpPut
> Source: https://github.com/aelassas/wexflow/wiki/HttpPut
```xml
```
---
# Document: ImagesConcat
> Source: https://github.com/aelassas/wexflow/wiki/ImagesConcat
```xml
```
---
# Document: ImagesCropper
> Source: https://github.com/aelassas/wexflow/wiki/ImagesCropper
```xml
```
---
# Document: ImagesOverlay
> Source: https://github.com/aelassas/wexflow/wiki/ImagesOverlay
```xml
```
---
# Document: ImagesResizer
> Source: https://github.com/aelassas/wexflow/wiki/ImagesResizer
```xml
```
---
# Document: ImagesTransformer
> Source: https://github.com/aelassas/wexflow/wiki/ImagesTransformer
```xml
```
---
# Document: InstagramUploadImage
> Source: https://github.com/aelassas/wexflow/wiki/InstagramUploadImage
```xml
```
---
# Document: InstagramUploadVideo
> Source: https://github.com/aelassas/wexflow/wiki/InstagramUploadVideo
```xml
```
---
# Document: Installing
> Source: https://github.com/aelassas/wexflow/wiki/Installing
Wexflow is easy to install and requires zero configuration. It can be installed and configured in just a few minutes.
This section explains how to install Wexflow on Windows, Linux, and macOS.
## Table of Contents
1. [Windows (.NET 4.8 - Legacy)](https://github.com/aelassas/wexflow/wiki/Installing#windows-net-48---legacy)
1. [Installation Instructions](https://github.com/aelassas/wexflow/wiki/Installing#installation-instructions)
1. [Windows (.NET 10.0+ - Stable)](https://github.com/aelassas/wexflow/wiki/Installing#windows-net-100---stable)
1. [Accessing the Admin Panel](https://github.com/aelassas/wexflow/wiki/Installing#accessing-the-admin-panel)
1. [Configuration](https://github.com/aelassas/wexflow/wiki/Installing#configuration)
1. [Running Wexflow as a Windows Service using Servy/NSSM](https://github.com/aelassas/wexflow/wiki/Installing#running-wexflow-as-a-windows-service-using-servynssm)
1. [Deleting the Wexflow Windows Service](https://github.com/aelassas/wexflow/wiki/Installing#deleting-the-wexflow-windows-service)
1. [Linux (.NET 10.0+ - Stable)](https://github.com/aelassas/wexflow/wiki/Installing#linux-net-100---stable)
1. [Installing the Admin Panel on NGINX](https://github.com/aelassas/wexflow/wiki/Installing#installing-the-admin-panel-on-nginx)
1. [Installing the Admin Panel on Apache2](https://github.com/aelassas/wexflow/wiki/Installing#installing-the-admin-panel-on-apache2)
1. [MongoDB Configuration](https://github.com/aelassas/wexflow/wiki/Installing#mongodb-configuration)
1. [Updating Wexflow](https://github.com/aelassas/wexflow/wiki/Installing#updating-wexflow)
1. [macOS (.NET 10.0+ - Stable)](https://github.com/aelassas/wexflow/wiki/Installing#macos-net-100---stable)
1. [Installing the Admin Panel on a Web Server](https://github.com/aelassas/wexflow/wiki/Installing#installing-the-admin-panel-on-a-web-server)
1. [.NET 4.8](https://github.com/aelassas/wexflow/wiki/Installing#net-48---legacy)
1. [.NET 10.0+](https://github.com/aelassas/wexflow/wiki/Installing#net-90---stable)
## Windows (.NET 4.8 - Legacy)
You can install Wexflow as a Windows Service (targeting .NET Framework 4.8) using one of the following [installers](https://github.com/aelassas/wexflow/releases/latest):
* wexflow-x.x-windows-x64.exe (64-bit)
* wexflow-x.x-windows-x86.exe (32-bit)
### Installation Instructions
1. Install [.NET Framework 4.8](https://dotnet.microsoft.com/en-us/download/dotnet-framework/net48)
1. Download the latest release of Wexflow
1. Right click on the installer, click on properties, check **Unblock** then click OK.
1. Launch the installer and follow the instructions
After installation, a Windows Service named Wexflow is installed and starts automatically.
The following menus are added in the start menu:
* The "Admin Panel" menu opens the Admin Panel.
* The "Configuration" menu opens the configuration folder of Wexflow.
* The "Documentation" menu opens the documentation folder of Wexflow.
* The "Logs" menu opens the log file of the day.
* The "Manager" menu opens Wexflow Manager GUI.
* The "Install SQLite samples" menu installs SQLite workflow samples.
* The "Install MongoDB samples" menu installs MongoDB workflow samples.
* The "Install SQL Server samples" menu installs SQL Server workflow samples.
* The "Install PostgreSQL samples" menu installs PostgreSQL workflow samples.
* The "Install MySQL samples" menu installs MySQL workflow samples.
* The "Install LiteDB samples" menu installs LiteDB workflow samples.
* The "Install Oracle samples" menu installs Oracle workflow samples.
The admin panel is accessible at: http://localhost:8000/
You can sign in to the admin panel or [Wexflow Manager](https://github.com/aelassas/wexflow/wiki/Getting-Started#wexflow-manager) using the following credentials:
* **Username**: admin
* **Password**: wexflow2018
Once logged in, you can change the password via the Admin Panel.
You can choose from [6 persistence providers](https://github.com/aelassas/wexflow/wiki/Persistence-Providers):
* SQLite (Default)
* MongoDB
* SQLServer
* PostgreSQL
* MySQL
* LiteDB
See [configuration page](https://github.com/aelassas/wexflow/wiki/Configuration#wexflowxml) to see how to change the persistence provider.
## Windows (.NET 10.0+ - Stable)
Follow these steps to run Wexflow using the .NET 10.0+ version on Windows:
1. Install [ASP.NET 10.0 Runtime](https://dotnet.microsoft.com/en-us/download/dotnet/10.0)
1. Download and extract the latest [Wexflow's .NET 10.0+ package](https://github.com/aelassas/wexflow/releases/latest) (wexflow-x.x-windows-netcore.zip)
1. Double-click on `install.bat` to install the configuration files (the database will **not** be overwritten).
That's it! To start the Wexflow workflow server, simply double-click on `run.bat`.
### Accessing the Admin Panel
Once the server is running, the admin panel will be accessible at: http://localhost:8000/
You can sign in to the admin panel using the following credentials:
* **Username**: admin
* **Password**: wexflow2018
### Configuration
You can find detailed instructions about configuration [here](https://github.com/aelassas/wexflow/wiki/Configuration#net-core).
### Running Wexflow as a Windows Service using Servy/NSSM
If you want to run Wexflow as a Windows Service (.NET 10.0+), it is recommended to use [Servy](https://servy-win.github.io/) or [NSSM (Non-Sucking Service Manager)](https://nssm.cc/). Both tools offer improved control over service startup behavior and working directories.
#### Installing the Service
First, [Download Wexflow .NET 10.0+ package](https://github.com/aelassas/wexflow/releases/latest) (wexflow-x.x-windows-netcore.zip), extract it to `C:\Program Files\Wexflow Server\`.
##### Servy
1. Download and install [Servy](https://servy-win.github.io/)
1. Open Servy
1. In the Servy GUI:
* **Service Name**: WexflowServer
* **Service Description**: Wexflow Workflow Automation Engine
* **Process path**: `C:\Program Files\dotnet\dotnet.exe`
* **Startup Directory**: `C:\Program Files\Wexflow Server\Wexflow.Server\`
* **Process Parameters**: `Wexflow.Server.dll`
1. Click **Install**
##### NSSM
1. [Download NSSM](https://nssm.cc/download), extract it to `C:\Program Files\nssm` and add `C:\Program Files\nssm\win64\` to your `PATH` environment variable
1. Open an elevated Command Prompt (Run as Administrator).
1. Run the following command to install the service:
```cmd
nssm install WexflowServer
```
1. In the NSSM GUI:
* **Application path**: `C:\Program Files\dotnet\dotnet.exe`
* **Arguments**: `Wexflow.Server.dll`
* **Startup directory**: `C:\Program Files\Wexflow Server\Wexflow.Server\`
1. Click **Install service**.
1. Set the service description (optional but recommended):
```cmd
sc description WexflowServer "Wexflow Workflow Automation Engine"
```
1. Start the service:
```cmd
nssm start WexflowServer
```
Once started, the Wexflow admin panel will be accessible at:
* **URL**: http://localhost:8000/
* **Username**: admin
* **Password**: wexflow2018
##### Deleting the Wexflow Windows Service
To remove the Wexflow Windows service installed with NSSM:
1. Stop the service:
```cmd
nssm stop WexflowServer
```
1. Remove the service:
```cmd
nssm remove WexflowServer confirm
```
## Linux (.NET 10.0+ - Stable)
**Note:** Installing systemd services, modifying permissions, and firewall rules on Linux require root or sudo privileges. Use `sudo` as needed when running commands.
Follow these steps to run Wexflow using the .NET 10.0+ version on Linux:
1. Download and install [ASP.NET 10.0 Runtime](https://dotnet.microsoft.com/en-us/download/dotnet/10.0)
1. Download and extract [Wexflow's .NET 10.0+ package](https://github.com/aelassas/wexflow/releases/latest) (wexflow-x.x-windows-linux.zip) in `/opt/`
1. Add permissions:
```bash
sudo chown -R $USER:$USER /opt/wexflow
sudo chmod +x /opt/wexflow/install.sh
```
1. Install wexflow systemd service:
```bash
sudo /opt/wexflow/install.sh
```
Wexflow is now installed and the admin panel will be accessible at: http://localhost:8000/
You can sign in to the admin panel using the following credentials:
* **Username**: admin
* **Password**: wexflow2018
### Installing the Admin Panel on NGINX
The admin panel is self-hosted and directly accessible at http://localhost:8000/ when you install wexflow.
However, if you want to install it on NGINX, follow these steps:
First, install NGINX:
```bash
sudo apt update
sudo apt install nginx-full
```
Then, add the admin panel to NGINX:
```bash
sudo nano /etc/nginx/sites-enabled/default
```
Add the following configuration:
```nginx
server {
listen 8011;
root /opt/wexflow/Admin;
index index.html;
access_log /var/log/nginx/wexflow.access.log;
error_log /var/log/nginx/wexflow.error.log;
location / {
# First attempt to serve request as file, then as directory,
# then as index.html, then fall back to displaying a 404.
try_files $uri $uri/ /index.html =404;
}
}
```
Check NGINX configuration and if it is successful restart NGINX:
```bash
sudo nginx -t
sudo systemctl restart nginx.service
```
That's it! the admin panel is installed and accessible from: http://\:8011
### Installing the Admin Panel on Apache2
To install the admin panel on Apache instead of NGINX, install apache2:
```bash
sudo apt update
sudo apt install apache2
```
Create a new site:
```bash
sudo nano /etc/apache2/sites-enabled/wexflow.conf
```
With the following content:
```apache
Listen 8011
# The ServerName directive sets the request scheme, hostname and port that
# the server uses to identify itself. This is used when creating
# redirection URLs. In the context of virtual hosts, the ServerName
# specifies what hostname must appear in the request's Host: header to
# match this virtual host. For the default virtual host (this file) this
# value is not decisive as it is used as a last resort host regardless.
# However, you must set it for any further virtual host explicitly.
#ServerName www.example.com
ServerAdmin webmaster@localhost
DocumentRoot /opt/wexflow/Admin
DirectoryIndex index.html
AllowOverride All
Require all granted
# Available loglevels: trace8, ..., trace1, debug, info, notice, warn,
# error, crit, alert, emerg.
# It is also possible to configure the loglevel for particular
# modules, e.g.
#LogLevel info ssl:warn
ErrorLog ${APACHE_LOG_DIR}/error.log
CustomLog ${APACHE_LOG_DIR}/access.log combined
# For most configuration files from conf-available/, which are
# enabled or disabled at a global level, it is possible to
# include a line for only one particular virtual host. For example the
# following line enables the CGI configuration for this host only
# after it has been globally disabled with "a2disconf".
#Include conf-available/serve-cgi-bin.conf
# vim: syntax=apache ts=4 sw=4 sts=4 sr noet
```
Enable the new site and reload apache2:
```bash
sudo a2ensite wexflow.conf
sudo systemctl reload apache2
```
If you want to install the admin panel on a web server, you'll need to edit the configuration file `js/settings.js`. Check out this [section](https://github.com/aelassas/wexflow/wiki/Installing#installing-the-admin-panel-on-a-web-server) for full guideline.
### MongoDB Configuration
To use MongoDB [persistence provider](https://github.com/aelassas/wexflow/wiki/Persistence-Providers), update `/opt/wexflow/wexflow.service` file as follows:
```
[Unit]
Description=wexflow
Wants=mongod.service
After=mongod.service
[Service]
ExecStart=/usr/bin/dotnet Wexflow.Server.dll
WorkingDirectory=/opt/wexflow/Wexflow.Server
[Install]
WantedBy=multi-user.target
```
Then, run `install.sh` again:
```bash
sudo /opt/wexflow/install.sh
```
If you want to use SQLServer, MySQL or PostgreSQL persistence provider, make sure to update `Wants=` and `After=` options with the matching services.
If you want to update Wexflow to a newer version, proceed as follows:
1. Backup `Wexflow` folder `/opt/wexflow/Wexflow`
1. Remove /opt/wexflow
1. Download and extract [Wexflow's .NET package](https://github.com/aelassas/wexflow/releases/latest) in /opt/
1. Copy `Wexflow` folder that you have saved in /opt/wexflow
1. Add permissions:
```bash
sudo chown -R $USER:$USER /opt/wexflow
sudo chmod +x /opt/wexflow/install.sh
```
1. Update and restart wexflow systemd service:
```bash
sudo /opt/wexflow/install.sh
```
That's it. Wexflow is updated.
For SQL Server, MySQL, or PostgreSQL adjust the `Wants=` and `After=` fields with the corresponding service names.
## Updating Wexflow
To update Wexflow to a newer version, follow these steps:
1. **Back up the existing `Wexflow` folder:**
```bash
cp -r /opt/wexflow/Wexflow ~/Wexflow-backup
```
1. **Remove the current Wexflow installation:**
```bash
sudo rm -rf /opt/wexflow
```
1. **Download and extract the latest [Wexflow .NET Linux package](https://github.com/aelassas/wexflow/releases/latest) into `/opt/`:**
```bash
cd /opt
# download and extract wexflow-x.x-linux-netcore.zip
```
1. **Restore the backed-up `Wexflow` folder:**
```bash
mv ~/Wexflow-backup /opt/wexflow/Wexflow
```
1. **Set the correct permissions:**
```bash
sudo chown -R $USER:$USER /opt/wexflow
sudo chmod +x /opt/wexflow/install.sh
```
1. **Reinstall and restart the systemd service:**
```bash
sudo /opt/wexflow/install.sh
```
Wexflow is now updated and running.
## macOS (.NET 10.0+ - Stable)
Follow these steps to run Wexflow using the .NET 10.0+ version on macOS:
1. Download and install [ASP.NET 10.0 Runtime](https://dotnet.microsoft.com/en-us/download/dotnet/10.0)
1. Download and extract [Wexflow's .NET package](https://github.com/aelassas/wexflow/releases/latest) (wexflow-x.x-macos-netcore.zip) in `/Applications/`
That's it. You can run Wexflow as follows:
```bash
cd /Applications/wexflow/Wexflow.Server
dotnet Wexflow.Server.dll
```
You can open the admin panel at: http://localhost:8000/
You can sign in using the following credentials:
* **Username**: admin
* **Password**: wexflow2018
## Installing the Admin Panel on a Web Server
The admin panel is self-hosted and by default accessible at: http://localhost:8000/
You can also host it on any web server.
### .NET 4.8 - Legacy
To install the admin panel on a web server:
1. Copy the contents of the folder `C:\Program Files\Wexflow\Admin\` to your web server's root or desired directory.
1. If you're hosting the backend (Wexflow server) on a different machine, update the configuration file `js/settings.js` as follows:
```js
window.Settings = (function () {
// Get the current hostname or fallback to 'localhost'
const hostname = window.location.hostname === "" ? "localhost" : window.location.hostname;
// Default Wexflow backend port
const port = 8000;
// Use current protocol (http or https)
const protocol = `${window.location.protocol}//`;
return {
Hostname: hostname,
Port: port,
Uri: `${protocol}${hostname}:${port}/api/v1/`,
/**
* To enable Server-Sent Events (SSE), set `SSE` to true
* and ensure `Version` is set to "netcore"
*/
SSE: false,
/**
* Version of the Wexflow server: "net48" for .NET Framework 4.8,
* or "netcore" for .NET Core / .NET 5+.
*/
Version: "net48",
/**
* Debounce delay in milliseconds for real-time updates.
*/
DebounceDelay: 300,
};
})();
```
1. Replace `hostname` with the IP address or domain name of the machine where the Wexflow server is installed.
1. Ensure that port 8000 (or the port you're using) is open in the firewall and accessible from the client machine.
1. If your Wexflow server uses a different port, update the `port` value accordingly.
1. If you're using HTTPS in Wexflow Server, be sure to use HTTPS on your web server as well.
### .NET 10.0+ - Stable
To install the admin panel on a web server:
1. Copy the contents of the folder `Admin` to your web server's root or desired directory:
* Windows: `.\Admin\`
* Linux: `/opt/wexflow/Admin/`
* macOS: `/Applications/wexflow/Admin/`
1. If you're hosting the backend (Wexflow server) on a different machine, update the configuration file `js/settings.js` as follows:
```js
window.Settings = (function () {
// Get the current hostname or fallback to 'localhost'
const hostname = window.location.hostname === "" ? "localhost" : window.location.hostname;
// Default Wexflow backend port
const port = 8000;
// Use current protocol (http or https)
const protocol = `${window.location.protocol}//`;
return {
Hostname: hostname,
Port: port,
Uri: `${protocol}${hostname}:${port}/api/v1/`,
/**
* To enable Server-Sent Events (SSE), set `SSE` to true
* and ensure `Version` is set to "netcore"
*/
SSE: true,
/**
* Version of the Wexflow server: "net48" for .NET Framework 4.8,
* or "netcore" for .NET Core / .NET 5+.
*/
Version: "netcore",
/**
* Debounce delay in milliseconds for real-time updates.
*/
DebounceDelay: 300,
};
})();
```
1. Replace `hostname` with the IP address or domain name of the machine where the Wexflow server is installed.
1. Ensure that port 8000 (or the port you're using) is open in the firewall and accessible from the client machine.
1. If your Wexflow server uses a different port, update the `port` value accordingly.
1. If you're using HTTPS in Wexflow Server, be sure to use HTTPS on your web server as well.
---
# Document: IsoCreator
> Source: https://github.com/aelassas/wexflow/wiki/IsoCreator
```xml
```
---
# Document: IsoExtractor
> Source: https://github.com/aelassas/wexflow/wiki/IsoExtractor
```xml
```
---
# Document: Java Client
> Source: https://github.com/aelassas/wexflow/wiki/Java-Client
## Prerequisites
* Install [Java JDK](https://www.oracle.com/java/technologies/downloads/)
## Client Sample
Here is a sample Java client `WexflowClient.java`:
```java
import java.io.BufferedReader;
import java.io.InputStreamReader;
import java.io.OutputStream;
import java.net.HttpURLConnection;
import java.net.URL;
public class WexflowClient {
private static final String BASE_URL = "http://localhost:8000/api/v1";
private static final String USERNAME = "admin";
private static final String PASSWORD = "wexflow2018";
private static final int WORKFLOW_ID = 41;
public static void main(String[] args) {
try {
String token = login(USERNAME, PASSWORD);
String jobId = startWorkflow(token, WORKFLOW_ID);
System.out.println("Workflow " + WORKFLOW_ID + " started successfully. Job ID: " + jobId);
} catch (Exception e) {
System.err.println("Error: " + e.getMessage());
e.printStackTrace();
}
}
private static String login(String username, String password) throws Exception {
URL url = new URL(BASE_URL + "/login");
HttpURLConnection conn = (HttpURLConnection) url.openConnection();
conn.setRequestMethod("POST");
conn.setRequestProperty("Content-Type", "application/json");
conn.setDoOutput(true);
String jsonInputString = String.format(
"{\"username\":\"%s\",\"password\":\"%s\",\"stayConnected\":false}",
username, password);
try (OutputStream os = conn.getOutputStream()) {
byte[] input = jsonInputString.getBytes("utf-8");
os.write(input);
}
int code = conn.getResponseCode();
if (code != 200) {
throw new RuntimeException("Login failed: HTTP " + code);
}
BufferedReader br = new BufferedReader(
new InputStreamReader(conn.getInputStream(), "utf-8"));
StringBuilder response = new StringBuilder();
String responseLine;
while ((responseLine = br.readLine()) != null) {
response.append(responseLine.trim());
}
// Response JSON format: { "access_token": "..." }
String json = response.toString();
String token = parseAccessToken(json);
if (token == null) {
throw new RuntimeException("No access_token found in response");
}
return token;
}
private static String startWorkflow(String token, int workflowId) throws Exception {
URL url = new URL(BASE_URL + "/start?w=" + workflowId);
HttpURLConnection conn = (HttpURLConnection) url.openConnection();
conn.setRequestMethod("POST");
conn.setRequestProperty("Authorization", "Bearer " + token);
conn.setDoOutput(true);
int code = conn.getResponseCode();
if (code != 200) {
throw new RuntimeException("Start workflow failed: HTTP " + code);
}
BufferedReader br = new BufferedReader(
new InputStreamReader(conn.getInputStream(), "utf-8"));
StringBuilder response = new StringBuilder();
String responseLine;
while ((responseLine = br.readLine()) != null) {
response.append(responseLine.trim());
}
return response.toString();
}
// Simple method to extract access_token from JSON response
private static String parseAccessToken(String json) {
// This is a naive parse, for production use a JSON library like Jackson or Gson
String tokenKey = "\"access_token\":\"";
int start = json.indexOf(tokenKey);
if (start == -1) return null;
start += tokenKey.length();
int end = json.indexOf("\"", start);
if (end == -1) return null;
return json.substring(start, end);
}
}
```
To run the client, use the following command:
```bash
javac WexflowClient.java
java WexflowClient
```
---
# Document: Java SSE Client
> Source: https://github.com/aelassas/wexflow/wiki/Java-SSE-Client
## Prerequisites
* Install [Java JDK](https://www.oracle.com/java/technologies/downloads/)
* Install [Maven](https://maven.apache.org/)
## Client SSE Sample
Here is a sample Java SSE client `WexflowSSEClient.java`:
```java
package com.example;
import java.io.IOException;
import java.net.URI;
import java.net.http.HttpClient;
import java.net.http.HttpRequest;
import java.net.http.HttpResponse;
import java.time.Duration;
import okhttp3.*;
import okhttp3.sse.EventSource;
import okhttp3.sse.EventSourceListener;
import okhttp3.sse.EventSources;
import com.fasterxml.jackson.databind.ObjectMapper;
import com.fasterxml.jackson.databind.JsonNode;
public class WorkflowSSEClient {
private static final String BASE_URL = "http://localhost:8000/api/v1";
private static final String USERNAME = "admin";
private static final String PASSWORD = "wexflow2018";
private static final int WORKFLOW_ID = 41;
private static final HttpClient httpClient = HttpClient.newHttpClient();
private static final ObjectMapper objectMapper = new ObjectMapper();
public static void main(String[] args) throws Exception {
String token = login(USERNAME, PASSWORD);
String jobId = startWorkflow(token, WORKFLOW_ID);
System.out.printf("Workflow %d started. Job ID: %s%n", WORKFLOW_ID, jobId);
String sseUrl = String.format("%s/sse/%d/%s", BASE_URL, WORKFLOW_ID, jobId);
listenToSse(sseUrl, token);
}
private static String login(String user, String pass) throws IOException, InterruptedException {
String jsonBody = String.format(
"{\"username\":\"%s\", \"password\":\"%s\", \"stayConnected\": false}", user, pass);
HttpRequest request = HttpRequest.newBuilder()
.uri(URI.create(BASE_URL + "/login"))
.header("Content-Type", "application/json")
.POST(HttpRequest.BodyPublishers.ofString(jsonBody))
.timeout(Duration.ofSeconds(10))
.build();
HttpResponse response = httpClient.send(request, HttpResponse.BodyHandlers.ofString());
if (response.statusCode() != 200) {
throw new RuntimeException("Login failed: HTTP " + response.statusCode());
}
JsonNode jsonNode = objectMapper.readTree(response.body());
return jsonNode.get("access_token").asText();
}
private static String startWorkflow(String token, int workflowId) throws IOException, InterruptedException {
HttpRequest request = HttpRequest.newBuilder()
.uri(URI.create(BASE_URL + "/start?w=" + workflowId))
.header("Authorization", "Bearer " + token)
.POST(HttpRequest.BodyPublishers.noBody())
.timeout(Duration.ofSeconds(10))
.build();
HttpResponse response = httpClient.send(request, HttpResponse.BodyHandlers.ofString());
if (response.statusCode() != 200) {
throw new RuntimeException("Start workflow failed: HTTP " + response.statusCode());
}
// The start endpoint returns the jobId as JSON string, e.g. "jobid-uuid-string"
return objectMapper.readTree(response.body()).asText();
}
private static void listenToSse(String sseUrl, String token) {
OkHttpClient client = new OkHttpClient.Builder()
.retryOnConnectionFailure(true)
.build();
Request request = new Request.Builder()
.url(sseUrl)
.addHeader("Authorization", "Bearer " + token)
.build();
EventSourceListener listener = new EventSourceListener() {
@Override
public void onOpen(EventSource eventSource, Response response) {
System.out.println("SSE connection opened");
}
@Override
public void onEvent(EventSource eventSource, String id, String type, String data) {
System.out.println("Received event:");
System.out.println("Type: " + type);
System.out.println("Data: " + data);
try {
JsonNode json = objectMapper.readTree(data);
System.out.println("Parsed JSON:");
System.out.println(objectMapper.writerWithDefaultPrettyPrinter().writeValueAsString(json));
} catch (Exception e) {
System.err.println("Failed to parse SSE JSON: " + e.getMessage());
}
// Close connection if you want after first event:
eventSource.cancel();
}
@Override
public void onClosed(EventSource eventSource) {
System.out.println("SSE connection closed");
}
@Override
public void onFailure(EventSource eventSource, Throwable t, Response response) {
System.err.println("SSE connection error: " + t.getMessage());
if (response != null) {
System.err.println("Response code: " + response.code());
}
}
};
EventSource.Factory factory = EventSources.createFactory(client);
factory.newEventSource(request, listener);
// Prevent JVM from exiting immediately to keep SSE alive:
try {
Thread.sleep(10 * 60 * 1000); // 10 minutes; adjust as needed
} catch (InterruptedException ignored) {}
}
}
```
To run the client, download [samples/clients/sse/java](https://github.com/aelassas/wexflow/tree/main/samples/clients/sse/java) example from GitHub and run the following commands:
```bash
cd java
mvn clean package
mvn clean compile
mvn exec:java -X
```
---
# Document: JavaScript Client
> Source: https://github.com/aelassas/wexflow/wiki/JavaScript-Client
Here is a sample JavaScript client:
```js
const baseUrl = 'http://localhost:8000/api/v1'
const username = 'admin'
const password = 'wexflow2018'
const workflowId = 1
async function login(user, pass, stayConnected = false) {
const res = await fetch(`${baseUrl}/login`, {
method: 'POST',
headers: { 'Content-Type': 'application/json' },
body: JSON.stringify({ username: user, password: pass, stayConnected })
})
if (!res.ok) {
throw new Error(`HTTP ${res.status} - ${res.statusText}`)
}
const data = await res.json()
return data.access_token
}
try {
const token = await login(username, password)
const res = await fetch(`${baseUrl}/start?w=${workflowId}`, {
method: 'POST',
headers: { 'Authorization': `Bearer ${token}` }
})
if (!res.ok) {
throw new Error(`HTTP ${res.status} - ${res.statusText}`)
}
const jobId = await res.json()
console.log(`Workflow ${workflowId} started successfully. Job ID:`, jobId)
} catch (err) {
console.error(`Failed to start workflow ${workflowId}:`, err)
}
```
---
# Document: JavaScript SSE Client
> Source: https://github.com/aelassas/wexflow/wiki/JavaScript-SSE-Client
## Steps to Consume the SSE Event
1. **Start the workflow** using the REST API and get the `jobId`.
2. **Connect to the SSE endpoint** using `workflowId` and `jobId`:
```
GET http://localhost:8000/api/v1/sse/{workflowId}/{jobId}
```
3. **Use this example Node.js code** with the `eventsource` package to listen for the final job status:
* Initialize a new Node.js project with default settings:
```bash
npm init -y
```
* Open the generated `package.json` file and add `"type": "module"` to enable ES module support:
```js
{
"name": "wexflow",
"version": "1.0.0",
"type": "module",
...
}
```
* Install the `eventsource` package to handle Server-Sent Events:
```bash
npm install eventsource
```
* Create your main script file `index.js` and add your SSE client code:
```js
import * as eventsource from 'eventsource'
const baseUrl = 'http://localhost:8000/api/v1'
const username = 'admin'
const password = 'wexflow2018'
const workflowId = 41
async function login(user, pass, stayConnected = false) {
const res = await fetch(`${baseUrl}/login`, {
method: 'POST',
headers: { 'Content-Type': 'application/json' },
body: JSON.stringify({ username: user, password: pass, stayConnected })
})
if (!res.ok) {
throw new Error(`HTTP ${res.status} - ${res.statusText}`)
}
const data = await res.json()
return data.access_token
}
async function startWorkflow(token, workflowId) {
const res = await fetch(`${baseUrl}/start?w=${workflowId}`, {
method: 'POST',
headers: { 'Authorization': `Bearer ${token}` }
})
if (!res.ok) {
throw new Error(`HTTP ${res.status} - ${res.statusText}`)
}
const jobId = await res.json()
return jobId
}
try {
const token = await login(username, password)
const jobId = await startWorkflow(token, workflowId)
console.log(`Workflow ${workflowId} started. Job ID: ${jobId}`)
const sseUrl = `${baseUrl}/sse/${workflowId}/${jobId}`
const es = new eventsource.EventSource(sseUrl, {
fetch: (input, init) =>
fetch(input, {
...init,
headers: {
...init.headers,
Authorization: `Bearer ${token}`
},
}),
})
es.onopen = () => {
console.log('SSE connection opened')
}
es.onmessage = (event) => {
try {
// This event is triggered when the workflow job finishes or stops.
// The SSE data arrives as a JSON-formatted string in event.data.
// Parse this string into a JavaScript object for easy access to properties.
// For the complete list of workflow statuses, see:
// https://github.com/aelassas/wexflow/wiki/Workflow-Notifications-via-SSE#statuses
const data = JSON.parse(event.data)
console.log('Received SSE JSON:', data)
// Access properties like data.workflowId, data.jobId, data.status, data.name, data.description
// Close connection if needed, e.g. after final status received
es.close()
} catch (err) {
console.error('Failed to parse SSE JSON:', err)
}
}
es.onerror = (err) => {
console.error('SSE error:', err)
es.close()
}
} catch (err) {
console.error('Error:', err)
}
```
* Run your Node.js program:
```bash
node index.js
```
Use `Workflow_Wait` with a period of 10 secs for instance to test.
Here is a sample output result:
```js
{
workflowId: 41,
jobId: '66aae8f4-e3ab-4fdc-8db2-a0a7692d8906',
status: 'Done',
name: 'Workflow_Wait',
description: 'Workflow_Wait'
}
```
## Summary
* The SSE event sends JSON with `{ workflowId, jobId, status, name, description }`.
* The connection closes automatically after the job finishes.
* Ensure your requests include proper JWT authorization.
---
# Document: JsonToYaml
> Source: https://github.com/aelassas/wexflow/wiki/JsonToYaml
```xml
```
---
# Document: ListEntities
> Source: https://github.com/aelassas/wexflow/wiki/ListEntities
```xml
```
---
# Document: ListFiles
> Source: https://github.com/aelassas/wexflow/wiki/ListFiles
```xml
```
---
# Document: Local Variables
> Source: https://github.com/aelassas/wexflow/wiki/Local-Variables
It is possible to declare local variables in a workflow.
The syntax is as follows:
```xml
```
When Wexflow server loads the workflow file, the workflow file will be parsed and thus the local variables will be replaced by their respective values.
It is also possible to combine global variables with local variables, here is an example:
GlobalVariables.xml:
```xml
```
Below a sample workflow which contains global variables and local variables:
```xml
```
---
# Document: Logging
> Source: https://github.com/aelassas/wexflow/wiki/Logging
Everything that happens in Wexflow is traced and logged. With Wexflow's logging system, you can track your workflows with ease and stay informed with real-time monitoring and email notifications.
Wexflow's logs are written in C:\Program Files\Wexflow\Wexflow.log. There is one log file per day. The old log files are saved in following format: Wexflow.logyyyyMMdd
It is possible to configure Wexflow to send incident reports when an error occurs by using log4net.Appender.SmtpAppender in the configuration file of Wexflow C:\Program Files\Wexflow\Wexflow.Clients.WindowsService.exe.config. Below a sample configuration:
```xml
```
Wexflow gives you a beautiful Dashboard to view real-time statistics on your workflows. The Dashboard will let you track your workflow server with ease.
The History page in the backend will also let you track all your workflows and everything that happens on the workflow server. Indeed, from this page you will have an overview of all the workflow instances executed on the workflow server.
---
# Document: MailsReceiver
> Source: https://github.com/aelassas/wexflow/wiki/MailsReceiver
```xml
```
---
# Document: MailsSender
> Source: https://github.com/aelassas/wexflow/wiki/MailsSender
```xml
```
---
# Document: Md5
> Source: https://github.com/aelassas/wexflow/wiki/Md5
```xml
```
---
# Document: MediaInfo
> Source: https://github.com/aelassas/wexflow/wiki/MediaInfo
```xml
```
---
# Document: MessageCorrect
> Source: https://github.com/aelassas/wexflow/wiki/MessageCorrect
```xml
```
---
# Document: Migration Guide to v10.0
> Source: https://github.com/aelassas/wexflow/wiki/Migration-Guide-to-v10.0
To migrate from Wexflow 9.0 and below to v10.0, follow these instructions.
# .NET 4.8
1. Backup the folder `C:\Wexflow`
1. Download the installer wexflow-10.0-windows-x64.exe
1. Run the installer
1. Login to http://localhost:8000
* Username: `admin`
* Password: `wexflow2018`
# .NET 10.0
## Windows
1. Backup the folder `C:\Wexflow-netcore`
1. Download the package wexflow-10.0-windows-netcore.zip
1. Unzip the package
1. Run `install.bat`
1. Run `run.bat`
1. Login to http://localhost:8000
* Username: `admin`
* Password: `wexflow2018`
## Linux
1. Backup the folder `/opt/wexflow/Wexflow`
1. Install ASP.NET Core Runtime 10.0
1. Remove `/opt/wexflow`
1. Download the package wexflow-10.0-linux-netcore.zip
1. Unzip the package in `/opt/`
1. Remove `/opt/wexflow/Wexflow`
1. Copy the backup `/opt/wexflow/Wexflow` in `/opt/wexflow/`
1. Add permissions:
```bash
sudo chown -R $USER:$USER /opt/wexflow
sudo chmod +x /opt/wexflow/install.sh
```
1. Install wexflow systemd service:
```bash
sudo /opt/wexflow/install.sh
```
1. Login to http://localhost:8000
* Username: `admin`
* Password: `wexflow2018`
## macOS
1. Backup the folder `/Applications/wexflow/Wexflow`
1. Install ASP.NET Core Runtime 10.0
1. Remove `/Applications/wexflow`
1. Download the package wexflow-10.0-macos-netcore.zip
1. Unzip the package in `/Applications/`
1. Remove `/Applications/wexflow/Wexflow`
1. Copy the backup `/Applications/wexflow/Wexflow` in `/Applications/wexflow/`
1. Run Wexflow:
```bash
cd /Applications/wexflow/Wexflow.Server
dotnet Wexflow.Server.dll
```
1. Login to http://localhost:8000
* Username: `admin`
* Password: `wexflow2018`
# Wexflow API
The authentication has changed to JWT. You need to update all your clients to use JWT:
* [Authentication](https://github.com/aelassas/wexflow/wiki/RESTful-API#authentication)
* [Sample Clients](https://github.com/aelassas/wexflow/wiki/RESTful-API#sample-clients)
---
# Document: Mkdir
> Source: https://github.com/aelassas/wexflow/wiki/Mkdir
```xml
```
---
# Document: Movedir
> Source: https://github.com/aelassas/wexflow/wiki/Movedir
```xml
```
---
# Document: Now
> Source: https://github.com/aelassas/wexflow/wiki/Now
```xml
```
---
# Document: PHP SSE Client
> Source: https://github.com/aelassas/wexflow/wiki/PHP-SSE-Client
## Prerequisites
* Install [PHP](https://www.php.net/)
* On Windows, enable `curl` in `php.ini`:
```
extension_dir = "ext"
extension=curl
```
# SSE Client Sample
Here is a sample PHP SSE client `sse.php`:
```php
$username,
'password' => $password,
'stayConnected' => $stayConnected
]);
$ch = curl_init($url);
curl_setopt_array($ch, [
CURLOPT_RETURNTRANSFER => true,
CURLOPT_POST => true,
CURLOPT_HTTPHEADER => ['Content-Type: application/json'],
CURLOPT_POSTFIELDS => $data
]);
$response = curl_exec($ch);
$statusCode = curl_getinfo($ch, CURLINFO_HTTP_CODE);
curl_close($ch);
if ($statusCode !== 200) {
throw new Exception("Login failed: HTTP $statusCode");
}
$json = json_decode($response, true);
return $json['access_token'];
}
function startWorkflow($token, $workflowId) {
$url = "http://localhost:8000/api/v1/start?w=$workflowId";
$ch = curl_init($url);
curl_setopt_array($ch, [
CURLOPT_RETURNTRANSFER => true,
CURLOPT_POST => true,
CURLOPT_HTTPHEADER => [
"Authorization: Bearer $token"
]
]);
$response = curl_exec($ch);
$statusCode = curl_getinfo($ch, CURLINFO_HTTP_CODE);
curl_close($ch);
if ($statusCode !== 200) {
throw new Exception("Start workflow failed: HTTP $statusCode");
}
return json_decode($response, true);
}
function listenToSse($url, $token) {
$headers = [
"Authorization: Bearer $token",
"Accept: text/event-stream"
];
$ch = curl_init($url);
curl_setopt_array($ch, [
CURLOPT_HTTPHEADER => $headers,
CURLOPT_WRITEFUNCTION => function($ch, $data) {
if (strpos($data, "data: ") === 0) {
$json = trim(substr($data, 6));
$decoded = json_decode($json, true);
if ($decoded !== null) {
echo "Received SSE JSON:\n";
print_r($decoded);
} else {
echo "Invalid SSE JSON\n";
}
}
return strlen($data);
},
CURLOPT_TIMEOUT => 0,
CURLOPT_RETURNTRANSFER => false,
]);
echo "Opening SSE connection...\n";
curl_exec($ch);
if (curl_errno($ch)) {
echo "SSE error: " . curl_error($ch) . "\n";
}
curl_close($ch);
}
// ---- Main execution ----
try {
$username = 'admin';
$password = 'wexflow2018';
$workflowId = 41;
$baseUrl = 'http://localhost:8000/api/v1';
$token = login($username, $password);
$jobId = startWorkflow($token, $workflowId);
echo "Workflow $workflowId started. Job ID: $jobId\n";
$sseUrl = "$baseUrl/sse/$workflowId/$jobId";
listenToSse($sseUrl, $token);
} catch (Exception $e) {
echo 'Error: ' . $e->getMessage() . "\n";
}
```
To run the client, use the following command:
```bash
php sse.php
```
---
# Document: PHP client
> Source: https://github.com/aelassas/wexflow/wiki/PHP-client
## Prerequisites
* Install [PHP](https://www.php.net/)
* On Windows, enable `curl` in `php.ini`:
```
extension_dir = "ext"
extension=curl
```
# Client Sample
Here is a sample PHP client `client.php`:
```php
$username,
'password' => $password,
'stayConnected' => $stayConnected
]);
$ch = curl_init($url);
curl_setopt_array($ch, [
CURLOPT_RETURNTRANSFER => true,
CURLOPT_POST => true,
CURLOPT_ENCODING => "",
CURLOPT_MAXREDIRS => 10,
CURLOPT_TIMEOUT => 0,
CURLOPT_FOLLOWLOCATION => true,
CURLOPT_HTTP_VERSION => CURL_HTTP_VERSION_1_1,
CURLOPT_HTTPHEADER => ['Content-Type: application/json'],
CURLOPT_POSTFIELDS => $payload
]);
$response = curl_exec($ch);
$httpCode = curl_getinfo($ch, CURLINFO_HTTP_CODE);
curl_close($ch);
if ($httpCode !== 200) {
throw new Exception("Login failed: HTTP $httpCode - $response");
}
$data = json_decode($response, true);
return $data['access_token'] ?? null;
}
/**
* Starts the workflow with the given ID using the access token.
*/
function startWorkflow($workflowId, $token)
{
global $baseUrl;
$url = $baseUrl . '/start?w=' . urlencode($workflowId);
$ch = curl_init($url);
curl_setopt_array($ch, [
CURLOPT_RETURNTRANSFER => true,
CURLOPT_POST => true,
CURLOPT_ENCODING => "",
CURLOPT_MAXREDIRS => 10,
CURLOPT_TIMEOUT => 0,
CURLOPT_FOLLOWLOCATION => true,
CURLOPT_HTTP_VERSION => CURL_HTTP_VERSION_1_1,
CURLOPT_HTTPHEADER => array(
"Content-Type: application/json",
"Content-Length: 0",
"Authorization: Bearer $token"
),
]);
$response = curl_exec($ch);
$httpCode = curl_getinfo($ch, CURLINFO_HTTP_CODE);
curl_close($ch);
if ($httpCode !== 200) {
throw new Exception("Start workflow failed: HTTP $httpCode - $response");
}
$data = json_decode($response, true);
return $data;
}
try {
$token = login($username, $password);
$jobId = startWorkflow($workflowId, $token);
echo "Workflow $workflowId started successfully. Job ID: " . json_encode($jobId) . "\n";
} catch (Exception $e) {
echo "Error: " . $e->getMessage() . "\n";
}
?>
```
To run the client, use the following command:
```bash
php client.php
```
---
# Document: PdfToText
> Source: https://github.com/aelassas/wexflow/wiki/PdfToText
```xml
```
---
# Document: Persistence Providers
> Source: https://github.com/aelassas/wexflow/wiki/Persistence-Providers
Wexflow ships with 6 persistence providers. You can choose from the following options:
* SQLite (Default)
* MongoDB
* SQLServer
* PostgreSQL
* MySQL
* LiteDB
If you want to change the persistence provider, you'll need to update `dbType` and `connectionString` settings in [Wexflow.xml](https://github.com/aelassas/wexflow/wiki/Configuration#wexflowxml) configuration file.
If you want to use SQL Server `Trusted_Connection=true` in the connection string, you have to run Wexflow Windows Service as a user who has privileges to connect to SQL Server.
Once you change the persistence provider, restart Wexflow server. Then, you can install workflow samples:
* .NET: `Start > Wexflow > Install [dbType] Samples`
* .NET Core Windows: `./install-[dbType].bat`
* .NET Core Linux: `cd /opt/wexflow/Wexflow.Scripts.[dbType] && dotnet Wexflow.Scripts.[dbType].dll`
* .NET Core macOS: `cd /Application/wexflow/Wexflow.Scripts.[dbType] && dotnet Wexflow.Scripts.[dbType].dll`
Don't forget to check and update the connection string of the samples script if necessary:
* .NET: `C:\Program Files\Wexflow\Wexflow.Scripts.[dbType]\Wexflow.Scripts.[dbType].exe.config`
* .NET Core Windows: `./Wexflow.Scripts.[dbType]/appsettings.json`
* .NET Core Linux: `/opt/wexflow/Wexflow.Scripts.[dbType]/appsettings.json`
* .NET Core macOS: `/Application/wexflow/Wexflow.Scripts.[dbType]/appsettings.json`
---
# Document: Ping
> Source: https://github.com/aelassas/wexflow/wiki/Ping
```xml
```
---
# Document: PowerShell Client
> Source: https://github.com/aelassas/wexflow/wiki/PowerShell-Client
# Client Sample
Here is a sample PowerShell client `client.ps1`:
```powershell
# Login and get JWT token
$loginPayload = @{
username = 'admin'
password = 'wexflow2018'
stayConnected = $false
} | ConvertTo-Json
$res = Invoke-WebRequest -Uri "http://localhost:8000/api/v1/login" -Method Post -Body $loginPayload -ContentType "application/json"
$token = ($res.Content | ConvertFrom-Json).access_token
# Build headers
$headers = @{
Authorization = "Bearer $token"
"Content-Type" = "application/json"
}
# Start workflow
$workflowId=1
$res = Invoke-WebRequest -Uri "http://localhost:8000/api/v1/start?w=$workflowId" -Method Post -Headers $headers
# Parse JSON response
$jobId = ($res.Content | ConvertFrom-Json)
Write-Host "Workflow $workflowId started successfully. Job ID: $jobId"
```
# Client Sending XML as rest variable
```powershell
$xmlFile = "C:\WexflowTesting\Xml\Products.xml"
# Explicitly read the file as plain text with no PowerShell object wrapping
$WorkflowXMLString = [System.IO.File]::ReadAllText($xmlFile)
# Build JSON payload
$xmlFile = "C:\WexflowTesting\Xml\Products.xml"
# Explicitly read the file as plain text with no PowerShell object wrapping
$WorkflowXMLString = [System.IO.File]::ReadAllText($xmlFile)
# Build JSON payload
$jsonPayload = @{
WorkflowId = 138
Variables = @(
@{
Name = "xml"
Value = $WorkflowXMLString
}
)
} | ConvertTo-Json
# Login and get JWT token
$loginPayload = @{
username = 'admin'
password = 'wexflow2018'
stayConnected = $false
} | ConvertTo-Json
$res = Invoke-WebRequest -Uri "http://localhost:8000/api/v1/login" -Method Post -Body $loginPayload -ContentType "application/json"
$token = ($res.Content | ConvertFrom-Json).access_token
# Build headers
$headers = @{
Authorization = "Bearer $token"
"Content-Type" = "application/json"
}
# Start workflow with variables
$res = Invoke-WebRequest -Uri "http://localhost:8000/api/v1/start-with-variables" -Method Post -Headers $headers -Body $jsonPayload
# Parse JSON response
$jobId = ($res.Content | ConvertFrom-Json)
Write-Host "Workflow $workflowId started successfully. Job ID: $jobId"
```
---
# Document: PowerShell SSE Client
> Source: https://github.com/aelassas/wexflow/wiki/PowerShell-SSE-Client
## Prerequisites
* Install [PowerShell 5.1+](https://docs.microsoft.com/powershell/scripting/install/installing-powershell) (pre-installed on modern Windows versions).
* Open a PowerShell terminal or ISE session.
## Long-Running Workflows & JWT Authentication
When monitoring workflows that run for extended periods (such as 2 days or more), standard authentication and connection handling require specific configurations:
### 1. Preventing JWT Token Expiration
By default, short-lived JWT tokens will expire before a multi-day workflow finishes. When authenticating via the `/login` endpoint, pass `"stayConnected": true` in the request body:
```json
{
"username": "admin",
"password": "your_password",
"stayConnected": true
}
```
* **`stayConnected: false`**: Produces a standard, short-lived JWT token (suitable for quick API operations).
* **`stayConnected: true`**: Produces a persistent, non-expiring JWT token necessary for long-running monitoring operations spanning days or weeks.
### 2. Stream Resiliency for Multi-Day Execution
Even with a persistent token, HTTP connections across local networks or the internet will periodically drop over 48+ hours due to proxy timeouts, firewall session resets, or transient network hiccups. The sample client handles this automatically:
* **Automatic Re-authentication:** If the server returns `401 Unauthorized` during a reconnection attempt, the script automatically calls `Get-WexflowToken` to fetch a fresh JWT token before retrying.
* **Idle Read Timeouts:** Uses a 5-minute timeout window via `CancellationTokenSource`. If an intermediate network proxy silently drops the connection without sending a TCP disconnect frame, the script detects the quiet socket and re-establishes the SSE stream seamlessly.
* **Terminal Status Detection:** The client stays connected through transient non-terminal states (`Pending`, `Running`) and only terminates the loop when a final status frame (`Done`, `Failed`, `Warning`, `Stopped`, or `Rejected`) is received.
## SSE Client Sample
Here is a sample PowerShell SSE client `sse.ps1`:
```powershell
#Requires -Version 5.1
<#
.SYNOPSIS
Wexflow Server-Sent Events (SSE) Client script for PowerShell 5.1+.
.DESCRIPTION
Authenticates with the Wexflow REST API, starts a specified workflow job,
subscribes to the corresponding SSE endpoint, and streams status updates until completion.
.PARAMETER BaseUrl
The base API endpoint URL for the Wexflow instance (default: "http://localhost:8000/api/v1").
.PARAMETER Username
The Wexflow username for authentication (default: "admin").
.PARAMETER Password
The Wexflow password for authentication.
.PARAMETER WorkflowId
The integer ID of the workflow to execute and monitor (default: 41).
.EXAMPLE
.\Invoke-WexflowSseClient.ps1 -Username "admin" -Password "wexflow2018" -WorkflowId 41
#>
[CmdletBinding()]
param(
[string]$BaseUrl = "http://localhost:8000/api/v1",
[string]$Username = "admin",
[string]$Password = "wexflow2018",
[int]$WorkflowId = 41
)
# Enforce TLS 1.2 for modern HTTP operations
[Net.ServicePointManager]::SecurityProtocol = [Net.SecurityProtocolType]::Tls12
# Assembly load for HttpClient
Add-Type -AssemblyName System.Net.Http
# Functions
function Get-WexflowToken {
param(
[string]$Url,
[string]$User,
[string]$Pass
)
$loginUrl = "$Url/login"
# stayConnected set to $true ensures the JWT token never expires (essential for multi-day jobs)
$body = @{
username = $User
password = $Pass
stayConnected = $true
} | ConvertTo-Json
# Perform REST Login
$response = Invoke-RestMethod -Uri $loginUrl -Method Post -Body $body -ContentType "application/json"
if (-not $response.access_token) {
throw "Failed to acquire JWT access token from response."
}
return $response.access_token
}
function Start-WexflowJob {
param(
[string]$Url,
[string]$Token,
[int]$WfId
)
$startUrl = "$Url/start?w=$WfId"
$headers = @{
Authorization = "Bearer $Token"
}
# Start the workflow via POST request
$jobId = Invoke-RestMethod -Uri $startUrl -Method Post -Headers $headers
return $jobId
}
function Watch-WexflowSse {
<#
.SYNOPSIS
Connects to the Server-Sent Events (SSE) endpoint and reads streamed lines.
.DESCRIPTION
Uses System.Net.Http.HttpClient to establish an HTTP GET request with
HttpCompletionOption.ResponseHeadersRead. This allows line-by-line streaming of
data payload lines prefixed with 'data: '.
#>
param(
[string]$BaseUrl,
[string]$Username,
[string]$Password,
[string]$SseUrl,
[string]$InitialToken
)
# Terminal workflow states that signal job completion
$terminalStatuses = @("Done", "Failed", "Warning", "Stopped", "Rejected")
$isTerminalStateReached = $false
$currentToken = $InitialToken
# Reconnection loop to handle network drops on multi-day running workflows
while (-not $isTerminalStateReached) {
$handler = New-Object System.Net.Http.HttpClientHandler
$client = New-Object System.Net.Http.HttpClient($handler)
# Prevent client-side timeout for multi-day operations
$client.Timeout = [System.TimeSpan]::FromMilliseconds([System.Threading.Timeout]::Infinite)
# Configure required HTTP Headers for SSE stream listening
$request = New-Object System.Net.Http.HttpRequestMessage([System.Net.Http.HttpMethod]::Get, $SseUrl)
$request.Headers.Accept.Add((New-Object System.Net.Http.Headers.MediaTypeWithQualityHeaderValue("text/event-stream")))
$request.Headers.Authorization = New-Object System.Net.Http.Headers.AuthenticationHeaderValue("Bearer", $currentToken)
Write-Host "[SSE] Connecting to SSE stream..." -ForegroundColor Cyan
try {
# ResponseHeadersRead is crucial: it prevents HttpClient from buffering the whole stream into memory
$responseTask = $client.SendAsync($request, [System.Net.Http.HttpCompletionOption]::ResponseHeadersRead)
$response = $responseTask.Result
# Handle edge cases where server session resets or invalidates the token
if ($response.StatusCode -eq [System.Net.HttpStatusCode]::Unauthorized) {
Write-Warning "JWT token unauthorized. Re-authenticating with stayConnected=$true..."
$currentToken = Get-WexflowToken -Url $BaseUrl -User $Username -Pass $Password
continue
}
if (-not $response.IsSuccessStatusCode) {
Write-Warning "SSE Request failed with HTTP Status: $($response.StatusCode) - $($response.ReasonPhrase). Retrying in 10 seconds..."
Start-Sleep -Seconds 10
continue
}
$streamTask = $response.Content.ReadAsStreamAsync()
$stream = $streamTask.Result
$reader = New-Object System.IO.StreamReader($stream)
Write-Host "[SSE] Connection established. Listening for events..." -ForegroundColor Green
# Loop through stream line-by-line as data events arrive
while (-not $reader.EndOfStream) {
# Protect against silent TCP deadlocks from intermediate proxies during idle days
$cts = New-Object System.Threading.CancellationTokenSource([TimeSpan]::FromMinutes(5))
try {
$lineTask = $reader.ReadLineAsync()
[System.Threading.Tasks.Task]::WaitAll(@($lineTask), $cts.Token)
$line = $lineTask.Result
}
catch {
Write-Warning "[SSE] Connection idle ping timeout (5 mins without frame). Re-establishing stream connection..."
break
}
finally {
$cts.Dispose()
}
if (-not [string]::IsNullOrWhiteSpace($line) -and $line.StartsWith("data: ")) {
# Extract JSON payload after 'data: ' prefix
$jsonString = $line.Substring("data: ".Length)
Write-Host "`n[SSE Event Received: $(Get-Date -Format 'yyyy-MM-dd HH:mm:ss')]" -ForegroundColor Yellow
try {
$eventData = $jsonString | ConvertFrom-Json
# Display structured output properties
Write-Host " Workflow ID : $($eventData.workflowId)"
Write-Host " Job ID : $($eventData.jobId)"
Write-Host " Name : $($eventData.name)"
Write-Host " Status : $($eventData.status)" -ForegroundColor Magenta
Write-Host " Description : $($eventData.description)"
# Break loop ONLY after reading a terminal status frame
if ($terminalStatuses -contains $eventData.status) {
$isTerminalStateReached = $true
break
}
}
catch {
Write-Warning "Failed to parse raw SSE JSON payload: $_"
Write-Host "Raw Payload: $jsonString"
}
}
}
}
catch {
if (-not $isTerminalStateReached) {
Write-Warning "SSE connection disconnected or timed out: $_. Reconnecting in 10 seconds..."
Start-Sleep -Seconds 10
}
}
finally {
# Cleanup HTTP connections
if ($null -ne $reader) { $reader.Dispose() }
if ($null -ne $stream) { $stream.Dispose() }
if ($null -ne $client) { $client.Dispose() }
if ($isTerminalStateReached) {
Write-Host "`n[SSE] Terminal status reached. Connection closed." -ForegroundColor Cyan
}
}
}
}
# Main Execution Script Logic
try {
Write-Host "1. Logging into Wexflow ($BaseUrl)..." -ForegroundColor White
$jwtToken = Get-WexflowToken -Url $BaseUrl -User $Username -Pass $Password
Write-Host " Token retrieved successfully (stayConnected = true)." -ForegroundColor Green
Write-Host "2. Starting Workflow ID: $WorkflowId..." -ForegroundColor White
$jobId = Start-WexflowJob -Url $BaseUrl -Token $jwtToken -WfId $WorkflowId
Write-Host " Job started successfully. Job ID: $jobId" -ForegroundColor Green
# Construct SSE URL endpoint: /api/v1/sse/{workflowId}/{jobId}
$sseEndpoint = "$BaseUrl/sse/$WorkflowId/$jobId"
Write-Host "3. Subscribing to Wexflow SSE Endpoint..." -ForegroundColor White
Watch-WexflowSse -BaseUrl $BaseUrl -Username $Username -Password $Password -SseUrl $sseEndpoint -InitialToken $jwtToken
}
catch {
Write-Error "Execution Failed: $_"
}
```
To run the client, execute the script in PowerShell:
```powershell
.\sse.ps1
```
---
# Document: ProcessInfo
> Source: https://github.com/aelassas/wexflow/wiki/ProcessInfo
```xml
```
---
# Document: ProcessKiller
> Source: https://github.com/aelassas/wexflow/wiki/ProcessKiller
```xml
```
---
# Document: ProcessLauncher
> Source: https://github.com/aelassas/wexflow/wiki/ProcessLauncher
```xml
```
---
# Document: Python Client
> Source: https://github.com/aelassas/wexflow/wiki/Python-Client
## Prerequisites
* Install [Python](https://www.python.org/)
* Install [pip](https://pip.pypa.io/)
* Install `requests`:
```bash
pip install requests
```
## Client Sample
Here is a sample Python client `client.py`:
```py
import requests
base_url = 'http://localhost:8000/api/v1'
username = 'admin'
password = 'wexflow2018'
workflow_id = 41
def login(user, passwd, stay_connected=False):
url = f'{base_url}/login'
headers = {'Content-Type': 'application/json'}
payload = {
'username': user,
'password': passwd,
'stayConnected': stay_connected
}
response = requests.post(url, json=payload, headers=headers)
if response.status_code != 200:
raise Exception(f'HTTP {response.status_code} - {response.reason}')
return response.json()['access_token']
try:
token = login(username, password)
headers = {
'Authorization': f'Bearer {token}'
}
response = requests.post(f'{base_url}/start?w={workflow_id}', headers=headers)
if response.status_code != 200:
raise Exception(f'HTTP {response.status_code} - {response.reason}')
job_id = response.json()
print(f'Workflow {workflow_id} started successfully. Job ID: {job_id}')
except Exception as e:
print(f'Failed to start workflow {workflow_id}: {e}')
```
To run the client, use the following command:
```bash
py client.py
```
---
# Document: Python SSE Client
> Source: https://github.com/aelassas/wexflow/wiki/Python-SSE-Client
## Prerequisites
* Install [Python](https://www.python.org/)
* Install [pip](https://pip.pypa.io/)
* Install `requests` and `sseclient-py`:
```bash
pip install requests sseclient-py
```
## SSE Client Sample
Here is a sample Python client `sse.py`:
```py
import requests
import sseclient
import json
base_url = 'http://localhost:8000/api/v1'
username = 'admin'
password = 'wexflow2018'
workflow_id = 41
def login(user, passwd, stay_connected=False):
url = f'{base_url}/login'
headers = {'Content-Type': 'application/json'}
payload = {
'username': user,
'password': passwd,
'stayConnected': stay_connected
}
response = requests.post(url, json=payload, headers=headers)
if response.status_code != 200:
raise Exception(f'HTTP {response.status_code} - {response.reason}')
return response.json()['access_token']
def start_workflow(token, workflow_id):
url = f'{base_url}/start?w={workflow_id}'
headers = {
'Authorization': f'Bearer {token}'
}
response = requests.post(url, headers=headers)
if response.status_code != 200:
raise Exception(f'HTTP {response.status_code} - {response.reason}')
return response.json()
def listen_to_sse(url, token):
headers = {
'Authorization': f'Bearer {token}',
'Accept': 'text/event-stream'
}
response = requests.get(url, headers=headers, stream=True)
client = sseclient.SSEClient(response)
print('SSE connection opened')
for event in client.events():
try:
data = json.loads(event.data)
print('Received SSE JSON:')
print(json.dumps(data, indent=2))
break # Stop after first message
except Exception as e:
print(f'Failed to parse SSE JSON: {e}')
break
print('SSE connection closed')
# Main execution
try:
token = login(username, password)
job_id = start_workflow(token, workflow_id)
print(f'Workflow {workflow_id} started successfully. Job ID: {job_id}')
sse_url = f'{base_url}/sse/{workflow_id}/{job_id}'
listen_to_sse(sse_url, token)
except Exception as e:
print(f'Error: {e}')
```
To run the client, use the following command:
```bash
py sse.py
```
---
# Document: REST Variables
> Source: https://github.com/aelassas/wexflow/wiki/REST-Variables
Local variables and global variables values are set before the workflow is started.
With REST variables, you can set values at runtime when you start a workflow.
REST variables cannot be set from the dashboard at the moment. You need to use Wexflow API from your application or through Swagger: http://localhost:8000/
To send variables when starting a workflow, use the following endpoint:
**POST** http://localhost:8000/api/v1/start-with-variables
Here is a sample payload:
```json
{
"WorkflowId":131,
"Variables":[
{
"Name":"restVar1",
"Value":"C:\\WexflowTesting\\file1.txt"
},
{
"Name":"restVar2",
"Value":"C:\\WexflowTesting\\file2.txt"
}
]
}
```
Here is a sample workflow:
```xml
```
---
# Document: RESTful API
> Source: https://github.com/aelassas/wexflow/wiki/RESTful-API
# Table of Contents
1. [Introduction](https://github.com/aelassas/wexflow/wiki/RESTful-API#introduction)
1. [Authentication](https://github.com/aelassas/wexflow/wiki/RESTful-API#authentication)
1. [Sample Clients](https://github.com/aelassas/wexflow/wiki/RESTful-API#sample-clients)
1. [Security Considerations](https://github.com/aelassas/wexflow/wiki/RESTful-API#security-considerations)
1. [Swagger](https://github.com/aelassas/wexflow/wiki/RESTful-API#swagger)
1. [Workflow Notifications via SSE](https://github.com/aelassas/wexflow/wiki/RESTful-API#workflow-notifications-via-sse)
1. [Endpoints](https://github.com/aelassas/wexflow/wiki/RESTful-API#endpoints)
# Introduction
Wexflow Server is a standalone workflow engine that helps automate tasks such as file handling, data processing, report generation, and more. It is language-independent, which means you can use it with any technology—whether your app is built in PHP, Node.js, .NET, Python, Ruby, or something else. Wexflow provides a RESTful API so your application can communicate with it over HTTP.
Beyond standard request-response operations, you can receive real-time workflow job status updates through **Server-Sent Events (SSE)**. For detailed instructions on how to subscribe to workflow status notifications via SSE, see the [Workflow Notifications via SSE](https://github.com/aelassas/wexflow/wiki/Workflow-Notifications-via-SSE) page.
This API lets you control workflows from your own software. You can start, stop, and monitor workflows, view logs, manage users, and access system information. Wexflow handles all the execution, so you can focus on your application logic while automating background processes with ease.
# Authentication
All Wexflow API endpoints are secured with JWT authentication. Every API request must include an `Authorization` header containing a valid **Bearer token**.
To get a JWT token, call the following endpoint:
```
POST http://localhost:8000/api/v1/login
```
With this JSON payload:
```js
{
'username': 'username',
'password': 'password',
'stayConnected': false,
}
```
If the credentials are valid, you'll receive a response like:
```js
{
"access_token": "eyJhbGciOiJIUzI1NiIsInR5cCI6IkpXVCJ9..."
}
```
Include the token in your `Authorization` header for all subsequent requests:
```
Authorization: Bearer eyJhbGciOiJIUzI1NiIsInR5cCI6IkpXVCJ9...
```
The default password of the user `admin` is `wexflow2018`. For security reasons, change it after your first login.
# Sample Clients
Wexflow provides a RESTful API that can be consumed from any programming language. Below are sample clients demonstrating how to authenticate, use access tokens, trigger workflows, and interact with the API:
- [C# Client](https://github.com/aelassas/wexflow/wiki/C%23-Client)
- [PowerShell Client](https://github.com/aelassas/wexflow/wiki/PowerShell-Client)
- [JavaScript Client](https://github.com/aelassas/wexflow/wiki/JavaScript-Client)
- [PHP Client](https://github.com/aelassas/wexflow/wiki/PHP-client)
- [Python Client](https://github.com/aelassas/wexflow/wiki/Python-Client)
- [Go Client](https://github.com/aelassas/wexflow/wiki/Go-Client)
- [Rust Client](https://github.com/aelassas/wexflow/wiki/Rust-Client)
- [Ruby Client](https://github.com/aelassas/wexflow/wiki/Ruby-Client)
- [Java Client](https://github.com/aelassas/wexflow/wiki/Java-Client)
- [C++ Client](https://github.com/aelassas/wexflow/wiki/CPP-Client)
You can find the source code for all these clients in the [samples/clients](https://github.com/aelassas/wexflow/tree/main/samples/clients/client) directory of the main Wexflow repository.
These examples serve as practical starting points to integrate Wexflow into your own applications regardless of the tech stack you're using.
# Security Considerations
Wexflow uses a secure authentication mechanism based on **JWT (JSON Web Tokens)**, **PBKDF2-hashed passwords**, HttpOnly secure cookies and HTTPS/SSL.
For production environments, it is strongly recommended to use [HTTPS/SSL](https://github.com/aelassas/wexflow/wiki/SSL) to encrypt all communication between clients and the Wexflow server.
Securing Wexflow behind **HTTPS** and using strong credentials is essential for reducing potential vulnerabilities.
These measures help protect against XSS, XST, CSRF, MITM, token theft, and insecure password storage.
# Swagger
Wexflow provides a built-in Swagger interface for exploring and testing the API: http://localhost:8000/swagger-ui/
Some api routes may not be listed here, check Swagger UI for full list.
# Workflow Notifications via SSE
You can subscribe to a Server-Sent Events (SSE) endpoint that notifies your client when a workflow job finishes or stops.
For detailed instructions on how to subscribe to workflow status notifications via SSE, see the [Workflow Notifications via SSE](https://github.com/aelassas/wexflow/wiki/Workflow-Notifications-via-SSE) page.
# Endpoints
## Dashboard
**GET** http://localhost:8000/api/v1/status-count
Returns status count.
**GET** http://localhost:8000/api/v1/entries-count-by-date?s={keyword}&from={date}&to={date}
Returns entries count by keyword and date filter.
**GET** http://localhost:8000/api/v1/search-entries-by-page-order-by?s={keyword}&from={date}&to={date}&page={page}&entriesCount={entriesCount}&heo={orderBy}
Searches for entries.
**GET** http://localhost:8000/api/v1/entry-status-date-min
Returns entry min date.
**GET** http://localhost:8000/api/v1/entry-status-date-max
Returns entry max date.
**GET** http://localhost:8000/api/v1/entry?w={workflowId}&i={jobId}
Returns workflow job entry. If jobId is not specified, it returns the latest job entry of the workflow.
Here is a sample response:
```json
{
"Id": "2",
"WorkflowId": 43,
"Name": "Workflow_ExecutionGraph",
"LaunchType": 1,
"Description": "Workflow_ExecutionGraph",
"Status": 1,
"StatusDate": "19-06-2025 18:23:54"
}
```
Here are job statuses:
| Status | Integer Value |
|-------------|----------------|
| Pending | 0 |
| Running | 1 |
| Done(success) | 2 |
| Failed | 3 |
| Warning | 4 |
| Disabled | 5 |
| Stopped | 6 |
| Rejected | 7 |
## Manager
**GET** http://localhost:8000/api/v1/search?s={keyword}
Search for workflows.
**GET** http://localhost:8000/api/v1/search-approval-workflows?s={keyword}
Search for approval workflows.
**GET** http://localhost:8000/api/v1/workflow?w={id}
Returns a workflow from its id.
**POST** http://localhost:8000/api/v1/start?w={id}
Starts a workflow.
**POST** http://localhost:8000/api/v1/start-with-variables
Starts a workflow with variables.
Here is a sample payload:
```json
{
"WorkflowId":131,
"Variables":[
{
"Name":"restVar1",
"Value":"C:\\WexflowTesting\\file1.txt"
},
{
"Name":"restVar2",
"Value":"C:\\WexflowTesting\\file2.txt"
}
]
}
```
Here is a sample workflow:
```xml
```
**POST** http://localhost:8000/api/v1/stop?w={id}&i={jobId}
Stops a workflow.
**POST** http://localhost:8000/api/v1/suspend?w={id}&i={jobId}
Suspends a workflow.
**POST** http://localhost:8000/api/v1/resume?w={id}&i={jobId}
Resumes a workflow.
**POST** http://localhost:8000/api/v1/approve?w={id}&i={jobId}
Approves a workflow.
**POST** http://localhost:8000/api/v1/disapprove?w={id}&i={jobId}
Disapproves a workflow.
**GET** http://localhost:8000/api/v1/job?w={workflowId}&i={jobId}
Returns currently running workflow job. When job finishes, it gets removed from jobs queue which will result in an empty response but if it is the latest job it will always return the latest job status even if the job ended.
Here is a sample response:
```json
{
"DbId": "16",
"Id": 43,
"InstanceId": "7d3e39df-2023-445f-9206-dfd8a4ab0a78",
"Name": "Workflow_ExecutionGraph",
"FilePath": null,
"LaunchType": 1,
"IsEnabled": true,
"IsApproval": false,
"EnableParallelJobs": true,
"IsWaitingForApproval": false,
"Description": "Workflow_ExecutionGraph",
"IsRunning": true,
"IsPaused": false,
"Period": "00.00:00:00",
"CronExpression": null,
"IsExecutionGraphEmpty": false,
"LocalVariables": [],
"StartedOn": "19-06-2025 18:23:54",
"RetryCount": 0,
"RetryTimeout": 1500,
"Status": "Running"
}
```
**GET** http://localhost:8000/api/v1/jobs?w={workflowId}
Returns currently running workflow jobs.
## Designer
**GET** http://localhost:8000/api/v1/tasks/{id}
Returns workflow's tasks.
**GET** http://localhost:8000/api/v1/xml/{id}
Returns a workflow as XML.
**GET** http://localhost:8000/api/v1/json/{id}
Returns a workflow as JSON.
**GET** http://localhost:8000/api/v1/task-names
Returns task names.
**GET** http://localhost:8000/api/v1/settings/{taskName}
Returns task settings.
**POST** http://localhost:8000/api/v1/task-to-xml
Returns a task as XML.
**GET** http://localhost:8000/api/v1/is-workflow-id-valid/{id}
Checks if a workflow id is valid.
**GET** http://localhost:8000/api/v1/is-cron-expression-valid?e={cronExpression}
Checks if a cron expression is valid.
**GET** http://localhost:8000/api/v1/is-period-valid/{period}
Checks if a period is valid.
**POST** http://localhost:8000/api/v1/is-xml-workflow-valid
Checks if the XML of a workflow is valid.
**POST** http://localhost:8000/api/v1/save-xml
Saves a workflow from XML.
**POST** http://localhost:8000/api/v1/save
Saves a workflow from JSON.
**POST** http://localhost:8000/api/v1/delete?w={id}
Deletes a workflow.
**POST** http://localhost:8000/api/v1/delete-workflows
Deletes workflows.
**GET** http://localhost:8000/api/v1/graph/{id}
Returns the execution graph of the workflow.
## History
**GET** http://localhost:8000/api/v1/history-entries-count-by-date?s={keyword}&from={date}&to={date}
Returns history entries count by keyword and date filter.
**GET** http://localhost:8000/api/v1/search-history-entries-by-page-order-by?s={keyword}&from={date}&to={date}&page={page}&entriesCount={entriesCount}&heo={orderBy}
Searches for history entries.
**GET** http://localhost:8000/api/v1/history-entry-status-date-min
Returns history entry min date.
**GET** http://localhost:8000/api/v1/history-entry-status-date-max
Returns history entry max date.
## Users
**GET** http://localhost:8000/api/v1/user?username={username}
Returns a user from his username.
**GET** http://localhost:8000/api/v1/search-users?keyword={keyword}&uo={orderBy}
Searches for users.
**POST** http://localhost:8000/api/v1/insert-user?username={username}&password={password}&up={userProfile}&email={email}
Inserts a user.
**POST** http://localhost:8000/api/v1/update-user?userId={userId}&username={username}&password={password}&up={userProfile}&email={email}
Updates a user.
**POST** http://localhost:8000/api/v1/update-username-email-user-profile?userId={userId}&username={username}&password={password}&up={userProfile}&email={email}
Updates the username, the email and the user profile of a user.
**POST** http://localhost:8000/api/v1/delete-user?username={username}&password={password}
Deletes a user.
**POST** http://localhost:8000/api/v1/reset-password?username={username}
Resets a password.
## Profiles
**GET** http://localhost:8000/api/v1/search-admins?keyword={keyword}&uo={orderBy}
Searches for administrators.
**GET** http://localhost:8000/api/v1/user-workflows?u={userId}
Returns user workflows.
**POST** http://localhost:8000/api/v1/save-user-workflows
Saves user workflow relations.
---
# Document: Reddit
> Source: https://github.com/aelassas/wexflow/wiki/Reddit
```xml
```
---
# Document: RedditListComments
> Source: https://github.com/aelassas/wexflow/wiki/RedditListComments
```xml
```
---
# Document: RedditListPosts
> Source: https://github.com/aelassas/wexflow/wiki/RedditListPosts
```xml
```
---
# Document: Rmdir
> Source: https://github.com/aelassas/wexflow/wiki/Rmdir
```xml
```
---
# Document: Ruby Client
> Source: https://github.com/aelassas/wexflow/wiki/Ruby-Client
## Prerequisites
* Install [Ruby](https://www.ruby-lang.org/)
## SSE Client Sample
Here is a sample Ruby client `client.rb`:
```rb
require 'net/http'
require 'json'
require 'uri'
BASE_URL = 'http://localhost:8000/api/v1'
USERNAME = 'admin'
PASSWORD = 'wexflow2018'
WORKFLOW_ID = 41
def login(user, pass, stay_connected = false)
uri = URI("#{BASE_URL}/login")
req = Net::HTTP::Post.new(uri, 'Content-Type' => 'application/json')
req.body = {
username: user,
password: pass,
stayConnected: stay_connected
}.to_json
res = Net::HTTP.start(uri.hostname, uri.port) { |http| http.request(req) }
unless res.is_a?(Net::HTTPSuccess)
raise "Login failed: HTTP #{res.code} #{res.message}"
end
data = JSON.parse(res.body)
data['access_token']
end
def start_workflow(token, workflow_id)
uri = URI("#{BASE_URL}/start?w=#{workflow_id}")
req = Net::HTTP::Post.new(uri)
req['Authorization'] = "Bearer #{token}"
res = Net::HTTP.start(uri.hostname, uri.port) { |http| http.request(req) }
unless res.is_a?(Net::HTTPSuccess)
raise "Failed to start workflow: HTTP #{res.code} #{res.message}"
end
res.body
end
begin
token = login(USERNAME, PASSWORD)
job_id = start_workflow(token, WORKFLOW_ID)
puts "Workflow #{WORKFLOW_ID} started successfully. Job ID: #{job_id}"
rescue => e
puts "Error: #{e}"
end
```
To run the client, use the following command:
```bash
ruby client.rb
```
---
# Document: Ruby SSE Client
> Source: https://github.com/aelassas/wexflow/wiki/Ruby-SSE-Client
## Prerequisites
* Install [Ruby](https://www.ruby-lang.org/)
* Add these gems to your project:
```bash
gem install em-eventsource
```
## SSE Client Sample
Here is a sample SSE Ruby client `sse.rb`:
```rb
require 'net/http'
require 'uri'
require 'json'
require 'em-eventsource'
BASE_URL = 'http://localhost:8000/api/v1'
USERNAME = 'admin'
PASSWORD = 'wexflow2018'
WORKFLOW_ID = 41
def login(username, password, stay_connected = false)
uri = URI("#{BASE_URL}/login")
req = Net::HTTP::Post.new(uri, 'Content-Type' => 'application/json')
req.body = { username: username, password: password, stayConnected: stay_connected }.to_json
res = Net::HTTP.start(uri.hostname, uri.port) do |http|
http.request(req)
end
unless res.is_a?(Net::HTTPSuccess)
raise "Login failed: #{res.code} #{res.message}"
end
json = JSON.parse(res.body)
json['access_token']
end
def start_workflow(token, workflow_id)
uri = URI("#{BASE_URL}/start?w=#{workflow_id}")
req = Net::HTTP::Post.new(uri, 'Authorization' => "Bearer #{token}")
res = Net::HTTP.start(uri.hostname, uri.port) do |http|
http.request(req)
end
unless res.is_a?(Net::HTTPSuccess)
raise "Start workflow failed: #{res.code} #{res.message}"
end
JSON.parse(res.body)
end
begin
token = login(USERNAME, PASSWORD)
job_id = start_workflow(token, WORKFLOW_ID)
puts "Workflow #{WORKFLOW_ID} started. Job ID: #{job_id}"
sse_url = "#{BASE_URL}/sse/#{WORKFLOW_ID}/#{job_id}"
EM.run do
source = EventMachine::EventSource.new(sse_url, nil, { 'Authorization' => "Bearer #{token}" })
source.message do |msg|
begin
data = JSON.parse(msg)
puts "Received SSE JSON: #{data}"
source.close
rescue => e
puts "Failed to parse SSE JSON: #{e.message}"
end
end
source.error do |err|
puts "SSE error: #{err}"
source.close
end
source.open do
puts "SSE connection opened"
end
source.start
end
rescue => e
puts "Error: #{e.message}"
end
```
To run the client, use the following command:
```bash
ruby sse.rb
```
---
# Document: Run From Source
> Source: https://github.com/aelassas/wexflow/wiki/Run-From-Source
To run Wexflow from source on Windows, proceed as follows:
- Clone the source down to your machine:
```
git clone https://github.com/aelassas/wexflow.git
```
- Install Visual Studio 2026.
- **.NET Framework 4.8 (legacy)**: Copy the folders `Wexflow` and `WexflowTesting` in C:\\. You can download them from [here](https://wexflow.github.io/content/net.zip).
- **.NET 9.0+ (stable)**: Copy the folders `Wexflow-netcore` and `WexflowTesting` in C:\\. You can download them from [here](https://wexflow.github.io/content/netcore.zip).
- If you installed Wexflow, make sure that Wexflow Windows Service is stopped and that the port 8000 is available. Othewise, you can change the port from the settings.
- Restore nuget packages with the following command:
```
nuget restore Wexflow.sln
```
- Open Wexflow.sln in Visual Studio.
- Make sure that all the projects are set to **Debug Any CPU**.
- Debug the project Wexflow.Server to start Wexflow Server in debug mode.
- Visit http://localhost:8000/
- Username: `admin`
- Password: `wexflow2018`
---
# Document: Rust Client
> Source: https://github.com/aelassas/wexflow/wiki/Rust-Client
## Prerequisites
* Install [Rust](https://www.rust-lang.org/)
* On Windows Install C++ build tools for Visual Studio and Windows 11 SDK
## Client Sample
1. Create a new Rust project:
```bash
cargo new wexflow_client
cd wexflow_client
```
2. Edit `Cargo.toml`:
```toml
[package]
name = "wexflow_client"
version = "0.1.0"
edition = "2024"
[dependencies]
reqwest = { version = "0.11", features = ["json", "rustls-tls"] }
serde = { version = "1.0", features = ["derive"] }
tokio = { version = "1", features = ["full"] }
```
3. Create `src/main.rs`:
```rs
use reqwest::StatusCode;
use serde::{Deserialize, Serialize};
use std::error::Error;
const BASE_URL: &str = "http://localhost:8000/api/v1";
const USERNAME: &str = "admin";
const PASSWORD: &str = "wexflow2018";
const WORKFLOW_ID: u32 = 41;
#[derive(Serialize)]
struct LoginRequest<'a> {
username: &'a str,
password: &'a str,
#[serde(rename = "stayConnected")]
stay_connected: bool,
}
#[derive(Deserialize)]
struct LoginResponse {
access_token: String,
}
#[tokio::main]
async fn main() -> Result<(), Box> {
let token = login(USERNAME, PASSWORD).await?;
let job_id = start_workflow(&token, WORKFLOW_ID).await?;
println!("Workflow {} started successfully. Job ID: {}", WORKFLOW_ID, job_id);
Ok(())
}
async fn login(username: &str, password: &str) -> Result> {
let client = reqwest::Client::new();
let login_body = LoginRequest {
username,
password,
stay_connected: false,
};
let res = client
.post(format!("{}/login", BASE_URL))
.json(&login_body)
.send()
.await?;
if res.status() != StatusCode::OK {
return Err(format!("Login failed: HTTP {} {}", res.status(), res.text().await?).into());
}
let login_response: LoginResponse = res.json().await?;
Ok(login_response.access_token)
}
async fn start_workflow(token: &str, workflow_id: u32) -> Result> {
let client = reqwest::Client::new();
let url = format!("{}/start?w={}", BASE_URL, workflow_id);
let res = client
.post(&url)
.bearer_auth(token)
.send()
.await?;
if res.status() != StatusCode::OK {
return Err(format!("Failed to start workflow: HTTP {} {}", res.status(), res.text().await?).into());
}
let job_id = res.text().await?;
Ok(job_id)
}
```
To run the client, use the following command:
```bash
cargo run
```
---
# Document: Rust SSE Client
> Source: https://github.com/aelassas/wexflow/wiki/Rust-SSE-Client
## Prerequisites
* Install [Rust](https://www.rust-lang.org/)
* On Windows Install C++ build tools for Visual Studio and Windows 11 SDK
## Client Sample
1. Create a new Rust project:
```bash
cargo new rust_sse
cd rust_sse
```
2. Edit `Cargo.toml`:
```toml
[package]
name = "wexflow_sse_client"
version = "0.1.0"
edition = "2021"
[dependencies]
tokio = { version = "1", features = ["full"] }
reqwest = { version = "0.11", features = ["json", "stream"] }
serde = { version = "1", features = ["derive"] }
serde_json = "1"
futures-util = "0.3"
```
3. Create `src/main.rs`:
```rs
use futures_util::StreamExt;
use reqwest::Client;
use serde::{Deserialize, Serialize};
use std::error::Error;
const BASE_URL: &str = "http://localhost:8000/api/v1";
const USERNAME: &str = "admin";
const PASSWORD: &str = "wexflow2018";
const WORKFLOW_ID: u32 = 41;
#[derive(Serialize)]
struct LoginPayload<'a> {
username: &'a str,
password: &'a str,
#[serde(rename = "stayConnected")]
stay_connected: bool,
}
#[derive(Deserialize)]
struct LoginResponse {
access_token: String,
}
#[tokio::main]
async fn main() -> Result<(), Box> {
let client = Client::new();
let token = login(&client).await?;
let job_id = start_workflow(&client, &token).await?;
println!("Workflow {} started. Job ID: {}", WORKFLOW_ID, job_id);
let sse_url = format!("{}/sse/{}/{}", BASE_URL, WORKFLOW_ID, job_id);
listen_to_sse(&client, &sse_url, &token).await?;
Ok(())
}
async fn login(client: &Client) -> Result> {
let payload = LoginPayload {
username: USERNAME,
password: PASSWORD,
stay_connected: false,
};
let res = client
.post(&format!("{}/login", BASE_URL))
.json(&payload)
.send()
.await?;
if !res.status().is_success() {
return Err(format!("Login failed: {}", res.status()).into());
}
let data: LoginResponse = res.json().await?;
Ok(data.access_token)
}
async fn start_workflow(client: &Client, token: &str) -> Result> {
let url = format!("{}/start?w={}", BASE_URL, WORKFLOW_ID);
let res = client.post(&url).bearer_auth(token).send().await?;
if !res.status().is_success() {
return Err(format!("Start workflow failed: {}", res.status()).into());
}
let job_id: String = res.json().await?;
Ok(job_id)
}
async fn listen_to_sse(client: &Client, url: &str, token: &str) -> Result<(), Box> {
let res = client
.get(url)
.bearer_auth(token)
.header("Accept", "text/event-stream")
.send()
.await?;
println!("SSE connection opened");
let mut lines = res.bytes_stream();
while let Some(chunk) = lines.next().await {
let bytes = chunk?;
let line = String::from_utf8_lossy(&bytes);
for l in line.lines() {
if l.starts_with("data: ") {
let json_data = &l[6..];
match serde_json::from_str::(json_data) {
Ok(value) => {
println!(
"Received SSE JSON:\n{}",
serde_json::to_string_pretty(&value)?
);
println!("SSE connection closed");
return Ok(()); // Exit after first message
}
Err(err) => {
println!("Failed to parse SSE JSON: {}", err);
return Ok(());
}
}
}
}
}
Ok(())
}
```
To run the client, use the following command:
```bash
cargo run
```
---
# Document: SSL
> Source: https://github.com/aelassas/wexflow/wiki/SSL
HTTPS/SSL support is available in Wexflow starting from version 9.2. You can enable it for both .NET 4.8 and .NET 9.0+ versions.
# Table Of Contents
1. [Installation Options](https://github.com/aelassas/wexflow/wiki/SSL#installation-options)
1. [.NET 4.8](https://github.com/aelassas/wexflow/wiki/SSL#net-48)
1. [.NET 9.0+](https://github.com/aelassas/wexflow/wiki/SSL#net-90)
1. [Development Certificates (Self-Signed)](https://github.com/aelassas/wexflow/wiki/SSL#development-certificates-self-signed)
1. [Admin Panel](https://github.com/aelassas/wexflow/wiki/SSL#admin-panel)
1. [.NET 9.0+](https://github.com/aelassas/wexflow/wiki/SSL#net-90-1)
1. [Prerequisites](https://github.com/aelassas/wexflow/wiki/SSL#prerequisites)
1. [Windows](https://github.com/aelassas/wexflow/wiki/SSL#windows)
1. [Linux](https://github.com/aelassas/wexflow/wiki/SSL#linux)
1. [macOS](https://github.com/aelassas/wexflow/wiki/SSL#macos)
1. [Notes](https://github.com/aelassas/wexflow/wiki/SSL#notes)
1. [Wexflow Server (Windows)](https://github.com/aelassas/wexflow/wiki/SSL#wexflow-server-windows)
1. [Wexflow Server (Linux)](https://github.com/aelassas/wexflow/wiki/SSL#wexflow-server-linux)
1. [Wexflow Server (macOS)](https://github.com/aelassas/wexflow/wiki/SSL#wexflow-server-macos)
1. [.NET 4.8](https://github.com/aelassas/wexflow/wiki/SSL#net-48-1)
1. [Enable HTTPS for Wexflow Windows Service](https://github.com/aelassas/wexflow/wiki/SSL#enable-https-for-wexflow-windows-service)
1. [Install the certificate](https://github.com/aelassas/wexflow/wiki/SSL#install-the-certificate)
1. [Get private key path](https://github.com/aelassas/wexflow/wiki/SSL#get-private-key-path)
1. [Grant permissions to Network Service and SYSTEM](https://github.com/aelassas/wexflow/wiki/SSL#grant-permissions-to-network-service-and-system)
1. [Bind the certificate to port 8000](https://github.com/aelassas/wexflow/wiki/SSL#bind-the-certificate-to-port-8000)
# Installation Options
You can find detailed installation instructions [here](https://github.com/aelassas/wexflow/wiki/Installing).
## .NET 4.8
You can install Wexflow as a Windows Service (targeting .NET Framework 4.8) using one of the following [installers](https://github.com/aelassas/wexflow/releases/latest):
* wexflow-x.x-windows-x64.exe (64-bit)
* wexflow-x.x-windows-x86.exe (32-bit)
## .NET 9.0+
You can install Wexflow as a cross-platform app/service (targeting .NET 9.0+) on Windows, Linux, or macOS using one of the following [packages](https://github.com/aelassas/wexflow/releases/latest):
* wexflow-x.x-windows-netcore.zip
* wexflow-x.x-linux-netcore.zip
* wexflow-x.x-macos-netcore.zip
> **Note:**
> Many of the operations in this guide — including installing services, managing certificates, and configuring firewalls or port bindings — require **Administrator (Windows)** or **root (Linux/macOS)** privileges.
> Be sure to run your terminal or PowerShell with elevated permissions where applicable.
# Development Certificates (Self-Signed)
To generate a self-signed certificate for development:
- On **Windows**, use the [ssl.ps1](https://github.com/aelassas/wexflow/blob/main/src/netcore/Wexflow.Server/ssl.ps1) script
- On **Linux**, use the [ssl.sh](https://github.com/aelassas/wexflow/blob/main/src/netcore/Wexflow.Server/ssl.sh) script
You can test with the following endpoint: https://localhost:8000/api/v1/hello
# Admin Panel
No configuration is required to use the admin panel.
If you plan to host the admin panel on a different web server and use **HTTPS** for the Wexflow server, make sure the web server hosting the admin panel also uses **HTTPS**. This is necessary to avoid mixed content issues in modern browsers.
By default, the admin panel is available at: https://localhost:8000/
# .NET 9.0+
## Prerequisites
Generate `.pfx` certificate file.
### Windows
1. Install [Win64 OpenSSL](https://slproweb.com/products/Win32OpenSSL.html)
2. Add `C:\Program Files\OpenSSL-Win64\bin` to your `PATH` environment variable
3. Open a PowerShell and run the following command to export your certificate to PFX:
```powershell
$KEY = "C:\Wexflow-netcore\wexflow.key"
$CRT = "C:\Wexflow-netcore\wexflow.crt"
$PFX = "C:\Wexflow-netcore\wexflow.pfx"
$PASSWORD = "wexflow2018"
openssl pkcs12 -export -out $PFX -inkey $KEY -in $CRT -password pass:$PASSWORD
```
### Linux
```bash
KEY="/opt/wexflow/Wexflow/wexflow.key"
CRT="/opt/wexflow/Wexflow/wexflow.crt"
PFX="/opt/wexflow/Wexflow/wexflow.pfx"
PASSWORD="wexflow2018"
openssl pkcs12 -export -out "$PFX" -inkey "$KEY" -in "$CRT" -password pass:"$PASSWORD"
```
### macOS
```bash
KEY="/Applications/wexflow/Wexflow/wexflow.key"
CRT="/Applications/wexflow/Wexflow/wexflow.crt"
PFX="/Applications/wexflow/Wexflow/wexflow.pfx"
PASSWORD="wexflow2018"
openssl pkcs12 -export -out "$PFX" -inkey "$KEY" -in "$CRT" -password pass:"$PASSWORD"
```
### Notes
- **Self-signed certificate warning:**
If you're using a self-signed certificate, browsers will show a security warning unless the certificate is explicitly trusted on your system.
## Wexflow Server (Windows)
Edit `.\Wexflow.Server\appsettings.json`:
```json
{
"HTTPS": true,
"PfxFile": "C:\\Wexflow-netcore\\wexflow.pfx",
"PfxPassword": "wexflow2018"
}
```
Then restart the server.
## Wexflow Server (Linux)
Place your PXF in `/opt/wexflow/Wexflow/wexflow.pfx`.
Edit `/opt/Wexflow/Wexflow.Server/appsettings.json`:
```json
{
"HTTPS": true,
"PfxFile": "/opt/wexflow/Wexflow/wexflow.pfx",
"PfxPassword": "wexflow2018"
}
```
Open Terminal and run the following command to restart `wexflow` service:
```bash
sudo systemctl restart wexflow
```
## Wexflow Server (macOS)
Place your PFX in `/Applications/wexflow/Wexflow/wexflow.pfx`.
Edit `/Applications/Wexflow/Wexflow.Server/appsettings.json`:
```json
{
"HTTPS": true,
"PfxFile": "/Applications/wexflow/Wexflow/wexflow.pfx",
"PfxPassword": "wexflow2018"
}
```
Open Terminal and run:
```bash
cd /Applications/wexflow/Wexflow.Server
dotnet Wexflow.Server.dll
```
# .NET 4.8
## Enable HTTPS for Wexflow Windows Service
1. Set `HTTPS` option to `true` in `C:\Program Files\Wexflow\Wexflow.Server.exe.config`
2. Restart Wexflow Windows Service
## Install the certificate
- Open the **MMC** console (`Win + R`, then type `mmc`)
- Install `wexflow.crt` in **Trusted Root Certification Authorities** (Local Computer)
- Install `wexflow.pfx` in **Personal** store (Local Computer)
- Locate your SSL certificate, double-click it
- Go to the **Details** tab, find **Thumbprint**
- Copy the thumbprint and **remove all spaces**
## Get private key path
```powershell
$thumb = "81d53a62964240b8d2cc77b40bf7e6c758554afc"
$cert = Get-ChildItem Cert:\LocalMachine\My | Where-Object { $_.Thumbprint -eq $thumb }
$keyName = $cert.PrivateKey.CspKeyContainerInfo.UniqueKeyContainerName
$keyPath = "C:\ProgramData\Microsoft\Crypto\RSA\MachineKeys\$keyName"
$keyPath
```
Example output:
```
C:\ProgramData\Microsoft\Crypto\RSA\MachineKeys\088395182206fa2acc494753b3099972_4ced353e-566d-4394-821c-bc9f487c4b5b
```
## Grant permissions to Network Service and SYSTEM
```powershell
icacls "C:\ProgramData\Microsoft\Crypto\RSA\MachineKeys\088395182206fa2acc494753b3099972_4ced353e-566d-4394-821c-bc9f487c4b5b" /grant *S-1-5-20:R
icacls "C:\ProgramData\Microsoft\Crypto\RSA\MachineKeys\088395182206fa2acc494753b3099972_4ced353e-566d-4394-821c-bc9f487c4b5b" /grant *S-1-5-18:R
```
## Bind the certificate to port 8000
- Generate a new GUID for appid in PowerShell:
```powershell
New-Guid
```
- Run the following command (replace the `certhash` and `appid` with your values):
```powershell
netsh http add sslcert ipport=0.0.0.0:8000 certhash=81d53a62964240b8d2cc77b40bf7e6c758554afc appid="{05e46c28-0ed2-4ac0-9473-e78190a425d4}"
```
- Verify the binding:
```powershell
netsh http show sslcert ipport=0.0.0.0:8000
```
---
# Document: Samples
> Source: https://github.com/aelassas/wexflow/wiki/Samples
Workflows can be designed through the Designer, through XML or JSON. However, it is highly recommended to understand Wexflow workflows syntax in order to become familiar with this workflow engine.
Each workflow in Wexflow has a configuration (XML/JSON). Each configuration contains a set of settings and tasks to do depending on a specified schedule and a specified configuration.
# Workflow samples
In this section, few workflow samples will be presented in order to make the end user familiar with Wexflow workflow syntax:
1. [Sequential workflows](https://github.com/aelassas/wexflow/wiki/Samples#sequential-workflows)
2. [Execution graph](https://github.com/aelassas/wexflow/wiki/Samples#execution-graph)
3. [Flowchart workflows](https://github.com/aelassas/wexflow/wiki/Samples#flowchart-workflows)
1. [If](https://github.com/aelassas/wexflow/wiki/Samples#if)
2. [While](https://github.com/aelassas/wexflow/wiki/Samples#while)
3. [Switch](https://github.com/aelassas/wexflow/wiki/Samples#switch)
4. [Approval workflows](https://github.com/aelassas/wexflow/wiki/Samples#approval-workflows)
1. [Simple approval workflow](https://github.com/aelassas/wexflow/wiki/Samples#simple-approval-workflow)
2. [OnRejected workflow event](https://github.com/aelassas/wexflow/wiki/Samples#onrejected-workflow-event)
3. [YouTube approval workflow](https://github.com/aelassas/wexflow/wiki/Samples#youtube-approval-workflow)
4. [Form submission approval workflow](https://github.com/aelassas/wexflow/wiki/Samples#form-submission-approval-workflow)
5. [Workflow events](https://github.com/aelassas/wexflow/wiki/Samples#workflow-events)
## Sequential workflows
A sequential workflow executes a set of tasks in order, one by one. Tasks are executed in a sequential manner until the last task finishes. The order of the execution of the tasks can be altered by modifying the execution graph of the workflow.
### Workflow 1
This workflow uploads invoices to an SFTP server, then waits for 2 days and then notifies the customers.
```xml
```
First of all, the FilesLoader task loads all the invoices located in the folder C:\WexflowTesting\Invoices\, then the Ftp task uploads them to the SFTP server, then the Wait task waits for 2 days, then the FilesLoader task loads the emails in XML format and then the MailsSender task sends the emails. Finally, the FilesMover task moves the invoices to the folder C:\WexflowTesting\Invoices_sent\.
### Workflow 2
This workflow waits for files to arrive in C:\WexflowTesting\Watchfolder1\ and C:\WexflowTesting\Watchfolder2\ then uploads them to an FTP server then moves them to C:\WexflowTesting\Sent\ folder. This workflow starts every 2 minutes.
```xml
```
First of all, the FilesLoader task loads all the files located in the folders C:\WexflowTesting\Watchfolder1\ and C:\WexflowTesting\Watchfolder2\ then the Ftp task loads the files and uploads them to the FTP server. Finally, the FilesMover task moves the files to the folder C:\WexflowTesting\Sent\.
If you want to trigger tasks on file events, you should use [FileSystemWatcher](https://github.com/aelassas/wexflow/wiki/FileSystemWatcher) task to avoid having a lot of logs. [Here](https://github.com/aelassas/wexflow/blob/main/samples/net/Wexflow/Workflows/Workflow_FileSystemWatcher.xml) is a sample workflow.
### Workflow 3
This workflow transcodes the WAV files located in C:\WexflowTesting\WAV\ to MP3 format through FFMPEG and moves the transcoded files to C:\WexflowTesting\MP3\.
```xml
```
First of all, the FilesLoader task loads all the files located in the folder C:\WexflowTesting\WAV\ then the ProcessLauncher task launches FFMPEG process on every file by specifying the right command in order to create the MP3 file. Finally, the FilesMover task moves the MP3 files to the folder C:\WexflowTesting\MP3\.
### Workflow 4
This workflow waits for WAV files to arrive in C:\WexflowTesting\WAV\ then transcodes them to MP3 files through VLC then uploads the MP3 files to an FTP server then moves the WAV files to C:\WexflowTesting\WAV_processed\. This workflow starts every 2 minutes.
```xml
```
First of all, the FilesLoader task loads all the files located in the folder C:\WexflowTesting\WAV\ then the ProcessLauncher task launches VLC process on every file by specifying the right command in order to create the MP3 file. Then, the Ftp task loads the MP3 files generated by the ProcessLauncher task and then uploads them to the FTP server. Finally, the FilesMover task moves the processed WAV files to the folder C:\WexflowTesting\WAV_processed\.
If you want to trigger tasks on file events, you should use [FileSystemWatcher](https://github.com/aelassas/wexflow/wiki/FileSystemWatcher) task to avoid having a lot of logs. [Here](https://github.com/aelassas/wexflow/blob/main/samples/net/Wexflow/Workflows/Workflow_FileSystemWatcher.xml) is a sample workflow.
### Workflow 5
This workflow downloads specific files from an FTP server. This workflow starts by listing all the files located at the root folder of the server, then the specific files that will be downloaded are tagged through an XSLT (LisFiles.xslt), then the files are downloaded by the Ftp task through todo="toDownload" and from="app4" tags, then the downloaded files are moved to the folder C:\WexflowTesting\Ftp_download\.
```xml
```
Roughly speaking, the Ftp task loads the list of files located at the root folder of the FTP server in the running instance of the workflow, then the ListFiles task outputs and XML file that contains all the files loaded then the Xslt task takes as input this XML and generates an XML which contains a system node called WexflowProcessing which contains the list of files to be tagged and/or renamed.
To understand how tagging and renaming files work, refer to the documentation of the ListFiles and Xslt tasks.
Below is the XSLT ListFiles.xslt used for tagging files:
```xml
```
## Execution graph
This workflow loads the file C:\WexflowTesting\file1.txt then uploads it to an FTP server then moves it to C:\WexflowTesting\Sent\ folder.
```xml
```
First of all, the FilesLoader task loads the file C:\WexflowTesting\file1.txt then the Ftp task loads that file and uploads it to the FTP server. Finally, the FilesMover task moves that file to the folder C:\WexflowTesting\Sent\.
By convention, the parent task id of the first task to be executed must always be -1.
However, if the execution graph is modified as follows:
```xml
```
Task 3 will be executed after task 1.
If the execution graph is modified as follows:
```xml
```
Task 3 will be executed first, then task 2 then task 1.
Two things are forbidden in the execution graph:
- Infinite loops.
- Parallel tasks.
Here is an example of infinite loops:
```xml
```
Here is an example of parallel tasks:
```xml
```
## Flowchart workflows
A flowchart workflow is a workflow that contains at least one flowchart node (If/While/Switch) in its execution graph. A flowchart node takes as input a flowchart task and a set of tasks to execute in order, one by one. The order of the execution of the tasks can be altered by modifying the execution graph of the flowchart node.
### If
The following workflow is a flowchart workflow that is triggered by the file file.trigger. If the file file.trigger is found on the file system then this workflow will upload the file file1.txt to an FTP server then it will notify customers that the upload was successful. Otherwise, if the trigger file.trigger is not found on the file system then the workflow will notify customers that the upload failed.
```xml
```
By convention, the parent task id of the first task to execute in and nodes must always be -1.
You can add If flowchart nodes pretty much wherever you want in the execution graph. Also, you can add as mush as you want. You can also add them in the event nodes OnSuccess, OnWarning and OnError.
An If can be inside an If, a While and a Switch.
### While
This workflow is triggered by the file file.trigger. While the file file.trigger exists, this workflow will upload the file file1.txt to an FTP server then it will notify customers then it will wait for 2 days then it will start again.
```xml
```
By convention, the parent task id of the first task to be executed in the node must always be -1.
You can add While flowchart nodes pretty much wherever you want in the execution graph. Also, you can add as mush as you want. You can also add them in the event nodes OnSuccess, OnWarning and OnError.
A While can be inside a While, an If and a Switch.
### Switch
This workflow starts every 24 hours. On Monday, it uploads files to an FTP server and on Wednesday it notifies customers.
```xml
```
By convention, the parent task id of the first task to be executed in the Case/Default nodes must always be -1.
You can add Switch flowchart nodes pretty much wherever you want in the execution graph. Also, you can add as mush as you want. You can also add them in the event nodes OnSuccess, OnWarning and OnError.
A Switch can be inside a While, an If and a Switch.
## Approval workflows
Approval workflows are workflows marked as approval through **approval** setting option. They can be marked as approval whether from the Designer page in the back end or by XML editing:
```xml
```
Approval workflows must contain at least one [Approval](https://github.com/aelassas/wexflow/wiki/Approval) task. Approval tasks can be put wherever you want in the workflow and can be multiple. You can create workflows where some tasks get done then the workflow waits for approval then the users are notified for example.
Workflows are being approved whether from Wexflow Manager or from Approval page in the backend.
If the workflow is rejected the OnRejected workflow event is raised and the tasks after Approval task are not executed.
The rejection of workflows can be done by clicking on reject button whether from Approval page in the back end or from Wexflow Manager.
### Simple approval workflow
To give you a hint on how approval workflows work, here is a very simple example:
```xml
```
This simple workflow is an approval workflow that waits for approval in order to start. Once approved, this workflow waits for 2 seconds. This workflow can be approved or rejected whether from Wexflow Manager or from Approval page in the backend.
### OnRejected workflow event
Here is another simple approval workflow:
```xml
```
This simple workflow is an approval workflow that waits for approval in order to start. Once approved, this workflow waits for 2 seconds. If this workflow is rejected, the task 2 is not executed and the task 3 is executed. In other words, if this workflow is rejected it waits for 3 seconds. This workflow can be approved or rejected whether from Wexflow Manager or from Approval page in the backend.
### YouTube approval workflow
Here is a more professional approval workflow:
```xml
```
This workflow starts by uploading videos to YouTube then it waits for approval in order to check that videos have been effectively uploaded with success to YouTube and edited by the management team. Then, if this workflow is approved from Approval page in the backend or from Wexflow Manager.
When this workflow arrives to Approval task, it suspends its jobs and waits for approval process until it's being approved and then continues its tasks.
### Form submission approval workflow
Here is another interesting approval workflow:
```xml
```
This approval workflow opens a submission form and waits for approval. If the submission is correct, the workflow is approved and waits for 2 seconds (this is just a simple task for testing but you can add email tasks or whatever). Otherwise, if the submission is incorrect, the workflow is rejected and waits for 3 seconds (this is just a simple task for testing but you can add email tasks or whatever). This workflow works on the .NET Core version of Wexflow only because the .NET version of Wexflow does not support opening GUI from ProcessLauncher task since Wexflow server is running in a Windows service in the .NET version.
Approval workflows are very useful when some tasks get done then you have to wait for approval to check that previous tasks have been done with success then users are notified for example. This is just an example, but you can create and imagine other examples as you want and as you need.
### Records
Wexflow allows approval workflows on generic assets called records. A record is an entity that refers to a file. Each record has a name, a description, file versions, comments, and approval start and end dates.
A manager can assign a record to a user. If the record is updated with required info, the manajer can approve or reject the workflow.
Here is a simple approval workflow on records:
```xml
```
The manager assigns the record 1 to the user wexflow. The user wexflow will receive a notification in Wexflow and an email if email settings are properly configured to edit the record in question. After the record is updated, the manager will receive a notification and can then check the latest version of the recod. If the record info is good, the manager can approve the workflow. Otherwise, he can reject it.
## Workflow events
After a workflow finishes its job, its final result is either success, or warning or error or rejected. If its final result is success, the OnSuccess event is triggered. If its final result is warning, the OnWarning event is triggered. If its final result is error, the OnError event is triggered. If the workflow is rejected, the OnRejected event is triggered. An event contains a set of tasks and/or flowchart nodes to execute in order, one by one. The order of the execution of the tasks and/or flowchart nodes can be altered by modifying the execution graph of the event.
This workflow uploads the file1.txt to an FTP server then notifies customers in case of success.
```xml
```
The flowchart event nodes OnWarning, OnError and OnRejected can be used in the same way. You can put If and While flowchart nodes in event nodes.
For OnRejected workflow event, the workflow must be an approval workflow and must contain at least one Approval task. The OnRejected workflow event is raised once the end user clicks on reject button whether from the Approval page in the backend or from Wexflow Manager.
These are simple and basic workflows to give an idea on how to make your own workflows. However, if you have multiple systems, applications and automations involved in a workflow, the workflow could be very interesting.
---
# Document: Screenshots
> Source: https://github.com/aelassas/wexflow/wiki/Screenshots
### Dashboard

### Manager

### Designer

### History

### Android App
---
# Document: ScssToCss
> Source: https://github.com/aelassas/wexflow/wiki/ScssToCss
```xml
```
---
# Document: SevenZip
> Source: https://github.com/aelassas/wexflow/wiki/SevenZip
```xml
```
---
# Document: Sha1
> Source: https://github.com/aelassas/wexflow/wiki/Sha1
```xml
```
---
# Document: Sha256
> Source: https://github.com/aelassas/wexflow/wiki/Sha256
```xml
```
---
# Document: Sha512
> Source: https://github.com/aelassas/wexflow/wiki/Sha512
```xml
```
---
# Document: Slack
> Source: https://github.com/aelassas/wexflow/wiki/Slack
```xml
```
---
# Document: SpeechToText
> Source: https://github.com/aelassas/wexflow/wiki/SpeechToText
```xml
```
---
# Document: Sql
> Source: https://github.com/aelassas/wexflow/wiki/Sql
```xml
```
---
# Document: SqlToCsv
> Source: https://github.com/aelassas/wexflow/wiki/SqlToCsv
```xml
```
---
# Document: SqlToXml
> Source: https://github.com/aelassas/wexflow/wiki/SqlToXml
```xml
```
---
# Document: SshCmd
> Source: https://github.com/aelassas/wexflow/wiki/SshCmd
```xml
```
---
# Document: SubWorkflow
> Source: https://github.com/aelassas/wexflow/wiki/SubWorkflow
```xml
```
---
# Document: Tar
> Source: https://github.com/aelassas/wexflow/wiki/Tar
```xml
```
---
# Document: Tasks
> Source: https://github.com/aelassas/wexflow/wiki/Tasks
Wexflow is modular. A workflow executes a set of tasks. The user can choose between the built-in tasks that come with Wexflow or create his own custom [tasks](https://github.com/aelassas/Wexflow/wiki/Custom-Tasks).
Every task is a module which can be enabled, disabled or replaced. Wexflow provides 100+ built-in tasks.
\*: The task is not available in the .NET Core version.
\*\*: The task is available in the .NET Core version only.
1. [File system tasks](https://github.com/aelassas/Wexflow/wiki/Tasks#file-system-tasks)
2. [Encryption tasks](https://github.com/aelassas/Wexflow/wiki/Tasks#encryption-tasks)
3. [Compression tasks](https://github.com/aelassas/Wexflow/wiki/Tasks#compression-tasks)
4. [Iso tasks](https://github.com/aelassas/Wexflow/wiki/Tasks#iso-tasks)
5. [Speech tasks](https://github.com/aelassas/Wexflow/wiki/Tasks#speech-tasks)
6. [Hashing tasks](https://github.com/aelassas/Wexflow/wiki/Tasks#hashing-tasks)
7. [Process tasks](https://github.com/aelassas/Wexflow/wiki/Tasks#process-tasks)
8. [Network tasks](https://github.com/aelassas/Wexflow/wiki/Tasks#network-tasks)
9. [XML tasks](https://github.com/aelassas/Wexflow/wiki/Tasks#xml-tasks)
10. [SQL tasks](https://github.com/aelassas/Wexflow/wiki/Tasks#sql-tasks)
11. [WMI tasks](https://github.com/aelassas/Wexflow/wiki/Tasks#wmi-tasks)
12. [Image tasks](https://github.com/aelassas/Wexflow/wiki/Tasks#image-tasks)
13. [Audio and video tasks](https://github.com/aelassas/Wexflow/wiki/Tasks#audio-and-video-tasks)
14. [Email tasks](https://github.com/aelassas/Wexflow/wiki/Tasks#email-tasks)
15. [Workflow tasks](https://github.com/aelassas/Wexflow/wiki/Tasks#workflow-tasks)
16. [Social media tasks](https://github.com/aelassas/Wexflow/wiki/Tasks#social-media-tasks)
17. [Waitable tasks](https://github.com/aelassas/Wexflow/wiki/Tasks#waitable-tasks)
18. [Reporting tasks](https://github.com/aelassas/Wexflow/wiki/Tasks#reporting-tasks)
19. [Web tasks](https://github.com/aelassas/Wexflow/wiki/Tasks#web-tasks)
20. [Script tasks](https://github.com/aelassas/Wexflow/wiki/Tasks#script-tasks)
21. [JSON and YAML tasks](https://github.com/aelassas/Wexflow/wiki/Tasks#json-and-yaml-tasks)
22. [Entities tasks](https://github.com/aelassas/Wexflow/wiki/Tasks#entities-tasks)
23. [Flowchart tasks](https://github.com/aelassas/Wexflow/wiki/Tasks#flowchart-tasks)
24. [Approval tasks](https://github.com/aelassas/Wexflow/wiki/Tasks#approval-tasks)
25. [Notification tasks](https://github.com/aelassas/Wexflow/wiki/Tasks#notification-tasks)
26. [SMS tasks](https://github.com/aelassas/Wexflow/wiki/Tasks#sms-tasks)
# File system tasks
These tasks allow to create, copy, move, rename or delete files and directories on a file system. These tasks allow also to check whether a collection of remote or local files and/or directories exists. These tasks allow also to check whether two files are the same and allow also to calculate the diff of two files.
- [FilesLoader](https://github.com/aelassas/wexflow/wiki/FilesLoader): This task loads a collection of files located in folders or through the file option.
- [FilesLoaderEx](https://github.com/aelassas/wexflow/wiki/FilesLoaderEx): This task loads a collection of files located in folders or through the file option. This task is inherited from FilesLoader task, but by default result is empty, you must configure file system attributes rules to populate result.
- [FilesCopier](https://github.com/aelassas/wexflow/wiki/FilesCopier): This task copies a collection of files to a destination folder.
- [FilesMover](https://github.com/aelassas/wexflow/wiki/FilesMover): This task moves a collection of files to a destination folder.
- [FilesRemover](https://github.com/aelassas/wexflow/wiki/FilesRemover): This task deletes a collection of files.
- [FilesRenamer](https://github.com/aelassas/wexflow/wiki/FilesRenamer): This task allows to rename a collection of files on a file system. The Xslt task can be used along with the ListFiles task to create new file names.
- [FilesExist](https://github.com/aelassas/wexflow/wiki/FilesExist): This task checks whether a collection of files and/or directories exists.
- [FilesEqual](https://github.com/aelassas/wexflow/wiki/FilesEqual): This task checks whether two files are the same.
- [FilesDiff*](https://github.com/aelassas/wexflow/wiki/FilesDiff): This task calculates the diff of two files.
- [FilesConcat](https://github.com/aelassas/wexflow/wiki/FilesConcat): This task concatenates a collection of files.
- [FilesJoiner](https://github.com/aelassas/wexflow/wiki/FilesJoiner): This task concatenates a collection of files. This task should be used to join and restore original file splitted with "FilesSplitter" task. Original file name is restored from splitted file name with end part "_N".
- [FilesConcat](https://github.com/aelassas/wexflow/wiki/FilesConcat): This task splits files into chunks.
- [FilesInfo](https://github.com/aelassas/wexflow/wiki/FilesInfo): This task generates files information of a collection of files and writes the results in an XML file. The format of the output XML file is described in the documentation of the task.
- [Touch](https://github.com/aelassas/wexflow/wiki/Touch): This task creates a collection of empty files.
- [ListFiles](https://github.com/aelassas/wexflow/wiki/ListFiles): This task lists all the files loaded by the workflow tasks in the logs. This task is useful for resolving issues.
- [Mkdir](https://github.com/aelassas/wexflow/wiki/Mkdir): This task creates a collection of folders.
- [Rmdir](https://github.com/aelassas/wexflow/wiki/Rmdir): This task deletes a collection of folders.
- [Movedir](https://github.com/aelassas/wexflow/wiki/Movedir): This task moves a folder and allows to overwrite the destination folder.
- [FileSystemWatcher](https://github.com/aelassas/wexflow/wiki/FileSystemWatcher): This task watches a hot folder and triggers tasks on file created, changed or deleted.
# Encryption tasks
These tasks allow to encrypt and decrypt any type of files of any size. These tasks allow also to encrypt and decrypt text based files.
- [FilesEncryptor](https://github.com/aelassas/wexflow/wiki/FilesEncryptor): This task encrypts a collection of files.
- [FilesDecryptor](https://github.com/aelassas/wexflow/wiki/FilesDecryptor): This task decrypts the files crypted by the task FilesEncryptor.
- [TextsEncryptor](https://github.com/aelassas/wexflow/wiki/TextsEncryptor): This task encrypts a collection of text based files.
- [TextsDecryptor](https://github.com/aelassas/wexflow/wiki/TextsDecryptor): This task decrypts the files crypted by the task TextsEncryptor.
# Compression tasks
These tasks allow to create a .zip, a .tar, a .tar.gz or a .7z from a collection of files. These tasks allow also to extract .zip, .tar, .tar.gz, .rar or .7z archives.
- [Zip](https://github.com/aelassas/wexflow/wiki/Zip): This task creates a zip archive from a collection of files.
- [Tar](https://github.com/aelassas/wexflow/wiki/Tar): This task creates a tar archive from a collection of files.
- [Tgz](https://github.com/aelassas/wexflow/wiki/Tgz): This task creates a tar.gz archive from a collection of files.
- [SevenZip*](https://github.com/aelassas/wexflow/wiki/SevenZip): This task creates a .7z archive from a collection of files.
- [Unzip](https://github.com/aelassas/wexflow/wiki/Unzip): This task extracts ZIP archives.
- [Untar](https://github.com/aelassas/wexflow/wiki/Untar): This task extracts TAR archives.
- [Untgz](https://github.com/aelassas/wexflow/wiki/Untgz): This task extracts TAR.GZ archives.
- [Unrar*](https://github.com/aelassas/wexflow/wiki/Unrar): This task extracts RAR archives.
- [UnSevenZip*](https://github.com/aelassas/wexflow/wiki/UnSevenZip): This task extracts 7Z archives.
# Iso tasks
These tasks allow to create a .iso from a source folder and to extract a .iso to a destination folder.
- [IsoCreator*](https://github.com/aelassas/wexflow/wiki/IsoCreator): This task creates a .iso from a source folder.
- [IsoExtractor*](https://github.com/aelassas/wexflow/wiki/IsoExtractor): This task extracts .iso files.
# Speech tasks
These tasks allow to convert text to speech and speech to text.
- [TextToSpeech*](https://github.com/aelassas/wexflow/wiki/TextToSpeech): This task converts text files to speech.
- [SpeechToText*](https://github.com/aelassas/wexflow/wiki/SpeechToText): This task converts audio files to text files.
# Hashing tasks
These tasks allow to generate MD5, SHA-1, SHA-256 and SHA-512 hashes of a collection of files.
- [Md5](https://github.com/aelassas/wexflow/wiki/Md5): This task generates MD5 sums of a collection of files and writes the results in an XML file. The format of the output XML file is described in the documentation of the task.
- [Sha1](https://github.com/aelassas/wexflow/wiki/Sha1): This task generates SHA-1 hashes of a collection of files and writes the results in an XML file. The format of the output XML file is described in the documentation of the task.
- [Sha256](https://github.com/aelassas/wexflow/wiki/Sha256): This task generates SHA-256 hashes of a collection of files and writes the results in an XML file. The format of the output XML file is described in the documentation of the task.
- [Sha512](https://github.com/aelassas/wexflow/wiki/Sha512): This task generates SHA-512 hashes of a collection of files and writes the results in an XML file. The format of the output XML file is described in the documentation of the task.
# Process tasks
These tasks allow to start or kill processes on the workflow server. They also allow to retrieve information about a process.
- [ProcessLauncher](https://github.com/aelassas/wexflow/wiki/ProcessLauncher): This task launches a process. If the process generates a file as output It is possible to pass a collection of files to the task so that for each file an output file will be generated through the process. Read the documentation of the task for further informations.
- [ProcessKiller*](https://github.com/aelassas/wexflow/wiki/ProcessKiller): This task kills a process.
- [ProcessInfo](https://github.com/aelassas/wexflow/wiki/ProcessInfo): This task shows information about a process.
- [SshCmd](https://github.com/aelassas/wexflow/wiki/SshCmd): This task executes an SSH command.
# Network tasks
These task allow to list, upload, download or delete files over FTP, FTPS or SFTP. These tasks allow also to download files over HTTP or HTTPS. These tasks allow also to download torrent files, to ping servers and to execute GET/POST/PUT/PATCH/DELETE requests.
- [Ftp](https://github.com/aelassas/wexflow/wiki/Ftp): This task allows to list, upload, download or delete files over FTP, FTPS or SFTP.
- [Http](https://github.com/aelassas/wexflow/wiki/Http): This task allows to downoad files over HTTP or HTTPS.
- [HttpGet](https://github.com/aelassas/wexflow/wiki/HttpGet): This task executes a GET request.
- [HttpPost](https://github.com/aelassas/wexflow/wiki/): This task executes a POST request.
- [HttpPut](https://github.com/aelassas/wexflow/wiki/HttpPut): This task executes a PUT request.
- [HttpPatch](https://github.com/aelassas/wexflow/wiki/HttpPatch): This task executes a PATCH request.
- [HttpDelete](https://github.com/aelassas/wexflow/wiki/HttpDelete): This task executes a DELETE request.
- [Torrent](https://github.com/aelassas/wexflow/wiki/Torrent): This task downloads torrent files.
- [Ping](https://github.com/aelassas/wexflow/wiki/Ping): This is a flowchart task that checks whether a server responds to a ping request or not.
# XML tasks
These tasks allow to work with XML and CSV data. XSLT can be used along with XPath to generate XML documents. XSLT 1.0 and XSLT 2.0 are supported.
- [CsvToXml](https://github.com/aelassas/wexflow/wiki/CsvToXml): This task transforms a CSV file to an XML file.
- [XmlToCsv](https://github.com/aelassas/wexflow/wiki/XmlToCsv): This task transforms an XML file to a CSV file. The format of the input XML file is described in the documentation of the task.
- [Xslt](https://github.com/aelassas/wexflow/wiki/Xslt): This task transforms a collection of XML files. It is possible to use XSLT 1.0 processor or XSLT 2.0 processor.
- [Guid](https://github.com/aelassas/wexflow/wiki/Guid): This task generates Guids and outputs the result in an XML file.
# SQL tasks
These tasks allow to execute SQL scripts. These tasks supports Microsoft Sql Server, Microsoft Access, Oracle, MySql, SQLite, PostGreSql and Teradata. These tasks can be used for bulk insert, for database updates, for database cleanup, for rebuilding indexes, for reorganizing indexes, for shrinking databases, for updating statistics, for transfering database data and so on. These tasks allow also to export SQL data to XML or CSV and to import CSV data to a database. These tasks allow also to backup and restore databases.
- [Sql](https://github.com/aelassas/wexflow/wiki/Sql): This task executes SQL scripts. It supports Microsoft Sql Server, Microsoft Access, Oracle, MySql, SQLite, PostGreSql and Teradata.
- [SqlToXml](https://github.com/aelassas/wexflow/wiki/SqlToXml): This task executes SQL scripts and outputs the results in XML files. It supports Microsoft Sql Server, Microsoft Access, Oracle, MySql, SQLite, PostGreSql and Teradata.
- [SqlToCsv](https://github.com/aelassas/wexflow/wiki/SqlToCsv): This task executes SQL scripts and outputs the results in CSV files. It supports Microsoft Sql Server, Microsoft Access, Oracle, MySql, SQLite, PostGreSql and Teradata.
- [CsvToSql](https://github.com/aelassas/wexflow/wiki/CsvToSql): This task converts CSV files to SQL scripts (SQL Server Insert only).
# WMI tasks
- [Wmi*](https://github.com/aelassas/wexflow/wiki/Wmi): This task executes a WMI query and outputs the results in an XML file. The format of the output XML file is described in the documentation of the task.
# Image tasks
These tasks allow to convert images to the following formats Bmp, Emf, Exif, Gif, Icon, Jpeg, Png, Tiff and Wmf. These tasks allow also to resize or to crop or to concatenate or to overlay images.
- [ImagesTransformer](https://github.com/aelassas/wexflow/wiki/ImagesTransformer): This task transforms a collection of image files to a specified format. The output format can be one of the followings Bmp, Emf, Exif, Gif, Icon, Jpeg, Png, Tiff or Wmf.
- [ImagesResizer](https://github.com/aelassas/wexflow/wiki/ImagesResizer): This task resizes a collection of images.
- [ImagesCropper](https://github.com/aelassas/wexflow/wiki/ImagesCropper): This task crops a collection of images.
- [ImagesConcat](https://github.com/aelassas/wexflow/wiki/ImagesConcat): This task concatenates a collection of images.
- [ImagesOverlay](https://github.com/aelassas/wexflow/wiki/ImagesOverlay): This task overlays a collection of images.
# Audio and video tasks
These tasks allow to convert, cut or edit audio and video files through FFMEG, VLC or any other audio/video software. These tasks can also be used to perform custom operations such as generating images and thumbnails from video files. These tasks allow also to generate the most relevant technical and tag data for video and audio files.
- [MediaInfo*](https://github.com/aelassas/wexflow/wiki/MediaInfo): This task generates the most relevant technical and tag data for video and audio files and outputs the results in an XML file. The format of the output XML file is described in the documentation of the task.
- [YouTube**](https://github.com/aelassas/wexflow/wiki/YouTube): This task uploads videos to YouTube.
- [YouTubeSearch**](https://github.com/aelassas/wexflow/wiki/YouTubeSearch): This task searches for content on YouTube.
- [YouTubeListUploads**](https://github.com/aelassas/wexflow/wiki/YouTubeListUploads): This task retrieves a list of videos uploaded to a YouTube channel.
- [Vimeo](https://github.com/aelassas/wexflow/wiki/Vimeo): This task uploads videos to Vimeo.
- [VimeoListUploads](https://github.com/aelassas/wexflow/wiki/VimeoListUploads): This task retrieves a list of videos uploaded to a Vimeo channel.
The task [ProcessLauncher](https://github.com/aelassas/wexflow/wiki/ProcessLauncher) can be used along with FFMPEG, VLC or any other software in order to perform audio and video tasks.
# Email tasks
This task allows to send or fetch a collection of emails.
- [MailsSender](https://github.com/aelassas/wexflow/wiki/MailsSender): This task sends a collection of emails from XML files. The format of the input XML files is described in the documentation of the task.
- [MailsReceiver](https://github.com/aelassas/wexflow/wiki/MailsReceiver): This task fetches a collection of emails.
# Workflow tasks
- [Workflow*](https://github.com/aelassas/wexflow/wiki/Workflow): This task allows to start, suspend, resume, stop, approve or disapprove a list of workflows.
- [SubWorkflow](https://github.com/aelassas/wexflow/wiki/SubWorkflow): This task kicks off a sub workflow.
# Social media tasks
- [Twitter](https://github.com/aelassas/wexflow/wiki/Twitter): This task sends tweets.
- [InstagramUploadImage](https://github.com/aelassas/wexflow/wiki/InstagramUploadImage): This task uploads images to Instagram.
- [InstagramUploadVideo](https://github.com/aelassas/wexflow/wiki/InstagramUploadVideo): This task uploads videos to Instagram.
- [Reddit**](https://github.com/aelassas/wexflow/wiki/Reddit): This task sends posts and links to Reddit.
- [RedditListPosts**](https://github.com/aelassas/wexflow/wiki/RedditListPosts): This task retrieves Reddit post history.
- [RedditListComments**](https://github.com/aelassas/wexflow/wiki/RedditListComments): This task retrieves Reddit comment history.
# Waitable tasks
- [Wait](https://github.com/aelassas/wexflow/wiki/Wait): This task waits for a specified duration of time.
# Reporting tasks
These tasks allow to generate reports in PDF format from HTML or XML or TXT files.
- [TextToPdf*](https://github.com/aelassas/wexflow/wiki/TextToPdf): This task generates PDF files from TEXT files.
- [HtmlToPdf*](https://github.com/aelassas/wexflow/wiki/HtmlToPdf): This task generates PDF files from HTML files.
- [PdfToText*](https://github.com/aelassas/wexflow/wiki/PdfToText): This task extracts TEXT from PDF files.
The task Xslt can be used to generate HTML reports from XML files. Then, the HTML reports can be transformed into PDF reports through HtmlToPdf task.
# Web tasks
These tasks allow to take screenshots from urls and to download the HTML source code from urls after the pages are rendered. These tasks allow also to uglify, minify and compress JavaScript, CSS and HTML files. These tasks allow also to extract text from HTML files. These tasks allow also to convert SCSS files to CSS files.
- [WebToScreenshot*](https://github.com/aelassas/wexflow/wiki/WebToScreenshot): This task takes screenshots from urls.
- [WebToHtml*](https://github.com/aelassas/wexflow/wiki/WebToHtml): This task retrieves HTML sources from urls.
- [UglifyJs*](https://github.com/aelassas/wexflow/wiki/UglifyJs): This task uglifys JavaScript files.
- [UglifyCss*](https://github.com/aelassas/wexflow/wiki/UglifyCss): This task compresses and minifies CSS files.
- [UglifyHtml*](https://github.com/aelassas/wexflow/wiki/UglifyHtml): This task compresses and minifies HTML files.
- [HtmlToText*](https://github.com/aelassas/wexflow/wiki/HtmlToText): This task extracts text from HTML files.
- [ScssToCss**](https://github.com/aelassas/wexflow/wiki/ScssToCss): This task converts SCSS files to CSS files.
# Script tasks
These tasks allow to execute C# and VB scripts.
- [ExecCs*](https://github.com/aelassas/wexflow/wiki/ExecCs): This task executes C# scripts.
- [ExecPython](https://github.com/aelassas/wexflow/wiki/ExecPython): This task executes Python scripts.
- [ExecVb*](https://github.com/aelassas/wexflow/wiki/ExecVb): This task executes Visual Basic scripts.
# JSON and YAML tasks
These tasks allow to convert YAML files to JSON files, JSON files to YAML files, CSV files to JSON files and CSV files to YAML files.
- [YamlToJson*](https://github.com/aelassas/wexflow/wiki/YamlToJson): This task converts YAML files to JSON files.
- [JsonToYaml*](https://github.com/aelassas/wexflow/wiki/JsonToYaml): This task converts JSON files to YAML files.
- [CsvToJson*](https://github.com/aelassas/wexflow/wiki/CsvToJson): This task converts CSV files to JSON files.
- [CsvToYaml*](https://github.com/aelassas/wexflow/wiki/CsvToYaml): This task converts CSV files to YAML files.
# Entities tasks
- [ListEntities](https://github.com/aelassas/wexflow/wiki/): This task lists all the entities loaded by the workflow tasks in the logs. This task is useful for resolving issues.
# Flowchart tasks
These tasks can be used within flowchart workflows to perform specific jobs.
- [FileExists](https://github.com/aelassas/wexflow/wiki/FileExists): This is a flowchart task that checks whether a given file exists on a file system or not.
- [FileMatch](https://github.com/aelassas/wexflow/wiki/FileMatch): This is a flowchart task that checks whether a file exists or not in a directory by using a regex pattern.
- [FileNotExist](https://github.com/aelassas/wexflow/wiki/FileNotExist): This is a flowchart task that checks whether a given file does not exist on a file system.
- [FileNotMatch](https://github.com/aelassas/wexflow/wiki/FileNotMatch): This is a flowchart task that checks whether a file does not exist in a directory by using a regex pattern.
- [Now](https://github.com/aelassas/wexflow/wiki/Now): This is a flowchart task that retrieves the current date in the specified format. This task is designed to be used in a Switch flowchart node.
- [Ping](https://github.com/aelassas/wexflow/wiki/Ping): This is a flowchart task that checks whether a server responds to a ping request or not.
- [EnvironmentVariable](https://github.com/aelassas/wexflow/wiki/EnvironmentVariable): This is a flowchart task that retrieves the value of an environment variable.
- [MessageCorrect](https://github.com/aelassas/wexflow/wiki/MessageCorrect): This is a flowchart task that checks whether a message is in the memory of the task having as key the value of the setting option checkString.
- [FolderExists](https://github.com/aelassas/wexflow/wiki/FolderExists): This is a flowchart task that checks whether a given folder exists on a file system or not.
- [FileContentMatch](https://github.com/aelassas/wexflow/wiki/FileContentMatch): This task checks whether the content of a file matches a regex pattern.
# Approval tasks
- [Approval](https://github.com/aelassas/wexflow/wiki/Approval): This task marks the current workflow as needing approval.
- [ApproveRecord](https://github.com/aelassas/wexflow/wiki/ApproveRecord): This task assigns a record to a user and launches the approval process on that record.
- [ApprovalRecordsCreator](https://github.com/aelassas/wexflow/wiki/ApprovalRecordsCreator): This task creates records from files.
- [ApprovalWorkflowsCreator](https://github.com/aelassas/wexflow/wiki/ApprovalWorkflowsCreator): This task creates approval workflows for records from shared memory and starts them. The record ids are sent from ApprovalRecordsCreator task.
# Notification tasks
- [Slack](https://github.com/aelassas/wexflow/wiki/Slack): This task sends Slack messages.
# SMS tasks
- [Twilio](https://github.com/aelassas/wexflow/wiki/Twilio): This task sends SMS messages.
---
# Document: TextToPdf
> Source: https://github.com/aelassas/wexflow/wiki/TextToPdf
```xml
```
---
# Document: TextToSpeech
> Source: https://github.com/aelassas/wexflow/wiki/TextToSpeech
```xml
```
---
# Document: TextsDecryptor
> Source: https://github.com/aelassas/wexflow/wiki/TextsDecryptor
```xml
```
---
# Document: TextsEncryptor
> Source: https://github.com/aelassas/wexflow/wiki/TextsEncryptor
```xml
```
---
# Document: Tgz
> Source: https://github.com/aelassas/wexflow/wiki/Tgz
```xml
```
---
# Document: Torrent
> Source: https://github.com/aelassas/wexflow/wiki/Torrent
```xml
```
---
# Document: Touch
> Source: https://github.com/aelassas/wexflow/wiki/Touch
```xml
```
---
# Document: Twilio
> Source: https://github.com/aelassas/wexflow/wiki/Twilio
```xml
```
---
# Document: Twitter
> Source: https://github.com/aelassas/wexflow/wiki/Twitter
```xml
```
---
# Document: UglifyCss
> Source: https://github.com/aelassas/wexflow/wiki/UglifyCss
```xml
```
---
# Document: UglifyHtml
> Source: https://github.com/aelassas/wexflow/wiki/UglifyHtml
```xml
```
---
# Document: UglifyJs
> Source: https://github.com/aelassas/wexflow/wiki/UglifyJs
```xml
```
---
# Document: UnSevenZip
> Source: https://github.com/aelassas/wexflow/wiki/UnSevenZip
```xml
```
---
# Document: Unrar
> Source: https://github.com/aelassas/wexflow/wiki/Unrar
```xml
```
---
# Document: Untar
> Source: https://github.com/aelassas/wexflow/wiki/Untar
```xml
```
---
# Document: Untgz
> Source: https://github.com/aelassas/wexflow/wiki/Untgz
```xml
```
---
# Document: Unzip
> Source: https://github.com/aelassas/wexflow/wiki/Unzip
```xml
```
---
# Document: Vimeo
> Source: https://github.com/aelassas/wexflow/wiki/Vimeo
```xml
```
---
# Document: VimeoListUploads
> Source: https://github.com/aelassas/wexflow/wiki/VimeoListUploads
```xml
```
---
# Document: Wait
> Source: https://github.com/aelassas/wexflow/wiki/Wait
```xml
```
---
# Document: WebToHtml
> Source: https://github.com/aelassas/wexflow/wiki/WebToHtml
```xml
```
---
# Document: WebToScreenshot
> Source: https://github.com/aelassas/wexflow/wiki/WebToScreenshot
```xml
```
---
# Document: Wexflow Security
> Source: https://github.com/aelassas/wexflow/wiki/Wexflow-Security
# Table of Contents
1. [Wexflow Security](https://github.com/aelassas/wexflow/wiki/Wexflow-Security#wexflow-security)
1. [Production Security Recommendations](https://github.com/aelassas/wexflow/wiki/Wexflow-Security#production-security-recommendations)
1. [JWT Configuration](https://github.com/aelassas/wexflow/wiki/Wexflow-Security#jwt-configuration)
1. [.NET 4.8](https://github.com/aelassas/wexflow/wiki/Wexflow-Security#net-48)
1. [.NET 9.0+](https://github.com/aelassas/wexflow/wiki/Wexflow-Security#net-90)
1. [Summary](https://github.com/aelassas/wexflow/wiki/Wexflow-Security#summary)
# Wexflow Security
Wexflow uses a secure authentication mechanism based on:
- **JWT (JSON Web Tokens)**
- **PBKDF2-hashed passwords**
- **HttpOnly secure cookies**
- **HTTPS/SSL**
These layers ensure that your workflows and API endpoints are well-protected in both development and production environments.
## Production Security Recommendations
For secure deployments:
- Enable [HTTPS/SSL](https://github.com/aelassas/wexflow/wiki/SSL) to encrypt all traffic.
- Use **strong passwords** and update the default credentials.
- Store the JWT secret securely and avoid hardcoding sensitive values.
- Avoid storing JWT tokens in `localStorage`; Wexflow uses **HttpOnly cookies** instead.
- Configure reasonable JWT expiration to reduce risk if a token is ever leaked.
These best practices help protect Wexflow from:
- Cross-Site Scripting (XSS)
- Cross-Site Tracing (XST) — Wexflow disables the HTTP `TRACE` method
- Cross-Site Request Forgery (CSRF)
- Man-in-the-Middle (MITM) attacks
- Token theft or misuse
- Weak password storage
## JWT Configuration
You can configure the **JWT secret key** and **token expiration time** in both .NET 4.8 and .NET 9.0+ versions.
### .NET 4.8
Edit the file:
```
C:\Program Files\Wexflow\Wexflow.Server.exe.config
```
Add or update these entries under ``:
```xml
```
- `JwtSecret`: Symmetric secret key used to sign JWTs. Must be at least 128 bits (16 bytes); 256 bits (32 bytes) is safer.
- `JwtExpireAtMinutes`: Token expiration duration in minutes (e.g., 1440 = 24 hours).
### .NET 9.0+
Open the JSON configuration file:
```
Wexflow.Server/appsettings.json
```
And set:
```json
{
"JwtSecret": "b7a3c04f10e84c3f95a3f3497bda8e32",
"JwtExpireAtMinutes": 1440
}
```
- Keep this file out of source control if you're storing secrets directly.
- Consider using environment variables or a secure secrets manager in production.
## Summary
By using:
- JWTs with expiration
- Strong symmetric keys
- Encrypted cookies
- PBKDF2 for password hashing
- HTTPS for secure transport
Wexflow significantly reduces common attack surfaces for workflow automation platforms.
---
# Document: Wmi
> Source: https://github.com/aelassas/wexflow/wiki/Wmi
```xml
```
---
# Document: Workflow Notifications via SSE
> Source: https://github.com/aelassas/wexflow/wiki/Workflow-Notifications-via-SSE
## Table of Contents
- [Introduction](https://github.com/aelassas/wexflow/wiki/Workflow-Notifications-via-SSE#introduction)
- [Prerequisites](https://github.com/aelassas/wexflow/wiki/Workflow-Notifications-via-SSE#prerequisites)
- [How It Works](https://github.com/aelassas/wexflow/wiki/Workflow-Notifications-via-SSE#how-it-works)
- [Steps to Use SSE](https://github.com/aelassas/wexflow/wiki/Workflow-Notifications-via-SSE#steps-to-use-sse)
- [Example Event Payload](https://github.com/aelassas/wexflow/wiki/Workflow-Notifications-via-SSE#example-event-payload)
- [Statuses](https://github.com/aelassas/wexflow/wiki/Workflow-Notifications-via-SSE#statuses)
- [Summary](https://github.com/aelassas/wexflow/wiki/Workflow-Notifications-via-SSE#summary)
- [Sample SSE Clients](https://github.com/aelassas/wexflow/wiki/Workflow-Notifications-via-SSE#sample-sse-clients)
## Introduction
Wexflow allows clients to subscribe to real-time notifications via Server-Sent Events (SSE) for workflow job status updates. This enables your application to receive a push notification when a workflow job finishes or stops, without polling the API repeatedly.
You can subscribe to a Server-Sent Events (SSE) endpoint that notifies your client when a workflow job finishes or stops.
## Prerequisites
SSE is available in the **.NET 9.0+** versions of Wexflow:
- `wexflow-x.x-windows-netcore.zip`
- `wexflow-x.x-linux-netcore.zip`
- `wexflow-x.x-macos-netcore.zip`
Ensure you are using one of these distributions. SSE is not available in the .NET Framework 4.8 version.
## How It Works
1. You **start a workflow** using the REST API.
2. You receive a `jobId` in the response.
3. You **subscribe to the SSE endpoint** using that `workflowId` and `jobId`.
4. Wexflow will push a notification to your client when the job finishes or stops.
5. The SSE connection is automatically closed after sending the final event.
## Steps to Use SSE
### 1. Start a Workflow
Use the REST API to start a workflow and receive the `jobId`:
```
POST /api/v1/start?w={workflowId}
Authorization: Bearer
```
For example:
```
POST http://localhost:8000/api/v1/start?w=41
```
### 2. Connect to the SSE Endpoint
Connect to the following endpoint using the returned `jobId`:
```
GET /api/v1/sse/{workflowId}/{jobId}
Authorization: Bearer
Accept: text/event-stream
```
For example:
```
GET http://localhost:8000/api/v1/sse/41/66aae8f4-e3ab-4fdc-8db2-a0a7692d8906
```
The server will keep the connection open until the workflow job ends.
## Example Event Payload
Once the workflow finishes or stops, you will receive an event like:
```js
{
"workflowId": 41,
"jobId": "66aae8f4-e3ab-4fdc-8db2-a0a7692d8906",
"status": "Done",
"name": "Workflow_Wait",
"description": "Workflow_Wait"
}
```
To test SSE, try running a workflow like `Workflow_Wait` with a 10-second delay.
## Statuses
Here are the possible statuses sent by the SSE event:
| Status | Description |
|--|-|
| Pending | Job is queued and waiting to start |
| Running | Job is currently in progress |
| Done | Job completed successfully |
| Failed | Job ended with an error |
| Warning | Job completed with warnings |
| Disabled | Job or workflow is disabled |
| Stopped | Job was manually stopped |
| Rejected | Job was rejected or not accepted |
## Summary
- The SSE event returns JSON with:
`{ workflowId, jobId, status, name, description }`
- Connection closes automatically when the workflow job ends.
- Always include a valid **JWT Bearer token** in the request headers.
- Useful for real-time job monitoring or triggering actions upon workflow completion.
## Sample SSE Clients
Here are SSE client examples in different languages:
- [C# SSE Client](https://github.com/aelassas/wexflow/wiki/C%23-SSE-Client)
- [PowerShell SSE Client](https://github.com/aelassas/wexflow/wiki/PowerShell-SSE-Client)
- [JavaScript SSE Client](https://github.com/aelassas/wexflow/wiki/JavaScript-SSE-Client)
- [PHP SSE Client](https://github.com/aelassas/wexflow/wiki/PHP-SSE-Client)
- [Python SSE Client](https://github.com/aelassas/wexflow/wiki/Python-SSE-Client)
- [Go SSE Client](https://github.com/aelassas/wexflow/wiki/Go-SSE-Client)
- [Rust SSE Client](https://github.com/aelassas/wexflow/wiki/Rust-SSE-Client)
- [Ruby SSE Client](https://github.com/aelassas/wexflow/wiki/Ruby-SSE-Client)
- [Java SSE Client](https://github.com/aelassas/wexflow/wiki/Java-SSE-Client)
- [C++ SSE Client](https://github.com/aelassas/wexflow/wiki/CPP-SSE-Client)
You can find the source code for all these SSE clients in the [samples/clients/sse](https://github.com/aelassas/wexflow/tree/main/samples/clients/sse) directory of the main Wexflow repository.
These examples serve as practical starting points to integrate Wexflow Push Notifications (SSE) into your own applications regardless of the tech stack you're using.
---
# Document: Workflow
> Source: https://github.com/aelassas/wexflow/wiki/Workflow
```xml
```
---
# Document: XmlToCsv
> Source: https://github.com/aelassas/wexflow/wiki/XmlToCsv
```xml
```
---
# Document: Xslt
> Source: https://github.com/aelassas/wexflow/wiki/Xslt
```xml
```
---
# Document: YamlToJson
> Source: https://github.com/aelassas/wexflow/wiki/YamlToJson
```xml
```
---
# Document: YouTube
> Source: https://github.com/aelassas/wexflow/wiki/YouTube
```xml
```
---
# Document: YouTubeListUploads
> Source: https://github.com/aelassas/wexflow/wiki/YouTubeListUploads
```xml
```
---
# Document: YouTubeSearch
> Source: https://github.com/aelassas/wexflow/wiki/YouTubeSearch
```xml
```
---
# Document: Zip
> Source: https://github.com/aelassas/wexflow/wiki/Zip
```xml
```
---